

|
Well it's clear Python took his name from his great sinewy limbs.  I know we established bows are inaccurate in this game, but I gotta say I'm hopeful that a character that strong with weapons that can hit several tiles away will turn out well.
|
 #
?
Apr 26, 2013 04:13
#
?
Apr 26, 2013 04:13
|
|


|

|
| # ? May 2, 2024 03:25 |
|
|
asymmetrical posted:This is a good vote It doesn't work like that. The heads give 3 total. Anyway, 1 strength, and 2 defense to Clair.
|
|
#
?
Apr 26, 2013 04:32
|
|

|
1 str and 1 def for Claire, 1 str for Silk
|
|
#
?
Apr 26, 2013 04:34
|
|

|
Folks, I think you're doing it wrong. This is a Fire Emblem thread, votes should be for maximum LPer pain! 3 str to Luka. Discendo Vox fucked around with this message at 06:59 on Apr 26, 2013 |
|
#
?
Apr 26, 2013 05:22
|
|

|
2 str to Claire, 1 str to Silk.
|
|
#
?
Apr 26, 2013 06:23
|
|

|
Discendo Vox posted:Folks, I think you're doing it wrong. This is a Fire Emblem thread, votes should be for maximum LPer pain!  There's no point in making an LPer suffer when they're the ones giving you free entertainment. There's no point in making an LPer suffer when they're the ones giving you free entertainment.2 str to Claire, 1 str to Silk sounds good.
|
|
#
?
Apr 26, 2013 06:28
|
|

|
Yapping Eevee posted:No, thankfully; most FE votes get enough sensible people to outweigh the jerks. This is stupid. Their suffering is the entertainment. 3 Def for Luka
|
|
#
?
Apr 26, 2013 06:51
|
|
|
1 str to Silk, 2 defense to Claire Flying tanks are fun. Also, Silk's both our only healer and only magic attacker with long-term prospects of not being utter poo poo. The strength will help her drain the life she needs to sustain her flimsy frame, though(and I can't believe I'm typing this), skill is really what she needs. Defense doesn't matter too much when you're throwing around Nosferatu 24/7.
|
|
#
?
Apr 26, 2013 07:24
|
|


|
Is it strange that I like the Cleric sprite? Lots of folds in those robes. Most of the later clerics don't have that kind of thing.
|
|
#
?
Apr 26, 2013 08:29
|
|
|
Lance of Llanwyln posted:1 str to Silk, 2 defense to Claire I don't think Skill adds to magic accuracy, actually. Though it does still add to the magic crit rate.
|
|
#
?
Apr 26, 2013 09:35
|
|

|
Yapping Eevee posted:No, thankfully; most FE votes get enough sensible people to outweigh the jerks. Sure could have used a few more of people like you when I did FE7.
|
|
#
?
Apr 26, 2013 15:45
|
|

|
DKII posted:FYI, the shrines can only be used 3 times total, not each. Since it's only 3 total, not three each I'll change my vote to 1 Str for Silk and 1 Str/1 Def for Clair. The statues would be better if they gave three points each. 
|
|
#
?
Apr 26, 2013 20:14
|
|

|
1 Str, 2 Def for Clair and 2 Str, 1 Def for Silk
|
|
#
?
Apr 27, 2013 04:05
|
|

|
3 str to Silk. for the god, and all that. for the god, and all that.
|
|
#
?
Apr 27, 2013 04:22
|
|
|
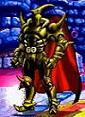
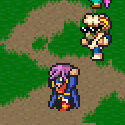
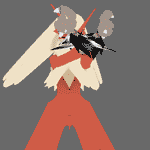
Chapter 1, Part 9: Southern Gate Before we start, some leftover business from last time.... 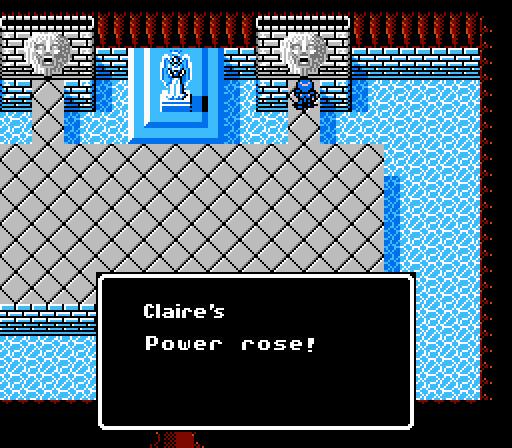  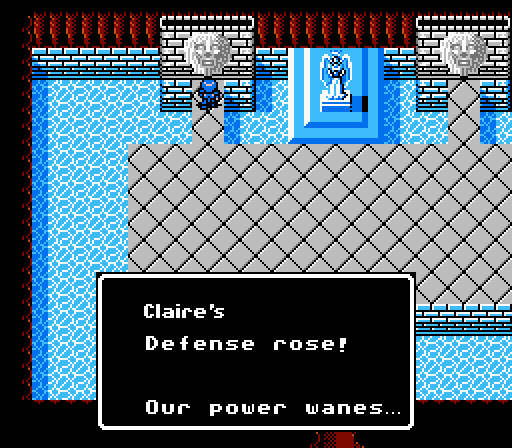 The thread input was pretty clear about how to use the lion head statues, so 1 Power each for Claire and Silk and 1 Defense for Claire. Claire also gets the Steel Lance to be come our flying murder machine. 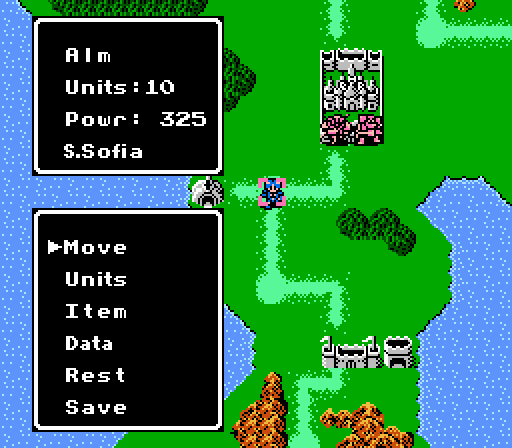 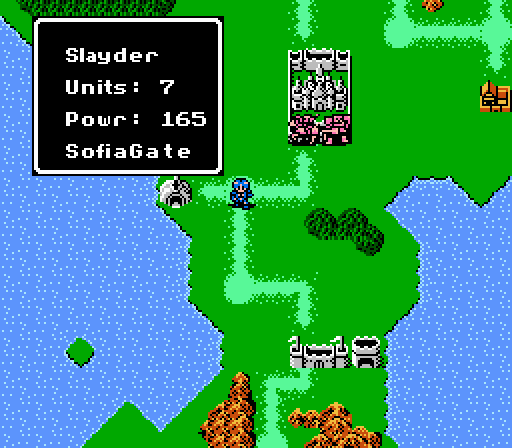 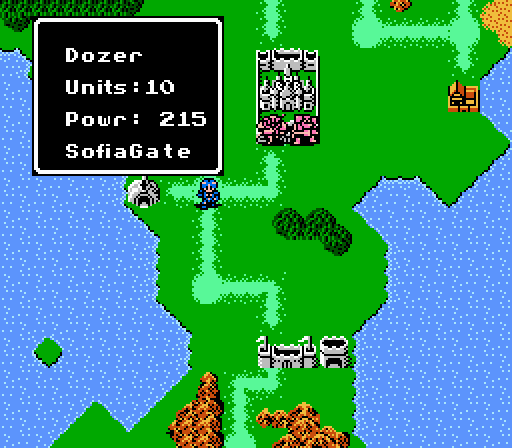 The final battle of the first chapter pits Alm's powerful army against the combined might of Slayder and Dozer. While we're outnumbered, our units are still plenty stronger on average. 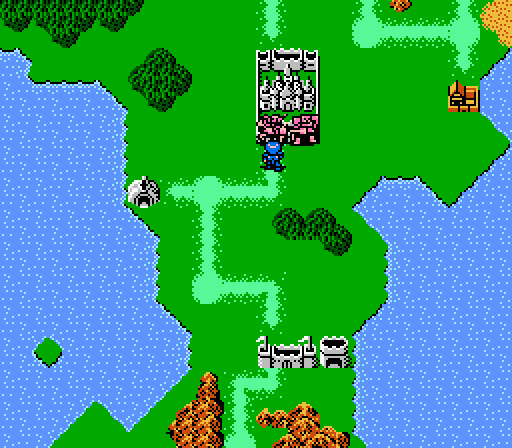 So, without further ado, Alm and his army storm the Southern Gate. 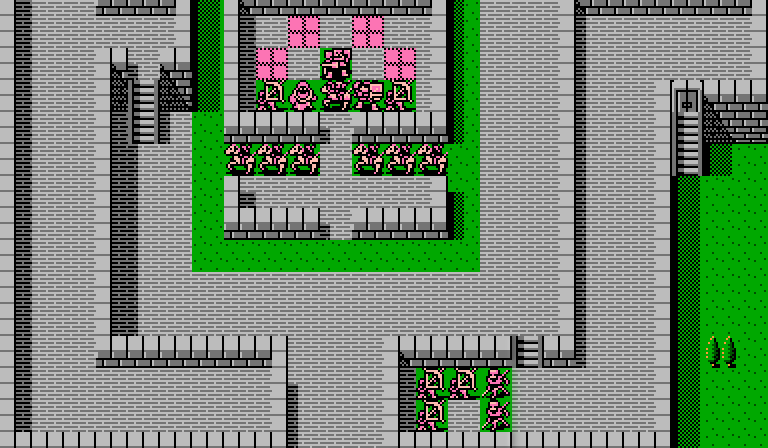 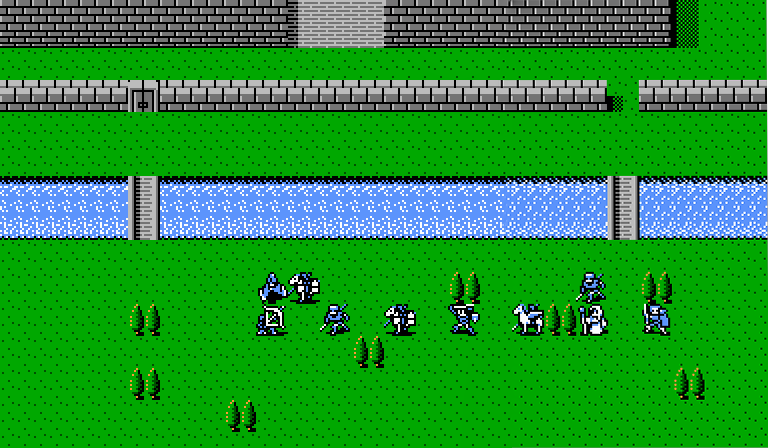 Easily our most complicated map thus far, with plenty of new enemies. Unfortunately the doors are just for show so we're forced to proceed single-file in front of a few archers that can hit us through the 2-wide wall with impunity. 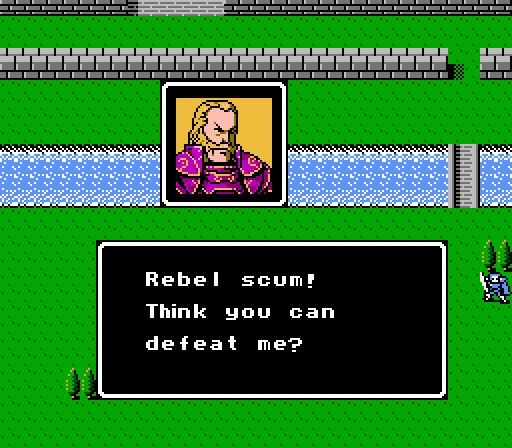  Slayder, use my army to scatter those swines! Slayder, use my army to scatter those swines!Dozer himself immediately accosts us as the battle begins, though he doesn't have much to say beyond generic villainry. 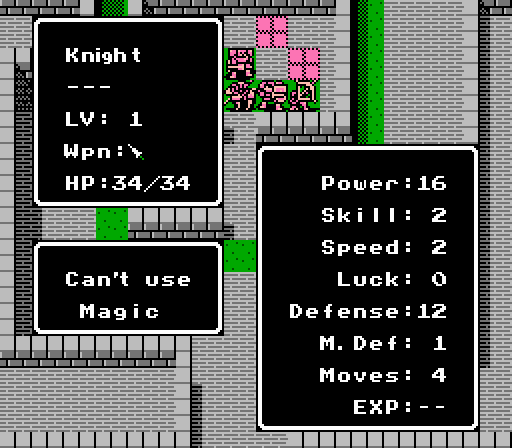  The archers, soldiers, and cavaliers are all the same level one generics we've been dealing with already. The cluster of four units at the top-center of the map is new, however. The right-most hulk of armor is a knight, the promoted form of a soldier, and has a pile of Power and Defense but is conspicuously light on Magic Defense. The mysterious robed figure on the left is a wizard, an enemy-only magic class with both Recover and Dora, a dark-flavored spell that is otherwise identical to Fire in every way. 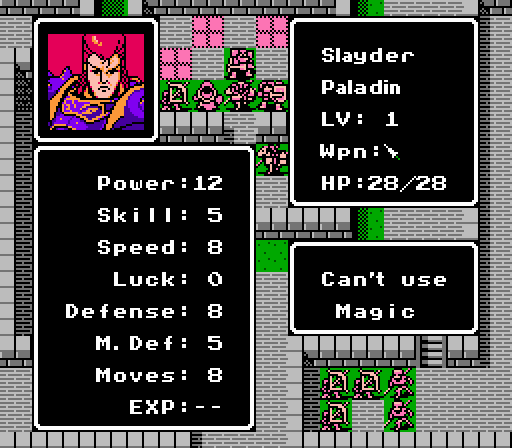 Slayder is a step up from the rest of this troops, even deserving of his own portrait. Solid Power, Speed, and Defense, with enough Magic Defense to be no pushover in that department, either. He's also another new class, the paladin - the promoted form of a cavalier. Promotions in Gaiden work about like what you'd expect from the rest of the series - at a certain level, a unit can 'promote' into a more powerful class. We've already seen a basic instance of this mechanic when the villagers were promoted back at the start of the chapter. Usually the level for promotion is well below the maximum - for instance, soldiers and cavaliers can promote at level 7, but can also gain levels in their own class up to level 20 first. Since a unit's stats are raised to the promoted class's base levels, rather than applying a fixed bonus, there's a tradeoff between gaining more power in the base class vs. achieving the more powerful class more quickly. 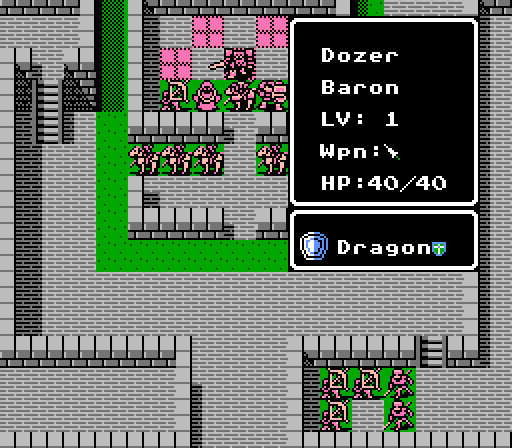 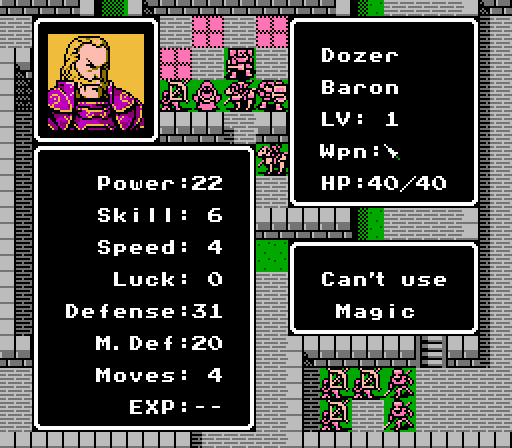 Dozer is a monster, and thanks to that Dragon Shield - +13 to both Defense and Magic Defense, plus 5 HP of healing at the start of each turn - we have no chance against him. Fortunately he is content to let Slayder do his fighting for him. His class, the baron, is the promoted form of the knight - that's right, some starting classes have not one but two promotions in Gaiden. Turn 1 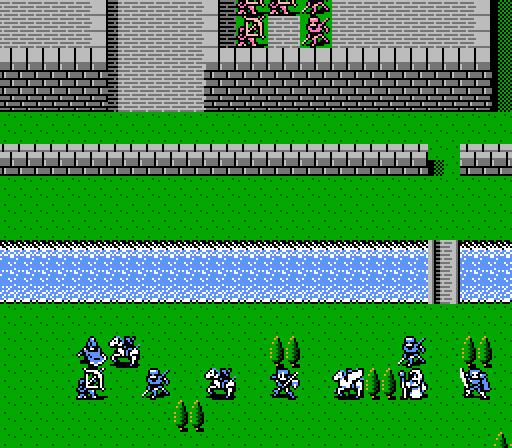  Given the map layout, we have to start off by sending everyone over the right bridge and through the gap in the wall, exposed to the group of archers along the way. The exception, of course, is Claire, who can fly over and even land atop the walls without any trouble. Turn 2 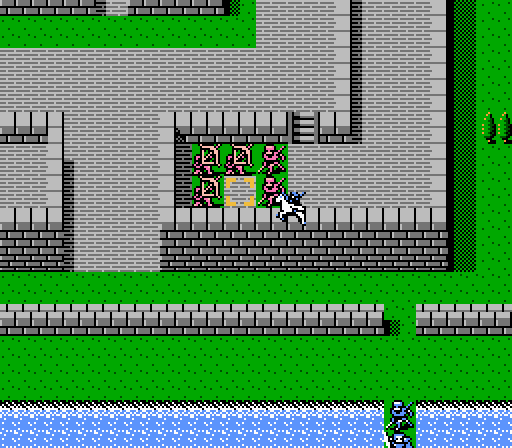 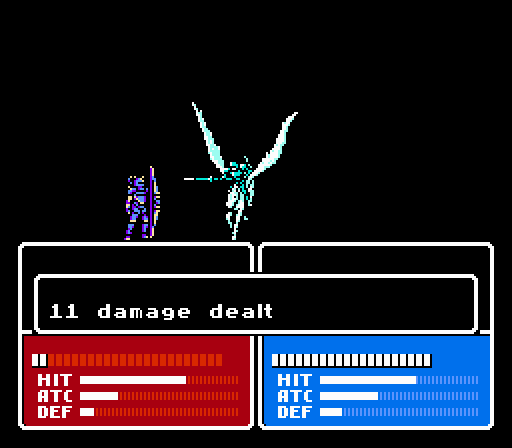 Claire charges straight into the group of archers and brings one of them down to critical condition right away. Normally this move would be Fire Emblem suicide, but in Gaiden archers only get effective damage against flying units if they have a special bow equipped - the default basic bow doesn't get any such bonus. 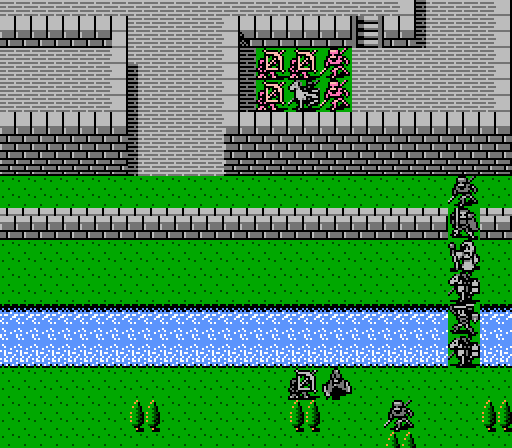 Of course, now she's going to have to suffer on the enemy phase. If everyone actually lands their attacks on her, Claire would be toast, but she's already dodged the first archer's counter-attack so should make it through the rest of the turn.  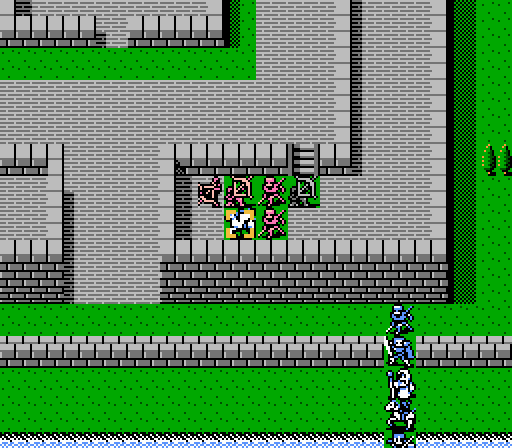 The enemy phase starts off with both healthy archers missing Claire, while the wounded one retreats to head for the healing tiles.  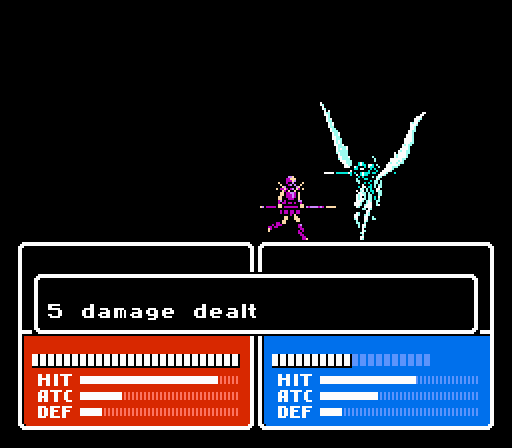 The two soldiers both connect for 5 damage a piece, but Claire gets in a few attacks of her own. Turn 3 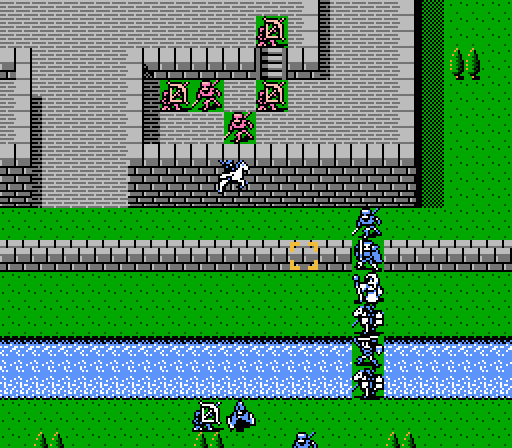 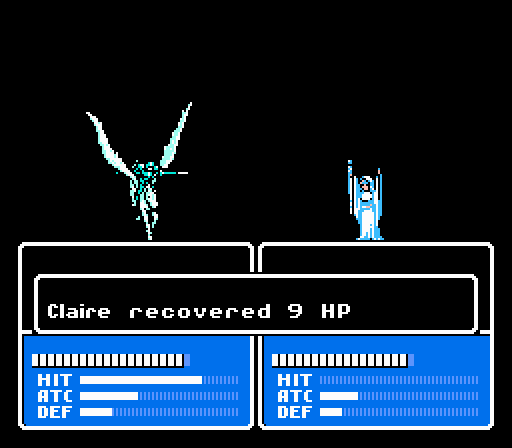 Claire retreats, allowing Silk to patch her back up. 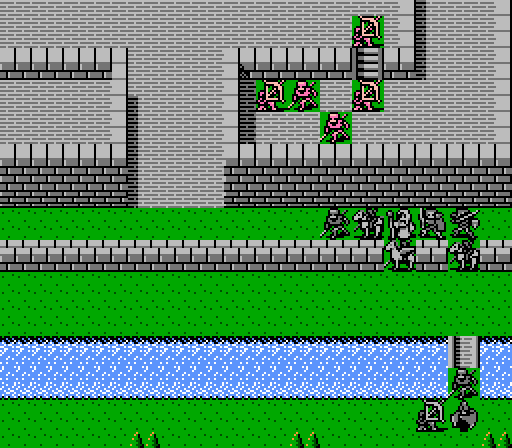 The only unit we have that can strike the group on the wall from the outside is Python. Unfortunately he's stuck at the end of the line due to some unfortunate placement of the units at the start of the battle. If I had to do it over again, I would probably have re-arranged the roster order to make sure he started closer to the front, but oh well. 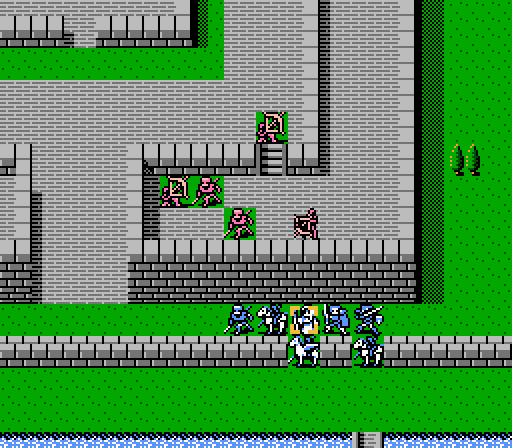 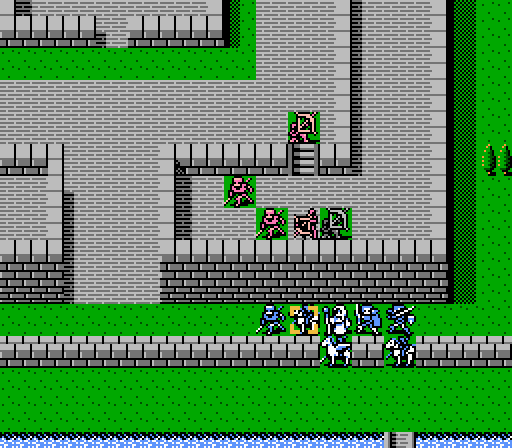 Silk takes four damage from one archer, while Cleive shrugs off just two damage from the other. The third enemy archer just continues to retreat. Turn 4 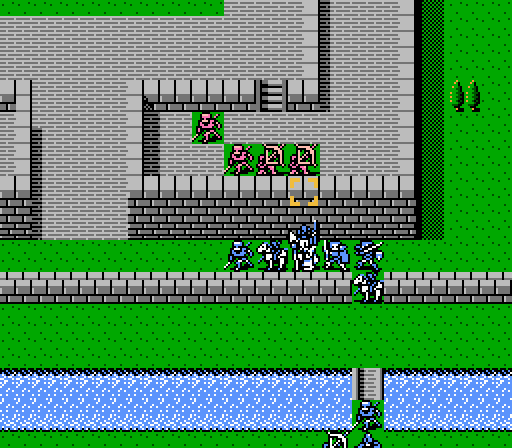  Claire starts off by going after the archers again, but only lands one of her attacks this time.  From there, it's more of the same as the rest of the army slowly shuffles forward.   The archers go after Silk and Alm this turn, both shots finding their targets again. Making up for missing three straight against Claire, I guess.   A soldier goes after Claire, but gets counter-killed for his trouble. 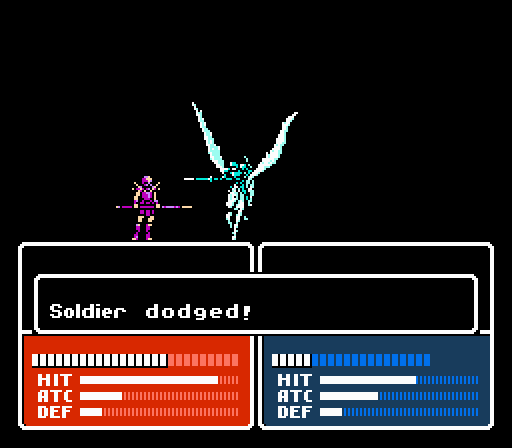 Of course, that opens up the space for the other soldier to also attack. Claire misses one of her attacks this time, as she falls into critical condition. Turn 5 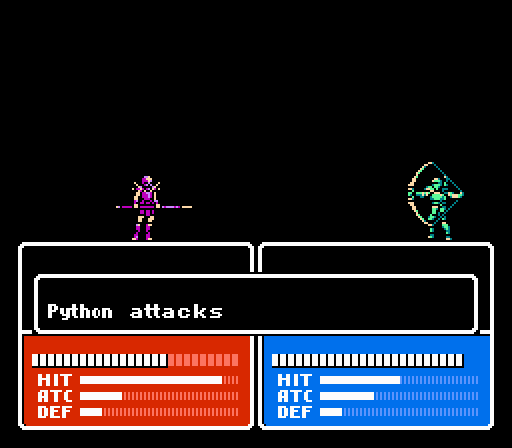 Python finally reaches the front lines...and misses with his one attack. 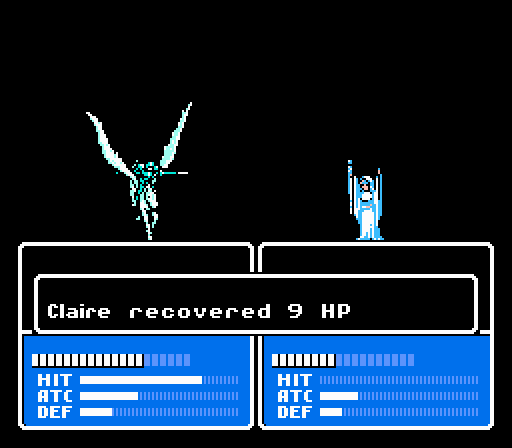 Claire retreats back to the first wall for some more healing, though it leaves Silk exposed to another arrow on the enemy phase.  Assembling in front of the gate, preparing to lure out Slayder and the cavaliers. 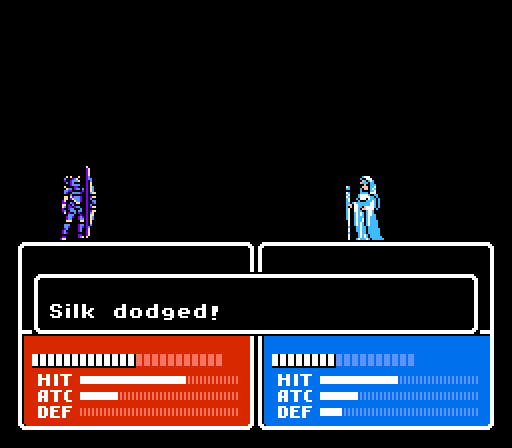  Silk manages to dodge this time, though I should probably keep her away from the archers now. The other archer scratches Force. Turn 6  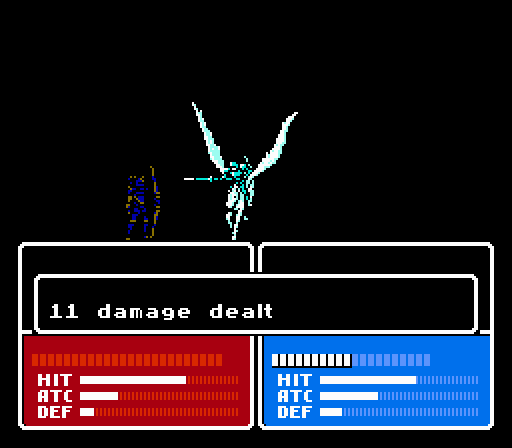 Claire dives right back into the fray and outright kills this archer with her two attacks. 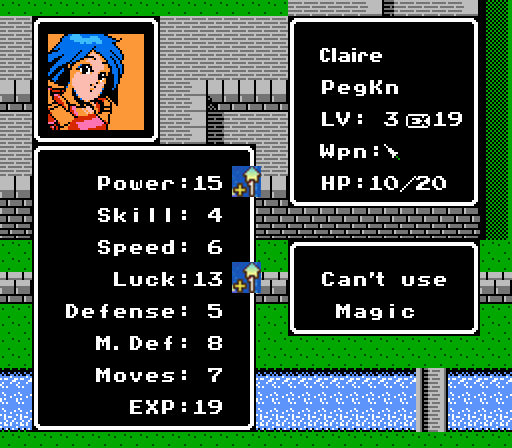 Pretty good level for her, though she could probably do with more Speed soon. 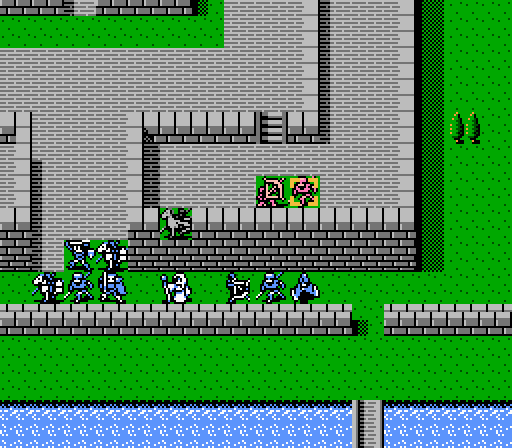 Python takes another shot at the last soldier, missing again.  Cleive takes the point of the formation to draw in Slayder, who will move first and then take up the only available space from which to attack. 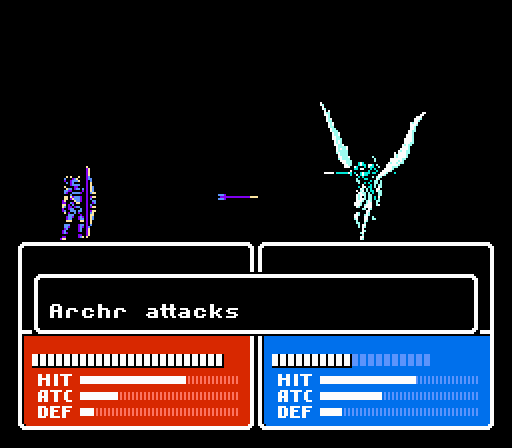 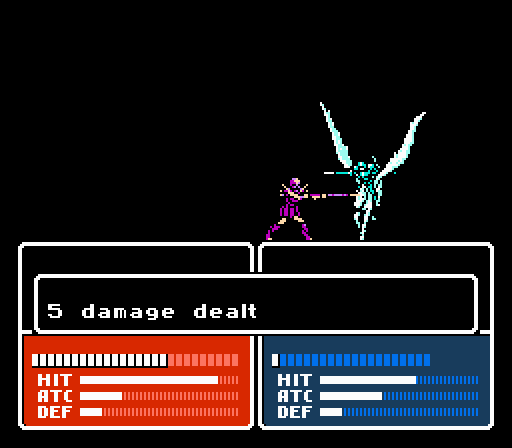 First, through, the archer and soldier up front both attack Claire. She not only survives thanks to the extra Defense we gave her (and the extra healing Power we gave Silk) but is able to counter-kill the soldier as well. 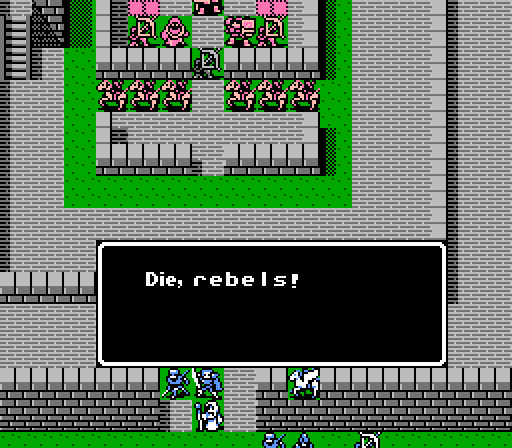 Slayder has some deep thoughts for us before he begins his attack.  - Chapter 1 Part 9 Battle 1.gif) Cleive isn't really in Slayder's class by himself, but now we have the rest of our army ready to fight against the one paladin and his jump-happy horse. Turn 7  Cliff with the Bolt Sword is the easy counter for Slayder - he can attack from range, against Slayder's weaker Magic Defense, and get in a double attack with Cliff's superior Speed. 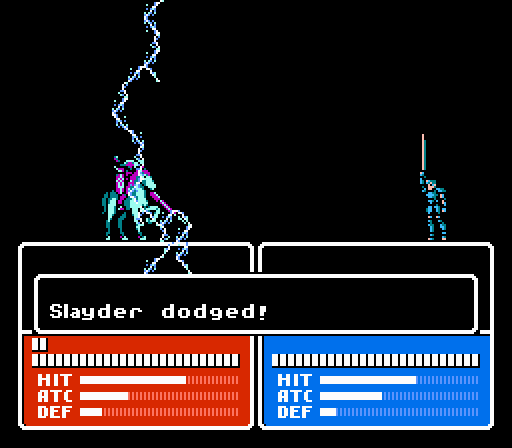 So of course, Cliff proceeds to miss both attacks.  That leaves us in a bit of a bind, so Silk patches up Cleive and Alm completes the line. Slayder will likely go after Cliff, who has the lowest Defense, and hopefully eat one or two lightning bolts in return.   Python finally does some damage, landing two attacks against the last of the archers on the wall.   Cliff dodges the flying horse and then cripples Slayder this time around. 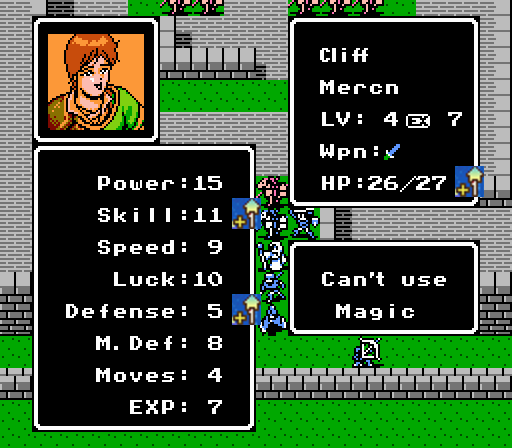 Cliff gets a little more sturdy with a solid level. 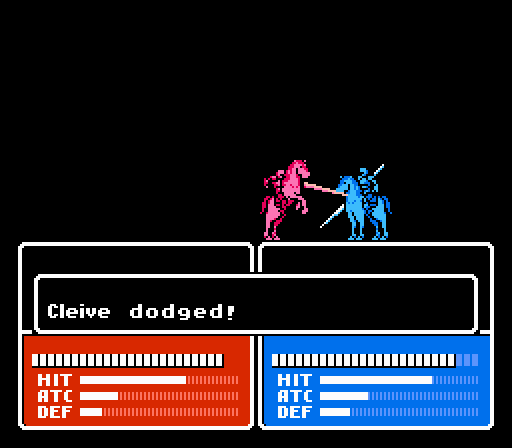 Slayder moving to the side to attack Cliff opened up space for a cavalier to come down for another shot at Cleive, but Cleive also dodges and dishes out 14 damage on the counterattack. Turn 8  We need to finish off Slayder and then start working on the group of cavaliers.  Python starts off by bringing Slayder down to just 3 HP.  Cliff moves around and finishes off the wounded cavalier. 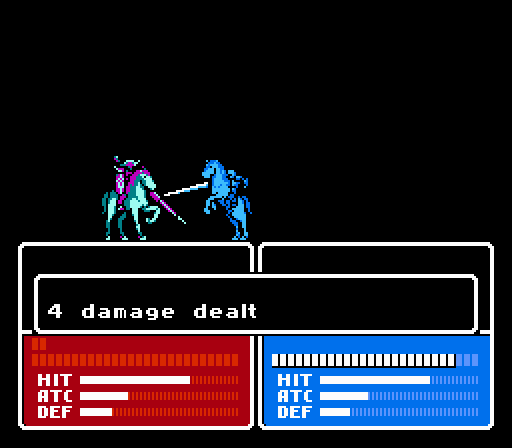 And Cleive gets his revenge on Slayder. 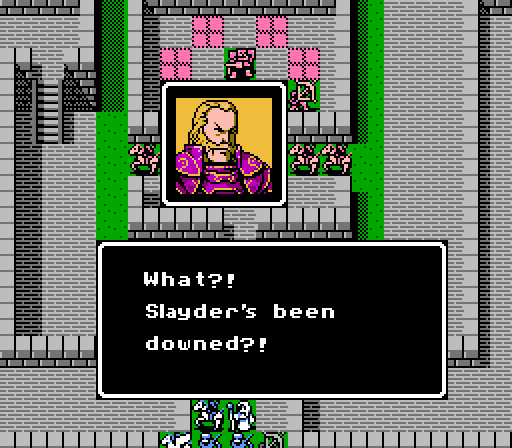  I'm leaving this to you, men! I'm leaving this to you, men!That prompts a sudden reaction from Dozer, who flees the battle and is removed from the map. Thank God. 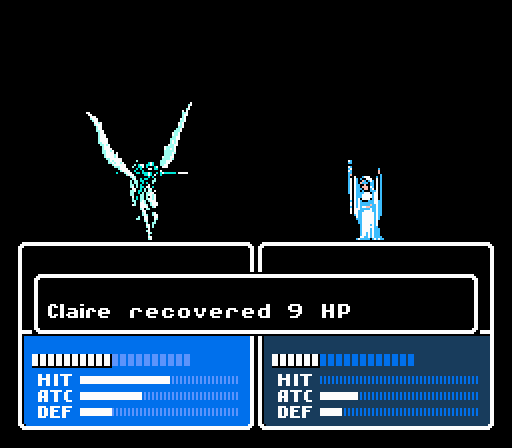 Meanwhile, Silk heals up Claire for the third time. 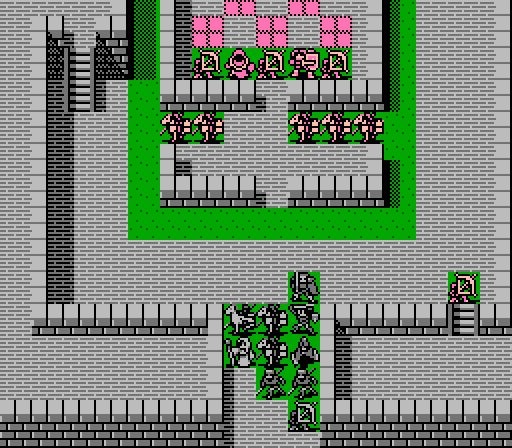 The rest of the army holds the line, ready to draw out a couple more cavaliers. 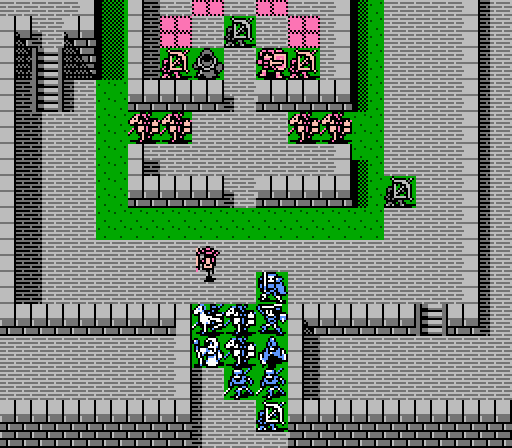 The first attack is on Claire again, who falls back down to 6 HP but deals out 10 damage. 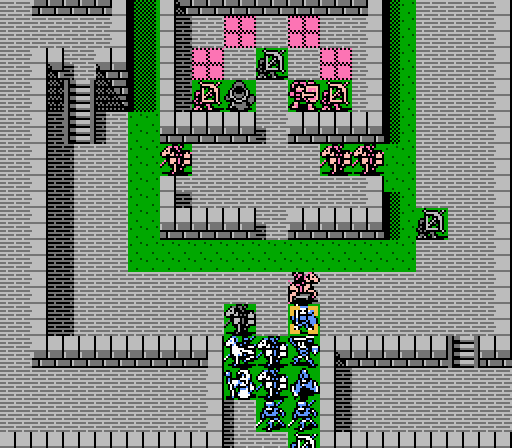 Another foolishly attacks Cliff, but escapes death by dodging a lightning bolt.  The next cavalier to go after Cliff isn't so lucky, and is counter-killed by twin bolts. Turn 9  Gray starts the turn by roasting a cavalier.  Not the most useful of levels, really, since Gray isn't really going to be taking many hits anyway.  Cliff meanwhile kills another cavalier. 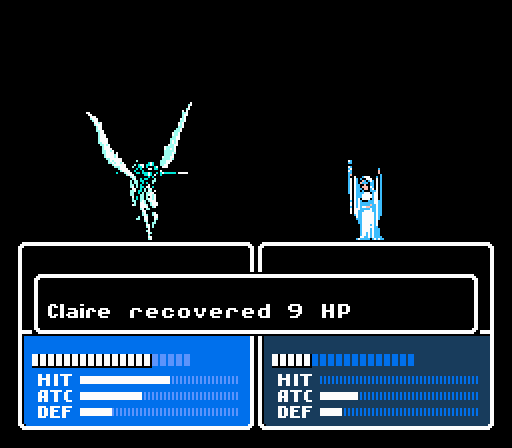 Four heals now from Silk to Claire. 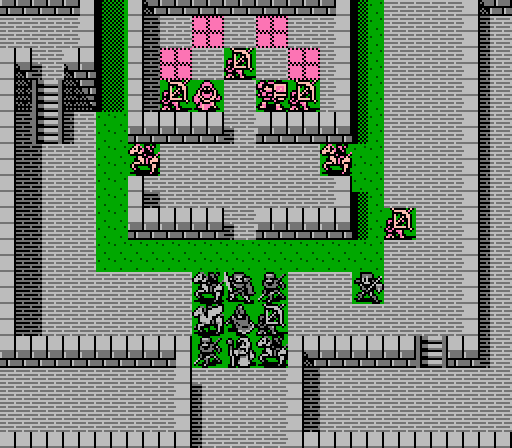 Setting up to draw in the remaining two cavaliers.  - Chapter 1 Part 9 Battle 2.gif) The one on the left goes after Cleive, who somehow follows up a crit with a miss. 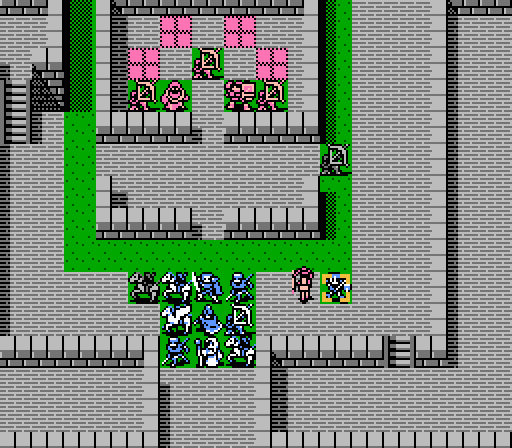 The other cavalier attacks Alm for 3 damage but receives 14 damage in return. Turn 10 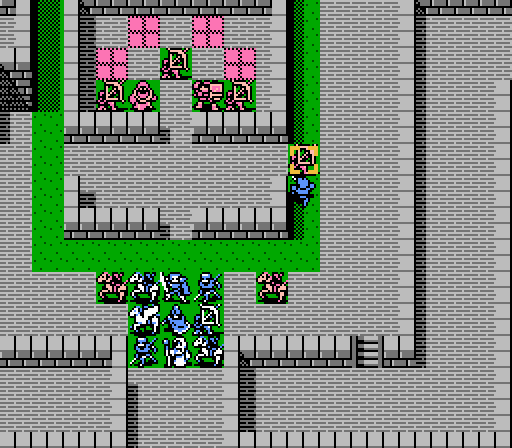 Alm catches up to the archer and finishes him off. 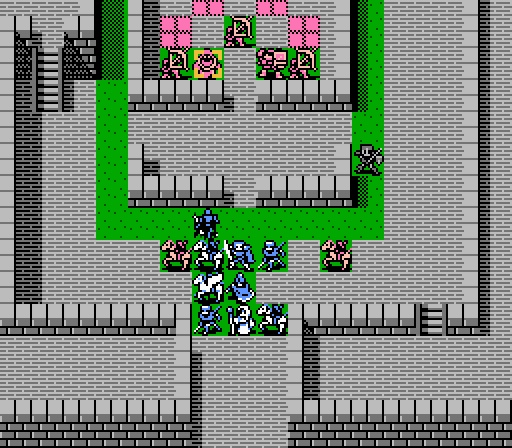 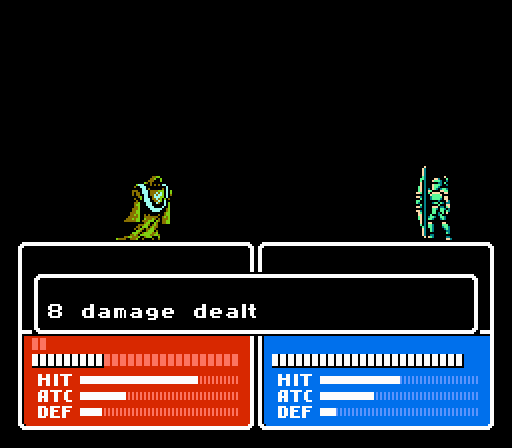 Python gets in the first attack on the back line, effectively taking the enemy wizard out of the fight.  Silk finally gets a break from healing, getting the kill on the last cavalier. 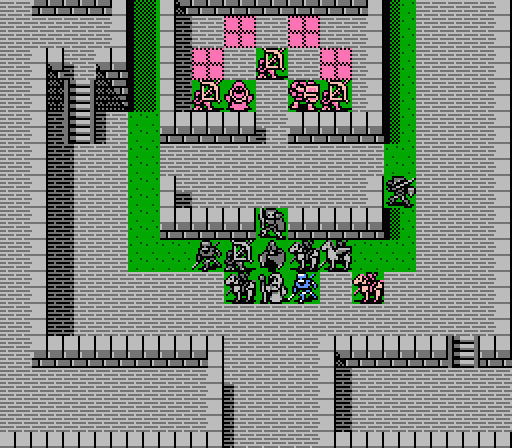 Down to just the back line now. Except I forgot about the enemy cavalier that had attacked Alm, so it's still just sitting there. It's in retreat mode, at least. Anyway, Cliff's going to draw in that knight.... 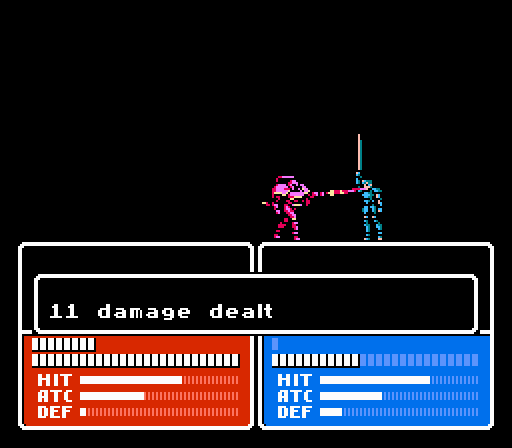 ...like so. Ouch. Cliff does land one counterattack for 14 damage of his own, though. 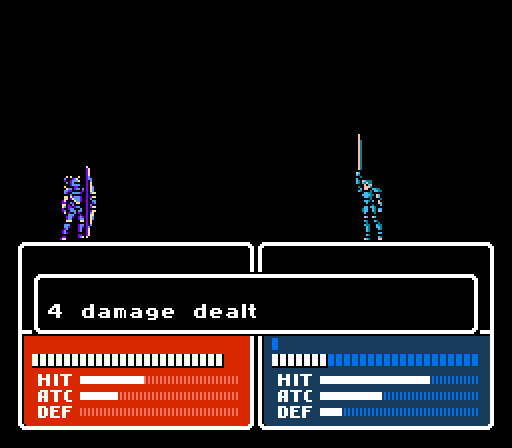 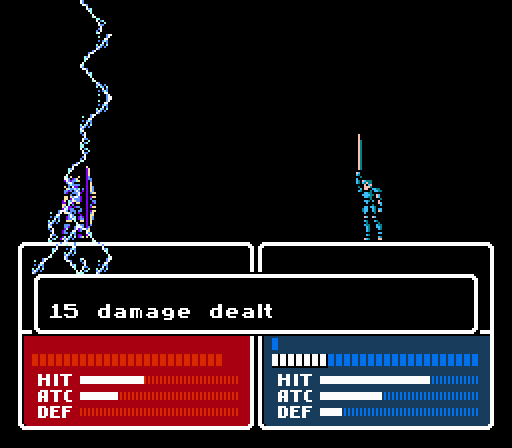 All three archers also go after Cliff, but one gets too close and is counter-killed. 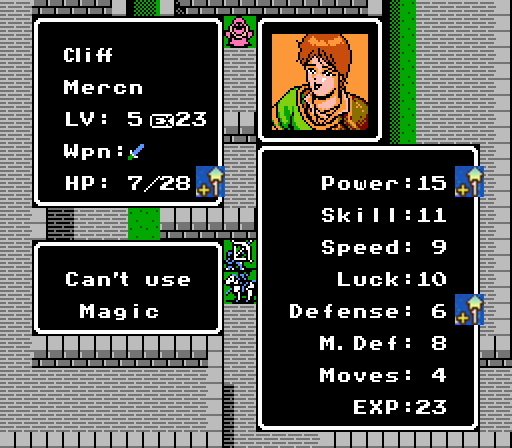 Now that's a pretty great level for Cliff. (Although his Power didn't really increase as displayed - it's set to 15 by the Bolt Sword - his base Power did go up from 8 to 9.) Turn 11 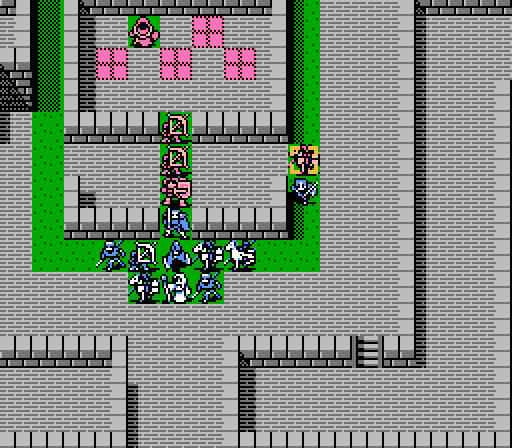 Alm attacks the real last cavalier, but misses an attack so can't finish him off.  After Gray moves out of the way, Cliff backs out of melee range to finish off the knight. 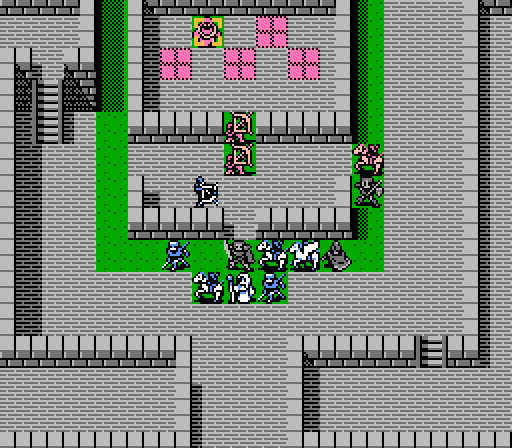 Python continues to harass the wizard, missing one shot but bringing the enemy down to 1 HP. 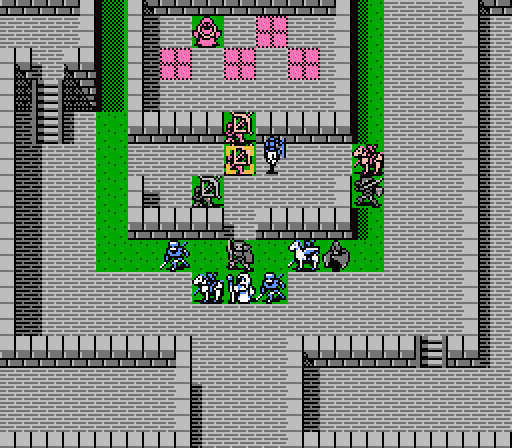 Cleive quietly gets rid of one of the archers. 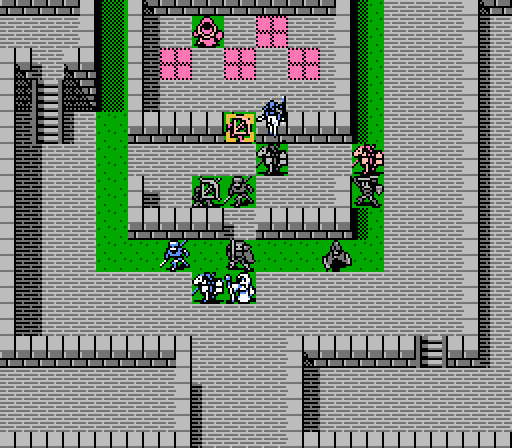 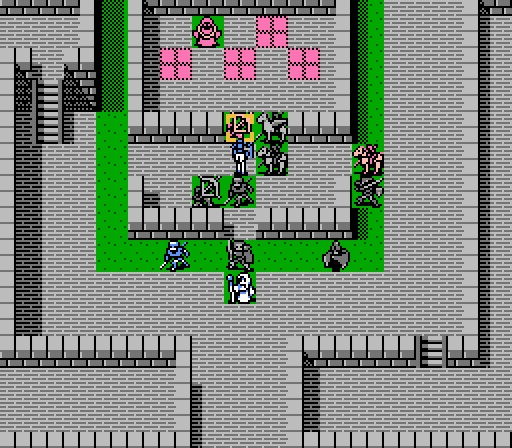 Claire and Robin team up for the last archer. Just clean-up from here, as both remaining enemies are in retreat mode. Turn 12 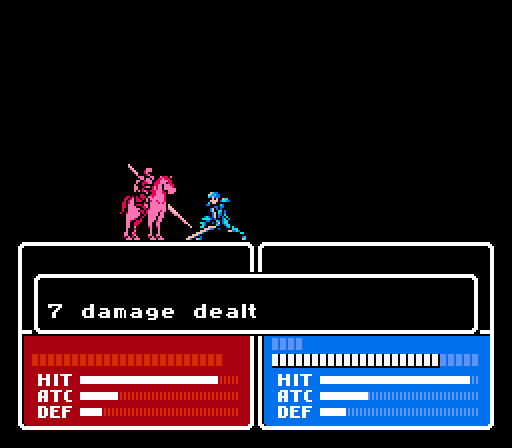 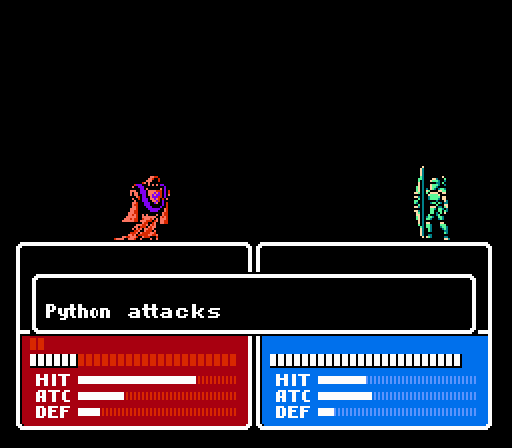 In our longest battle so far, Alm finally kills the last cavalier, while Python finishes up with the wizard. 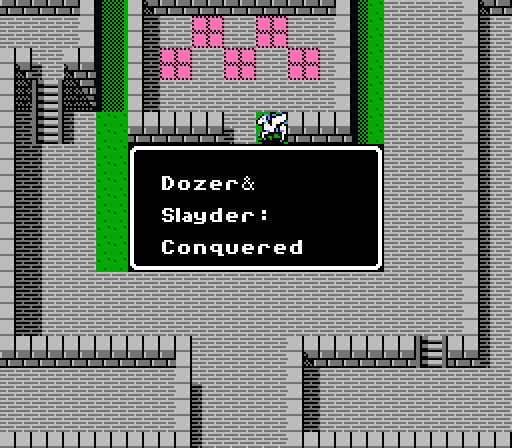 The battle wasn't particularly challenging since I approached it carefully. Well, that and Dozer ran off instead of slaughtering us all. Next time:  We finally arrive at Sofia Castle and wrap up the first chapter.
|
|
#
?
Apr 29, 2013 05:10
|
|
|
Chapter 1, Epilogue: Sofia Castle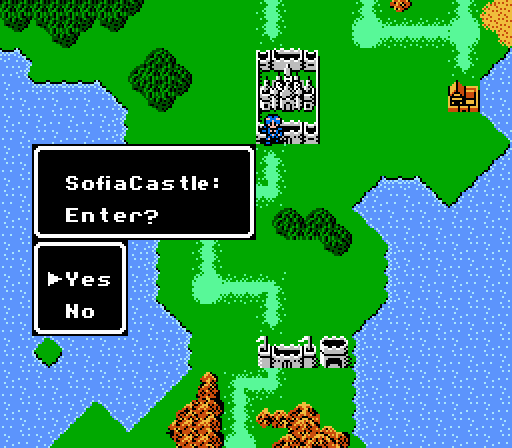 Time to finish up the first chapter by exploring Sofia Castle. Music: Castle 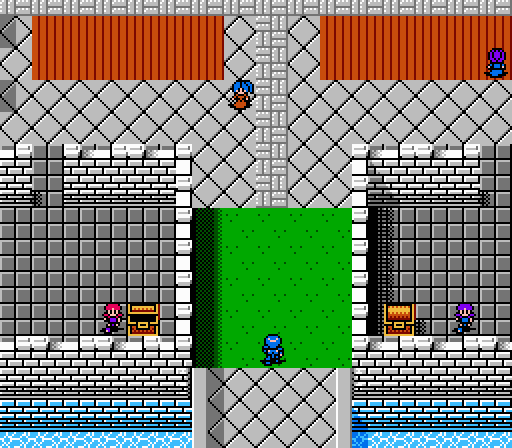 We heard this music back at the fort, but it seems appropriate to post it again here. The castle is another exploration area, with several people to talk to, and a couple of treasures as well. Though one of them appears to have already been opened.... 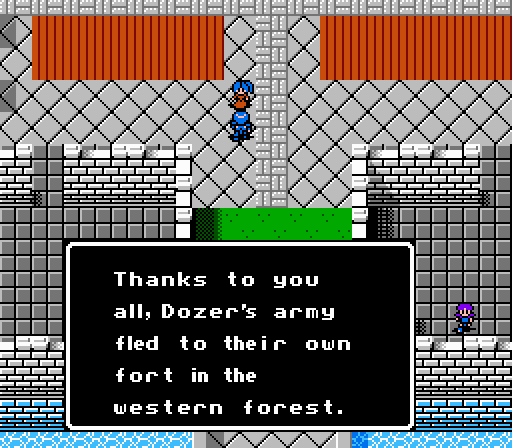 From the first lady at the entrance, we learn that we're not done with Dozer quite yet, though it will be some time before we actually see him again. 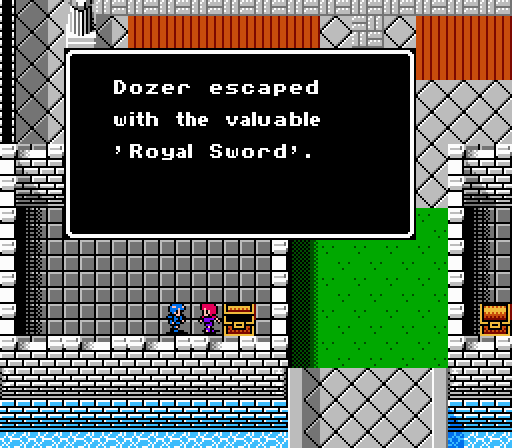 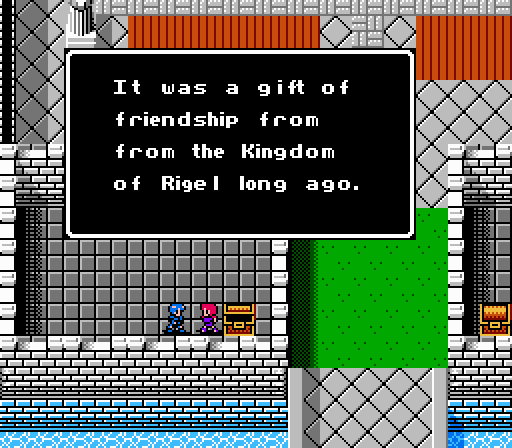 No normal person can use it. In the lower-left chamber, we find that Dozer looted the open treasure before he took off, though he may not be able to make use of it. Remember that one for the next time we encounter him. 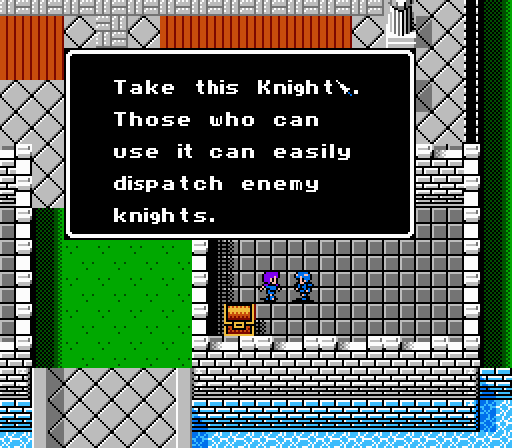 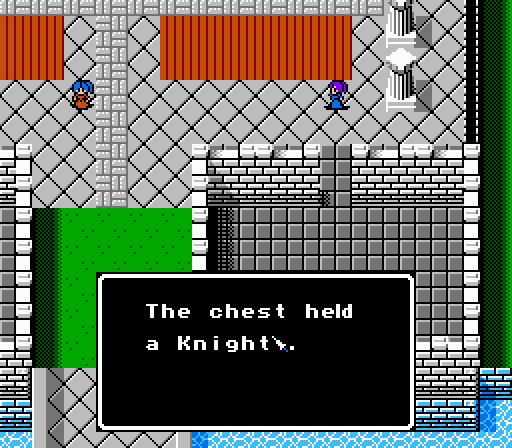 The man in the lower-right chamber gives us outright permission to loot the treasure next to him. Alm picks up the Knight Killer - it has 1 less Might and 5 more Accuracy than the Steel Lance, but gives triple Attack against cavaliers and their promotions. It's good for a high-movement unit like Claire or Cleive.  Well, except the princess whom Lord Mycen was entrusted with. So wait, Alm was raised by Mycen, and the princess was left with Mycen. So...that makes Alm the princess? Clearly we still need some more information here. 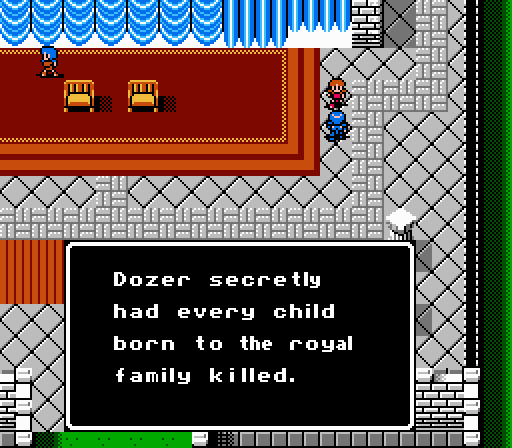 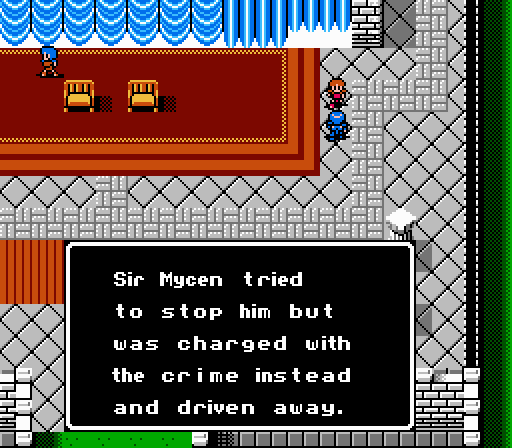 Dozer's not a very nice man.  If he's not stopped before the Rigelian army comes, there'll be big trouble. Setting up more plot for the rest of the game here.  But he shouldn't have any kin.... N-no way, that rumor was true? What rumor? Argh these people are useless.  We can leave the castle to the north and reach the Northern Gate, but we're not allowed to go anywhere from there except back to the castle.  Instead, Alm heads upstairs, to find.... 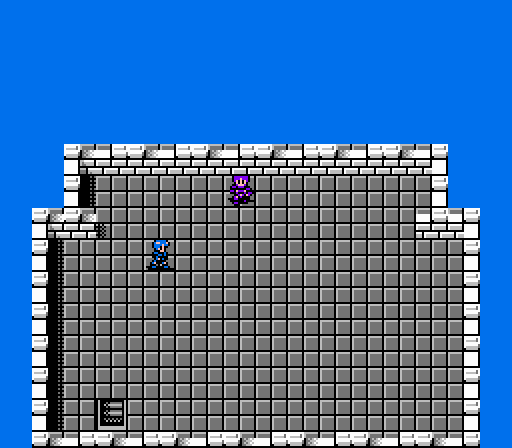 There's one more person to talk to, and he looks about as familiar as 8-bit sprites can look. 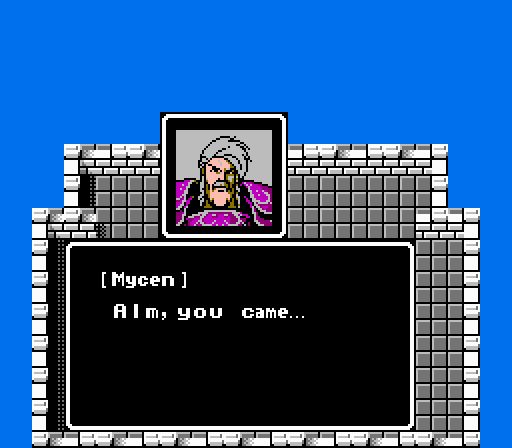 So, Mycen is here. Why couldn't he have just come with us in the first place, then? Sheesh. 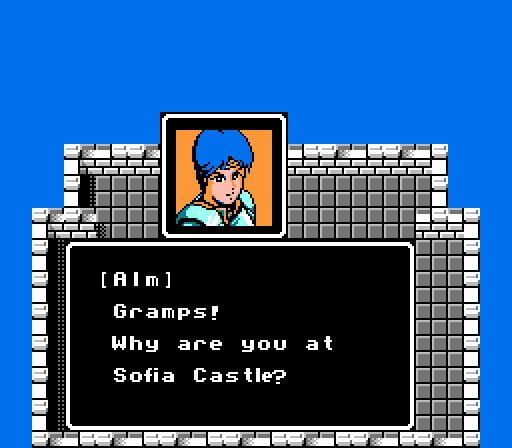  I can't seem to escape destiny. Alm, it's best if you follow your own path. Free this land of Valencia from its cursed fate. I can't seem to escape destiny. Alm, it's best if you follow your own path. Free this land of Valencia from its cursed fate.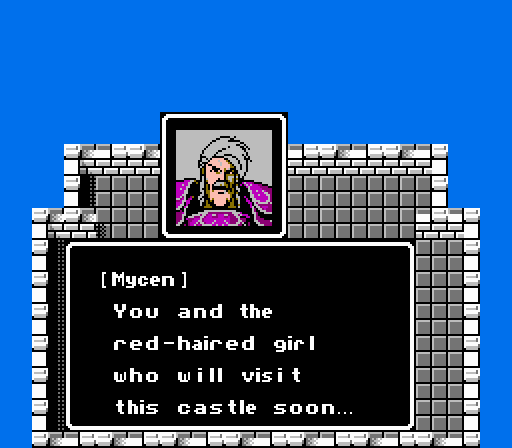 Red-haired girl, huh. Considering there's only one other mysterious person that's been mentioned today, I would bet good money on the next red-haired girl we see being the lost princess. Perhaps that is what fate has in store for you....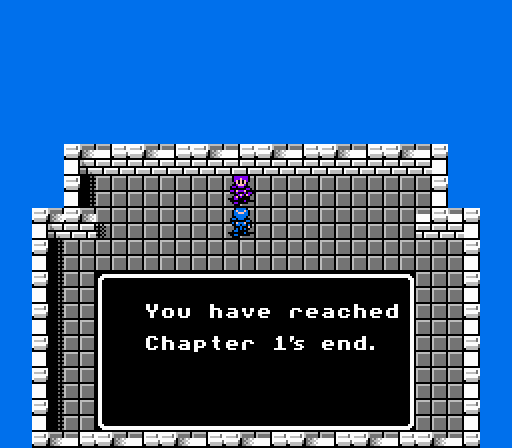 And with that, we've reached the end of the first chapter. Next time: 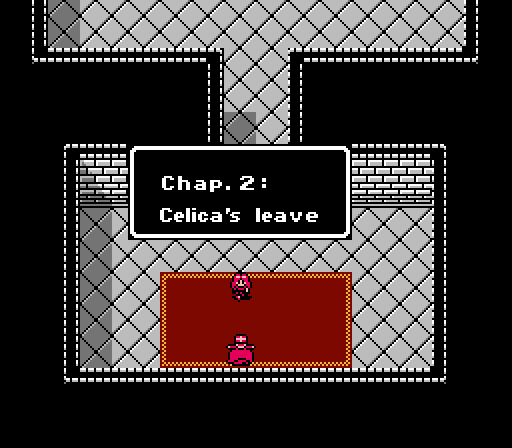 We start the second chapter, and immediately encounter a red-haired girl. DKII fucked around with this message at 20:39 on May 4, 2013 |
|
#
?
Apr 30, 2013 03:07
|
|
|
Chapter 2, Prologue: Cloister Today we start the second chapter, going off in a completely different direction from where we left off with Alm and his army at Sofia Castle.  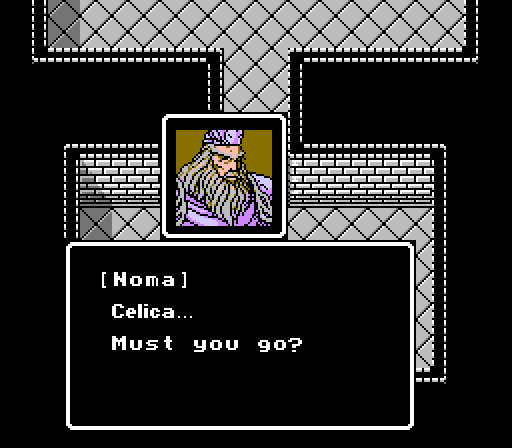  The road to Mila's Temple is long. The road to Mila's Temple is long.A couple updates ago, Force had mentioned that Mila (the goddess of Sofia) had gone missing, and someone should go to Mila's Temple to investigate. Looks like Celica is picking up that torch. Gaiden goes full-out with multiple separate armies played in parallel. Between Geyse's pirates and the evil fiends rising, you'll surely be attacked. It's too risky....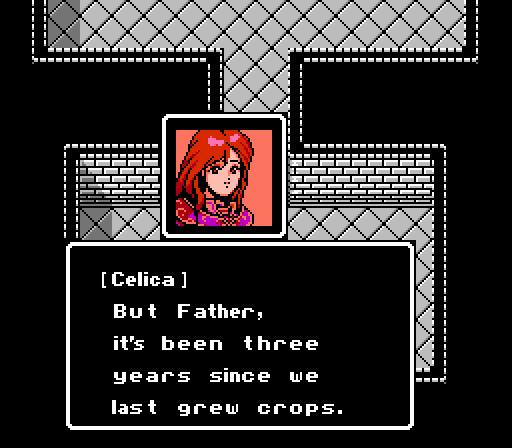 Jesus, three years without any crops? What the hell have you all been eating? On second thought, I don't want to know.  What in the world befell the Earth Goddess Mila? I want to find out for myself. I see.... If you insist, then I shall not stop you, Celica. You know why Sir Mycen placed you in my care, right? You are the last of the Sofian royal family. Sofia's people depend on you. Don't try to do the impossible. What in the world befell the Earth Goddess Mila? I want to find out for myself. I see.... If you insist, then I shall not stop you, Celica. You know why Sir Mycen placed you in my care, right? You are the last of the Sofian royal family. Sofia's people depend on you. Don't try to do the impossible. Missing princess, confirmed. Didn't take long to get to the bottom of that mystery. 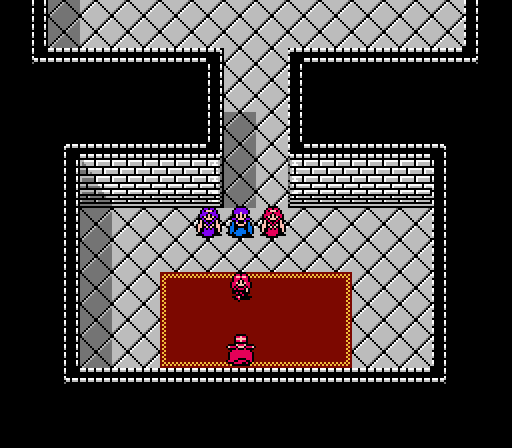 We gain control of Celica in another exploration segment. Lots of people to talk to before we go anywhere, though. 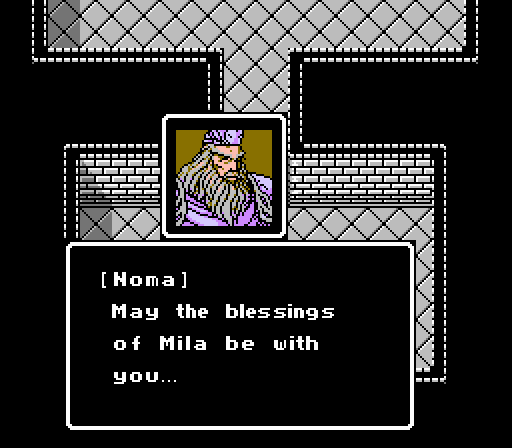 Noma doesn't have any more to see beyond well-wishes, so let's talk to the other three, who look a lot like potential recruits. 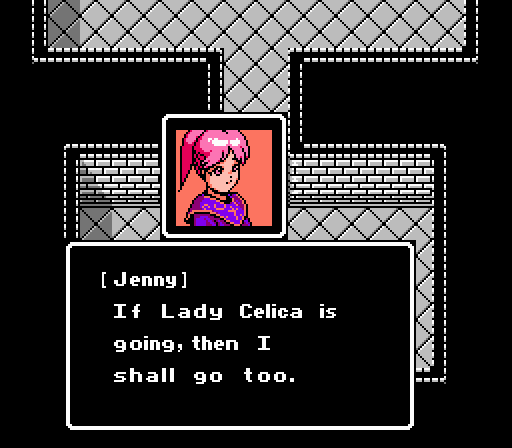  If you get hurt, I can heal you with my Recover spell. If you get hurt, I can heal you with my Recover spell.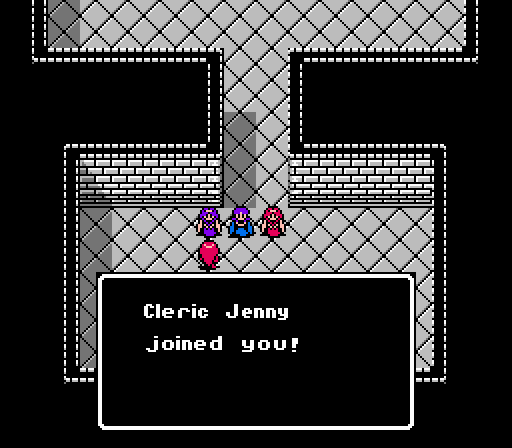 And the lady on the left beomces our first recruit, another cleric. Jenny is pretty much the equivalent of Silk for Celica's army, but she has one surprising difference that we'll see later on. 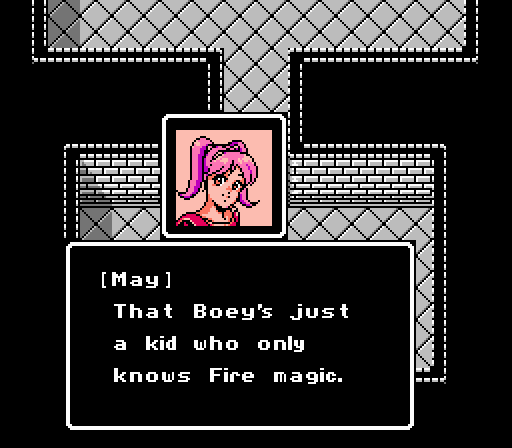  I can also use Thunder, so please rely on me, 'kay? I can also use Thunder, so please rely on me, 'kay?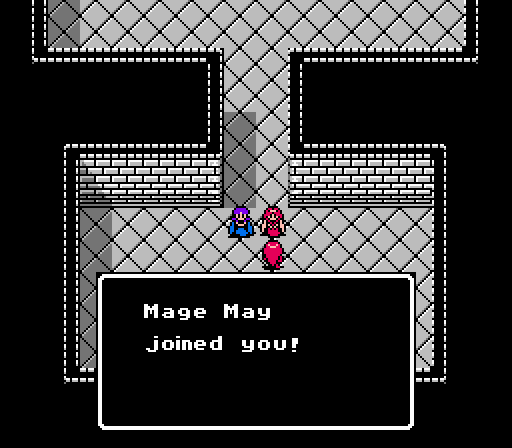 The girl on the right is May the mage, clever, right? 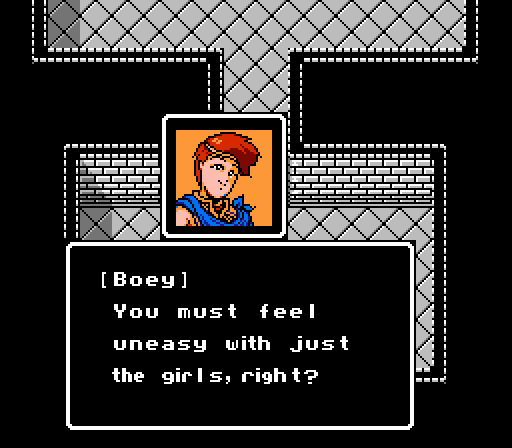  I'll come along too, so please relax. I'll come along too, so please relax.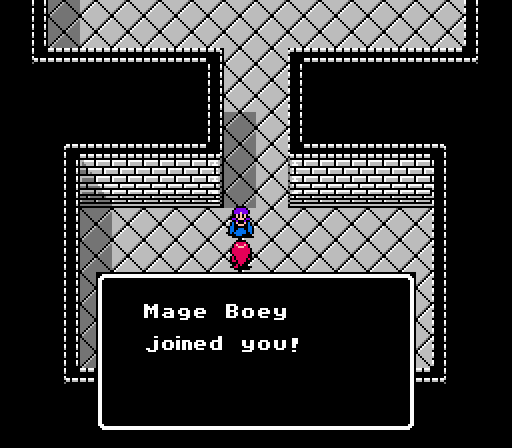 Boey joins as well, a second mage. We...don't really need two mages. 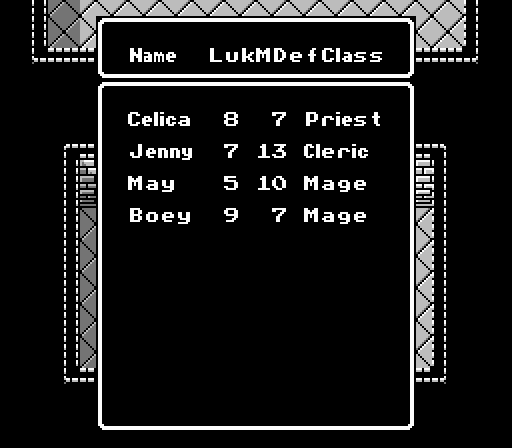 Celica is a Priest, so that means our entire army is four magic-users. Could make for some interesting battles to start the chapter.... 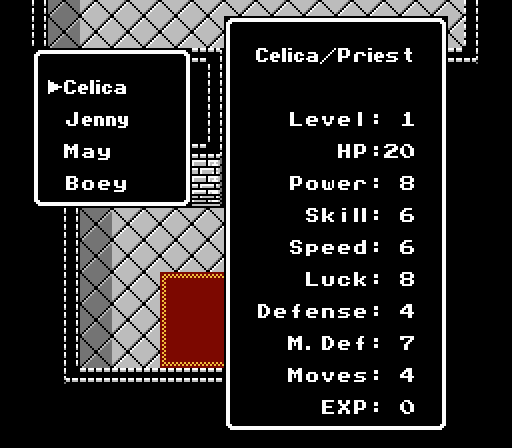 Celica starts off with decent stats, but still worse overall than Alm at the start of the first chapter. She has one key advantage, though - she can both cast Black Magic and use Swords. She starts off with the Fire spell.  Jenny starts off with a bit less Power and more Speed than Silk, but her growth rates are the opposite in comparison so they'll even out after a few levels. Like Silk, she starts off with both Recover and Nosferatu. 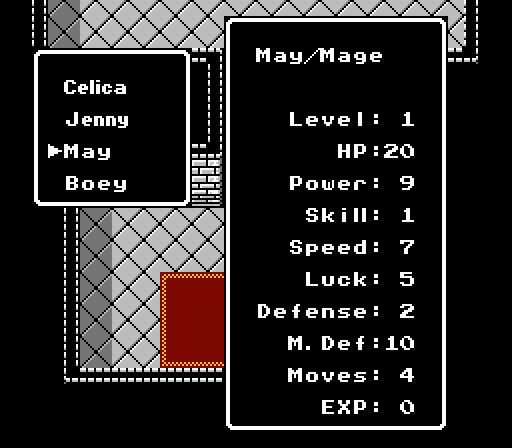 May is the stronger of the two mages, starting off with good Power and Speed and both the Fire and Lightning (Thunder) spells. Effectively, Lightning is like Fire, but more so. It has 1 more Might (4), 10 less Accuracy (70), 2 extra Weight (5), 1 more HP cost (2), and, most importantly, 1 more Range (1-3 tiles). It's usually best to stick with Fire unless the extra point of damage is needed to get a kill, or May can only reach the enemy from three tiles away. 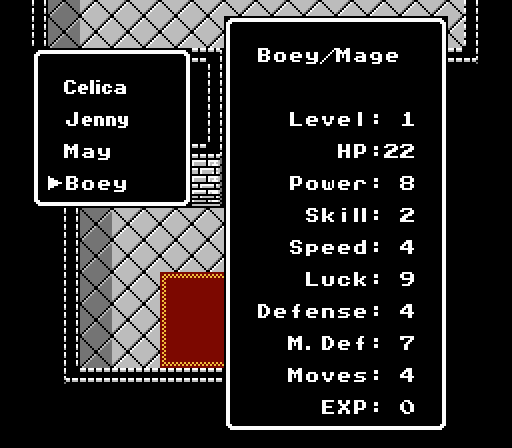 Boey starts out flat-out worse than May in every way that matters. Less Power and Speed, and he only knows Fire to start. His only real advantage is Defense, which shouldn't really matter for a mage, and HP, which will help him cast more powerful spells more often but isn't enough to offset his weakness. Moving north, we find...  ...it's another shrine!   This time we have a choice between Power and Speed. Again, they can be used three times total, not each. When you see the growth rates for our army, it'll become pretty clear what needs to be done. Which isn't necessarily what we will end up actually doing, of course.  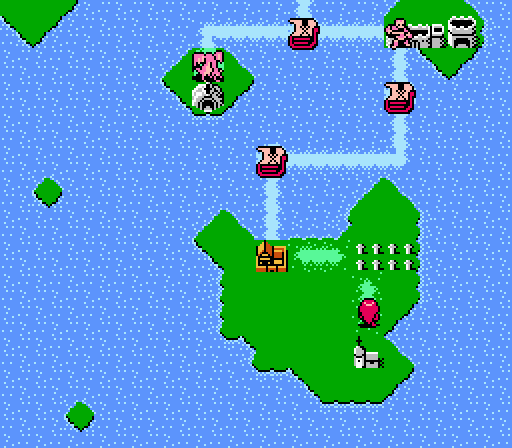 Exiting to the north will bring us to the world map, where we're immediately thrown into another battle. But that'll have to wait until next time! Current Roster: 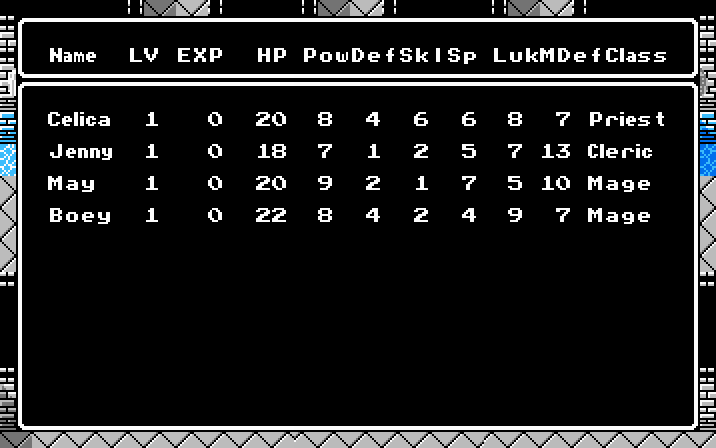 New Characters Celica is the main character for the second chapter, and as with Alm, it's game over if she falls in battle. Not that we're letting anyone die anyway. She has worse stats and growths than Alm overall, but makes up for it with the ability to both cast spells and wield swords. If we can get her a power-increasing sword, it'll actually increase the potency of her spells, as well.pre:Stat Base L1 Growth HP 20 30 Power 8 25 Skill 6 40 Speed 6 30 Luck 8 40 Defense 4 20 M. Def 7 0 Moves 4 0 Quality 32 155 Jenny is the healer for our group, and not very different from Silk at first. She will make for a very good magic tank if the need arises, and her Power growth will make her into a strong healer, but her Speed will eventually keep her from being effective offensively.pre:Stat Base L1 Growth HP 18 20 Power 7 40 Skill 2 40 Speed 5 15 Luck 7 20 Defense 1 20 M. Def 13 0 Moves 4 0 Quality 22 135 May is a great mage with her Power growth, but eventually won't have enough Speed to offset the large weight of Black Magic.pre:Stat Base L1 Growth HP 20 20 Power 9 40 Skill 1 20 Speed 7 10 Luck 5 10 Defense 2 20 M. Def 10 0 Moves 4 0 Quality 24 100 Boey's another mage, and though he appears to be marginally better than May by the pure numbers, with less Power and a lower base Speed he's actually much less effective. He eventually gets some cool spells, but May gets hers more quickly.pre:Stat Base L1 Growth HP 22 40 Power 8 30 Skill 2 15 Speed 4 10 Luck 9 20 Defense 4 40 M. Def 7 0 Moves 4 0 Quality 27 115 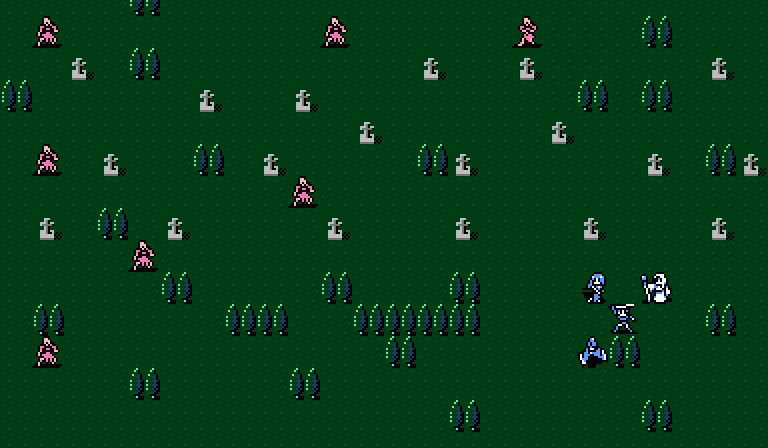 A romp through a cemetery to warm up the new army.
|
|
#
?
Apr 30, 2013 03:21
|
|
|
So we have two lacklustre mages, a back-up cleric and the precursor to the Tactician. Clearly only one of these needs to be with us past this Chapter. +2 Speed, +1 Power to Cecila.
|
|
#
?
Apr 30, 2013 04:12
|
|
|
Yapping Eevee posted:So we have two lacklustre mages, a back-up cleric and the precursor to the Tactician. Clearly only one of these needs to be with us past this Chapter. Without giving away too much, let's just say there's a much smaller bench in Gaiden than you might be used to. But Jenny and May are set for Power and hopeless in Speed so your vote was pretty much what I was thinking anyway.
|
|
#
?
Apr 30, 2013 05:16
|
|
|
Trying to ruin your day until someone stops me.+3 Spd for Boey.
|
|
#
?
Apr 30, 2013 05:56
|
|
|
2 speed, 1 power for Celica . I really like her so I want her to get all the boosts  Can I also preemptively beg to ditch Boey forever? Can I also preemptively beg to ditch Boey forever?Haha I do like how the game :makes Alm the princess thanks to NES limitations. Though it should be obvious who the real princess is, no matter how fabulous Alm is.
|
|
#
?
Apr 30, 2013 06:02
|
|
|
Yapping Eevee posted:So we have two lacklustre mages, a back-up cleric and the precursor to the Tactician. Clearly only one of these needs to be with us past this Chapter. Sounds like a plan.
|
|
#
?
Apr 30, 2013 06:07
|
|


|
All for Celica
|
|
#
?
Apr 30, 2013 06:11
|
|
|
SC Bracer posted:how fabulous Alm is. Alm is forever a princess. In his heart, and in ours. Discendo Vox fucked around with this message at 06:22 on Apr 30, 2013 |
|
#
?
Apr 30, 2013 06:15
|
|
|
Yapping Eevee posted:So we have two lacklustre mages, a back-up cleric and the precursor to the Tactician. Clearly only one of these needs to be with us past this Chapter. I'm gonna go with this, too. My god, those growths! And on the "main" character!? Oy. I've been looking forward to this part! I'm starting to figure out who's who in Gaiden, thanks to FE: Awakening and the Spotpass teams, etc. I've been anxious to meet Celica!
|
|
#
?
Apr 30, 2013 13:28
|
|

|
Chapter 2, Part 1: Nova Cemetery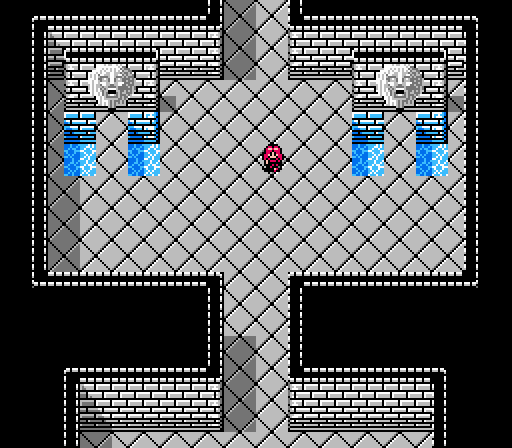 Today we have our first battle with Celica and her new army. But first we have a couple shrines to use up. Music: Shrine 2 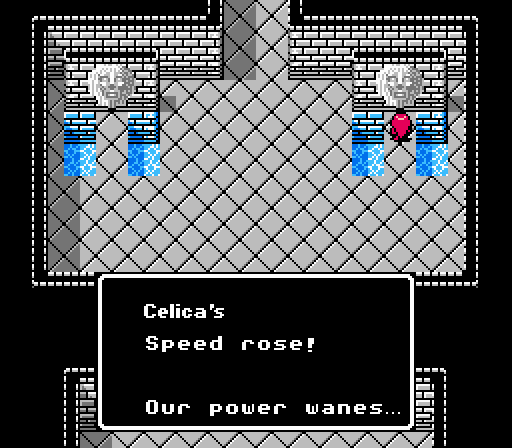 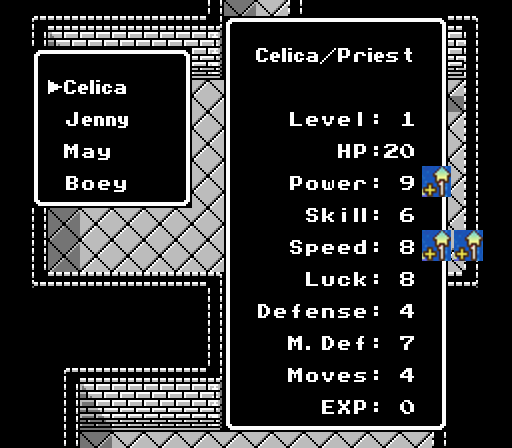 Celica is the beneficiary of all three shrine uses, gaining 1 Power and 2 Speed. The Power especially will be immediately useful.  Leaving the shrine forces us to enter the cemetery, where a battle immediately begins. Music: Celica Battle Map 1 The battle music changes for the second chapter here, though the combat music remains the same. Our army is small and rather fragile, but all we're facing is seven zombies. As when Alm faced them, the zombies have a lot of HP but fall quickly due to an extremely low quality. Turn 1 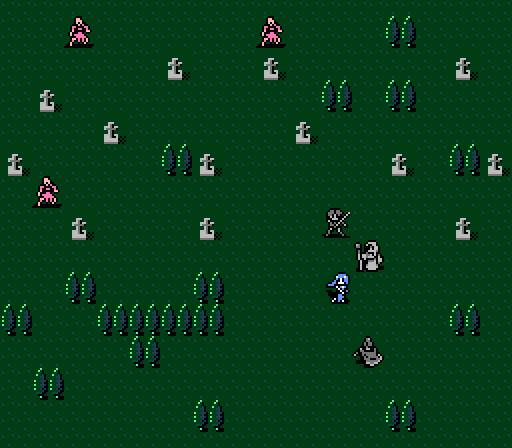 Celica moves out to the front as we wait for the zombies to approach. Music: Battle Map 2, Enemy Phase The enemy phase music changes for the second chapter as well. The zombies shuffle forward but can't reach us quite yet. Turn 2 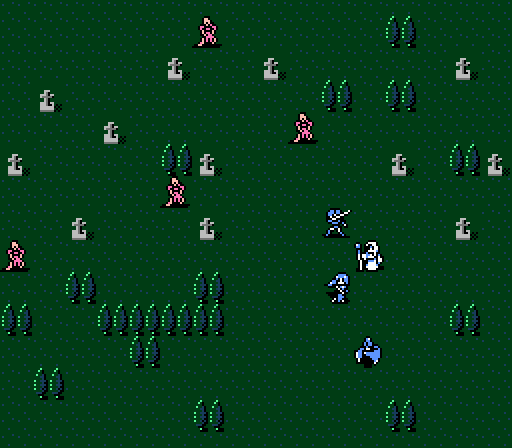 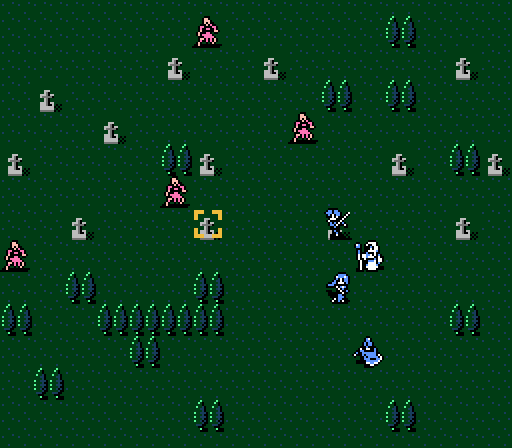 A couple zombies are in range, so Celica moves forward to attack one with a fireball. The gravestones for some reason give a massive 60% bonus to physical evasion, so we'll be making use of them extensively here.  - Chapter 2 Part 1 Battle 1.gif) Celica's battle sprite is unique and more accurately represents her plot-important red hair color. She casually tosses a couple fireballs at the zombie for 2/3 of its HP. 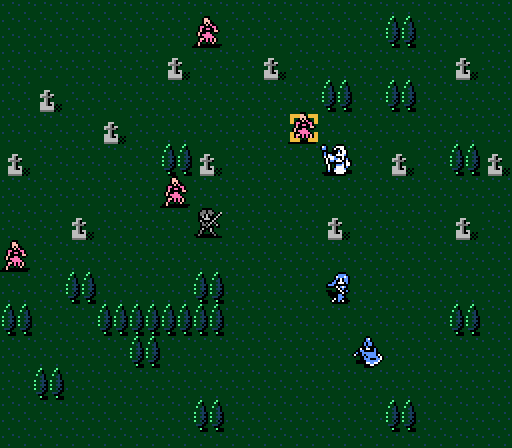 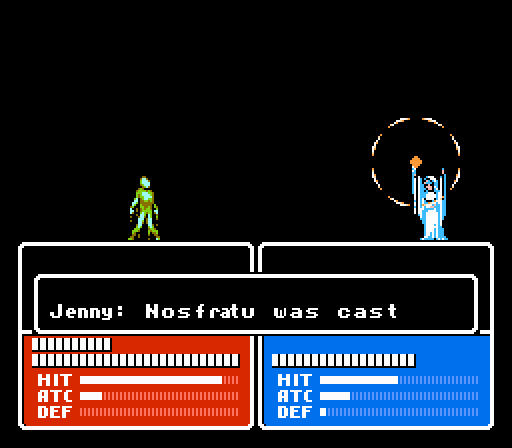 Jenny moves up to try and work over another zombie, but misses both attacks. 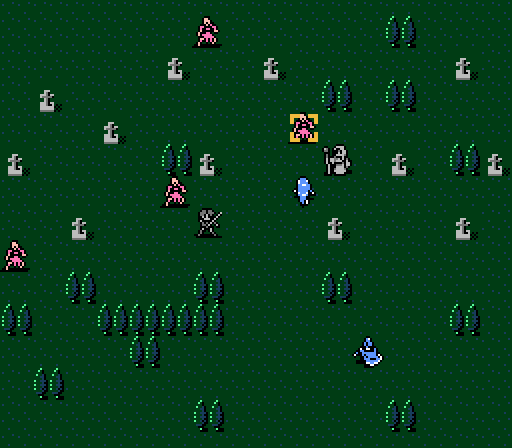 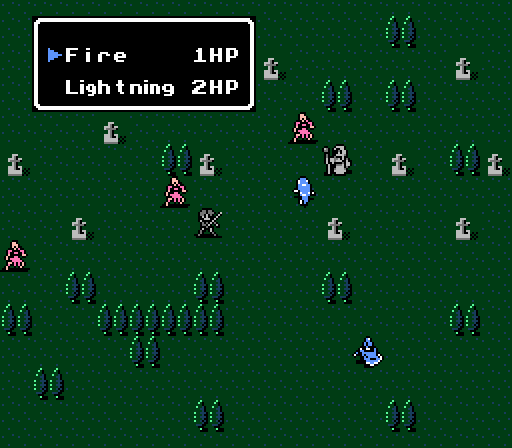 May moves up to support Jenny with some fireballs. Unless the extra range or extra point of damage from Lightning is really necessary, it's best to stick to Fire - it's more accurate, lighter, and has a smaller HP cost.  - Chapter 2 Part 1 Battle 2.gif) May has a unique sprite as well, as a female mage. She's also much more into her fire-throwing, with her skirts flying around and even her long hair getting into the action. (Her battle sprite is actually recycled from Linda, the female mage in Fire Emblem 1.) 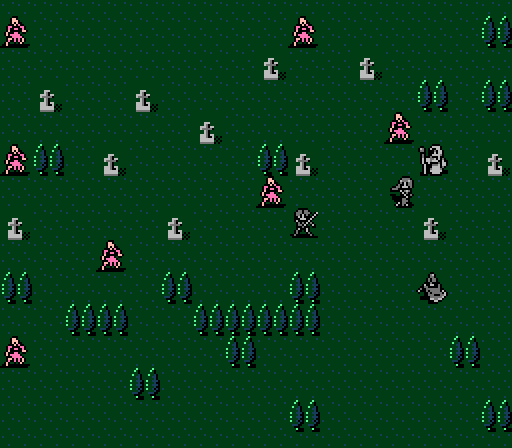 Boey still hangs back to support whoever needs it. The zombies don't have anywhere to retreat to, so they'll continue to be aggressive even when severely damaged. 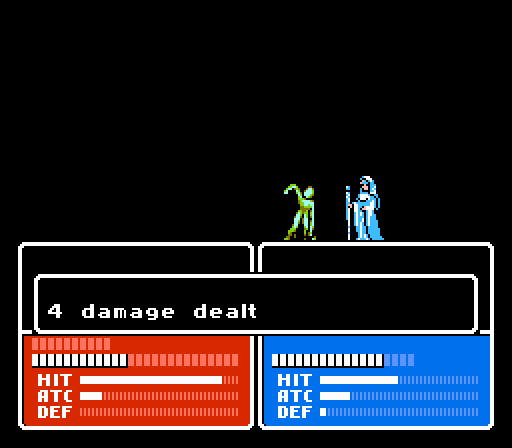 One of the zombies scratches Jenny, who misses both of her attacks again.  - Chapter 2 Part 1 Battle 3.gif) The other attacks Celica, who's forced to counterattack with her sword rather than her magic. One fireball would've killed the zombie, but an unlucky miss with the sword allows the zombie to live another turn. Turn 3 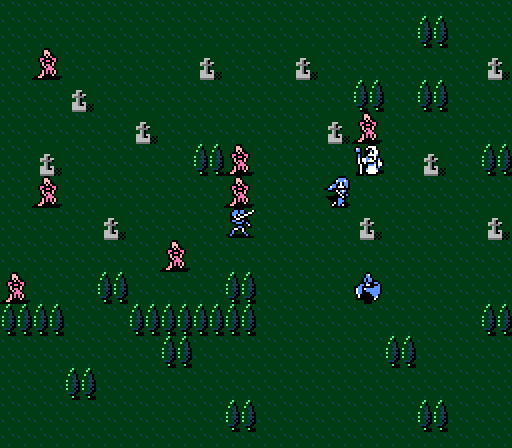 We need to finish off the two damaged zombies now, because a couple more are about to reach us. 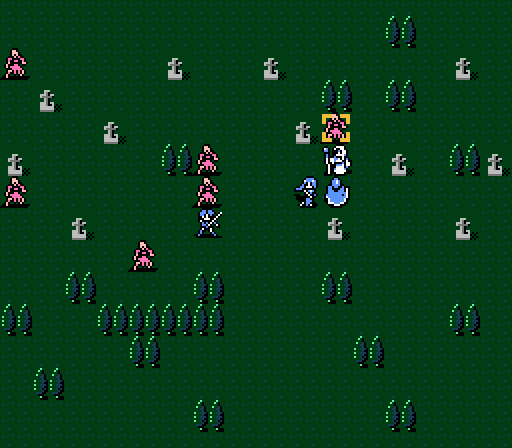 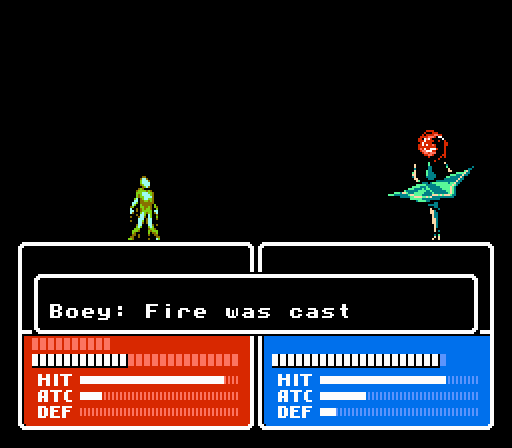 Boey lands his first attack of the game, bringing the zombie down to 1 HP. Unfortunately he's the only one of our units who can't double-attack.  However the zombie's now weak enough that Jenny only needs to land one of her attacks, which she manages to do this time. 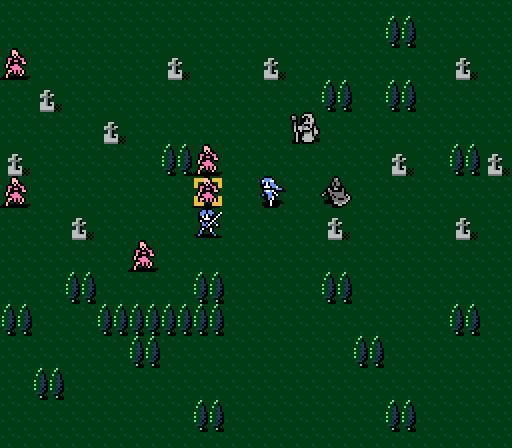 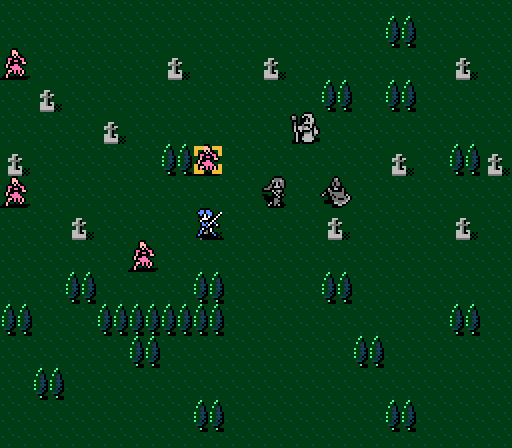 May's now free to finish off Celica's attacker, which gives Celica the opportunity to toss a couple fireballs at one of the incoming zombies from the safety of the grave.  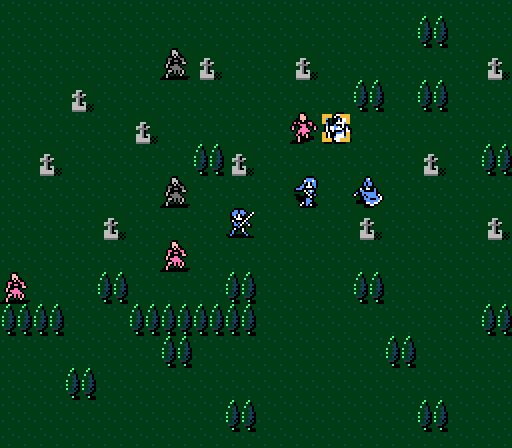 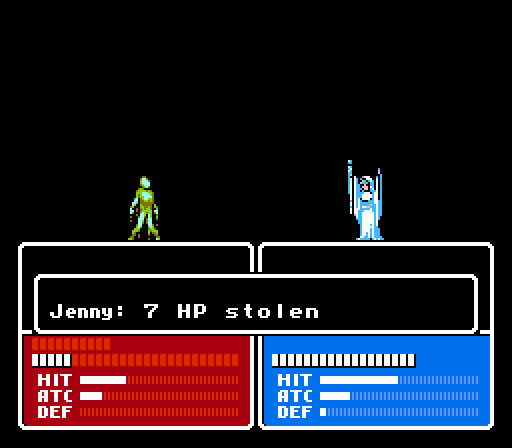 As the back line of zombies approach, Celica's target goes after Jenny for 4 damage, but Jenny immediately takes it back by landing a shot of Nosferatu.  The other zombie goes for Celica, but can't penetrate the defenses of the gravestone. Celica's sword flashes a couple times for a solid 16 damage. Turn 4  Two more zombies will close with Celica this turn, so let's try and finish off the two that attacked last turn.   May moves into the tree instead of the grave so that she can use the more accurate Fire spell, which is more than enough to turn Celica's attacker into ash.  Jenny moves from grave to grave to finish off her own opponent.  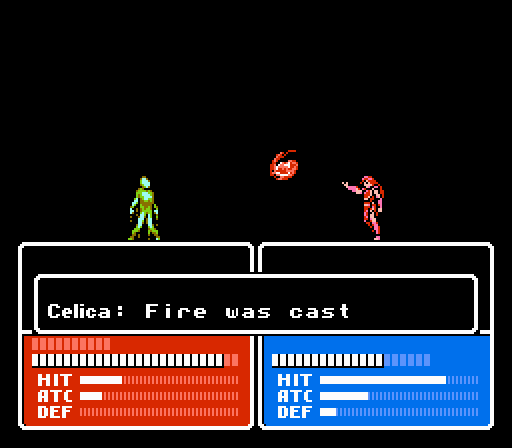 Celica rushes forward to another grave herself for some close-range fireballs. Definitely worth incurring a counterattack here to keep the extra evasion - plus, the zombie missed, anyway, which was kind of the point. 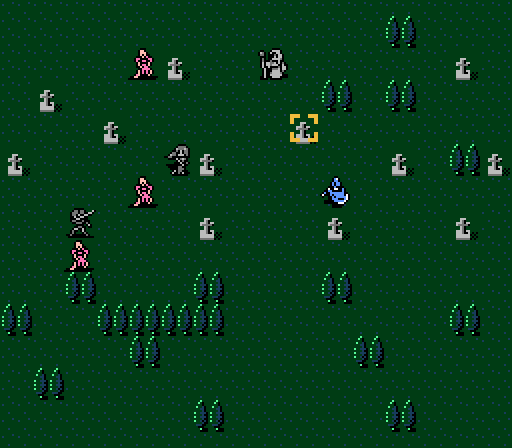 Boey could attack the zombie directly to his left, but instead he parks himself on a grave to support Jenny next turn, if necessary. 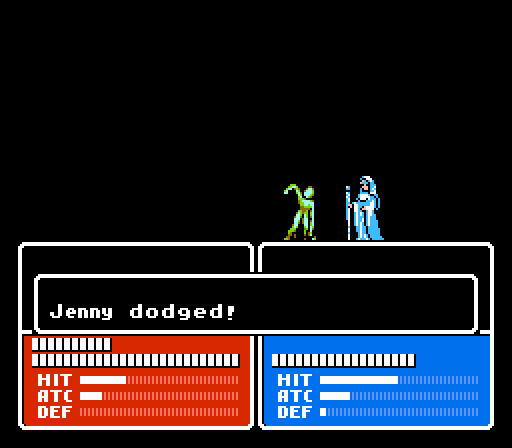 Jenny dodges the northern zombie but misses both of her attacks again. Nosferatu is a fickle spell. 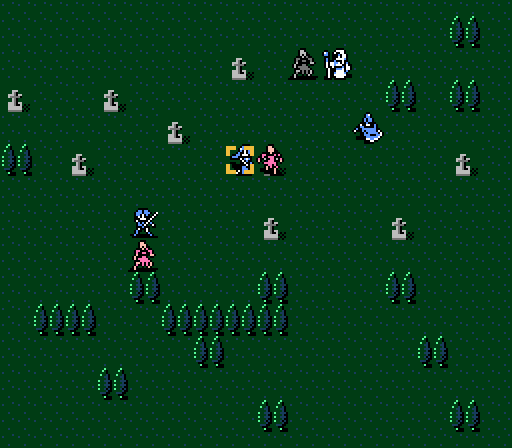 The center zombie misses May, and eats a couple of fireballs in exchange.  The southern zombie also misses, and Celica lands both attacks for the counter-kill. Turn 5  Should be a quick wrap-up from here.  Celica is the only one not able to reach the northern zombie, so she finishes off the central one instead.  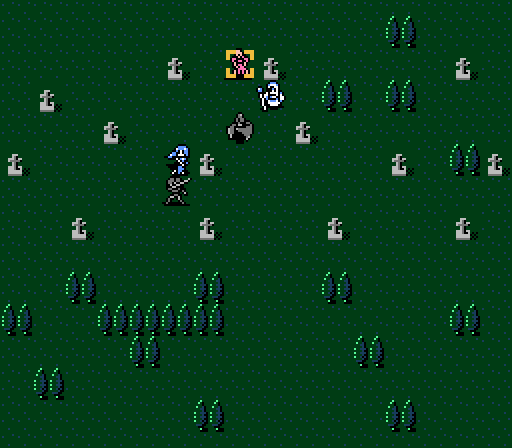 Boey and Jenny only combine for 18 damage, half of the zombie's HP. 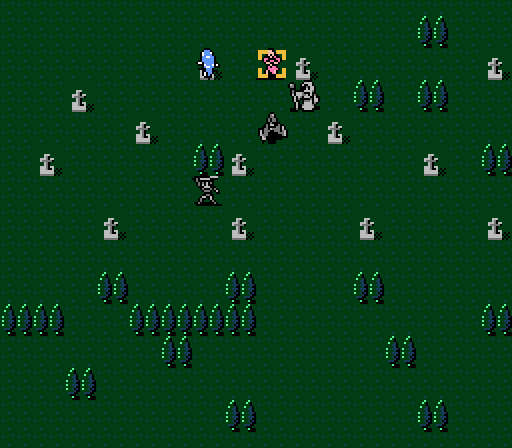  That's still more than enough damage to allow May to get the kill and end the battle. 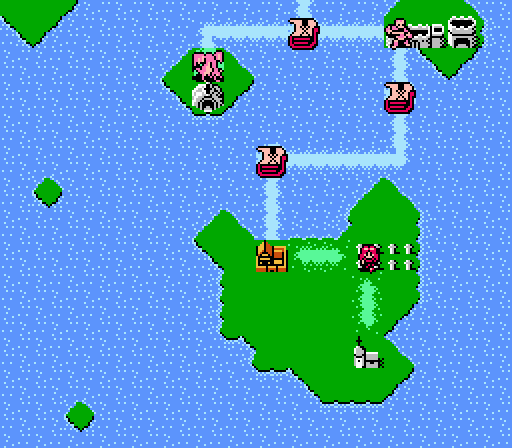 With the battle over, we're returned to the world map with our first chance to look around.... Music: World Map 2  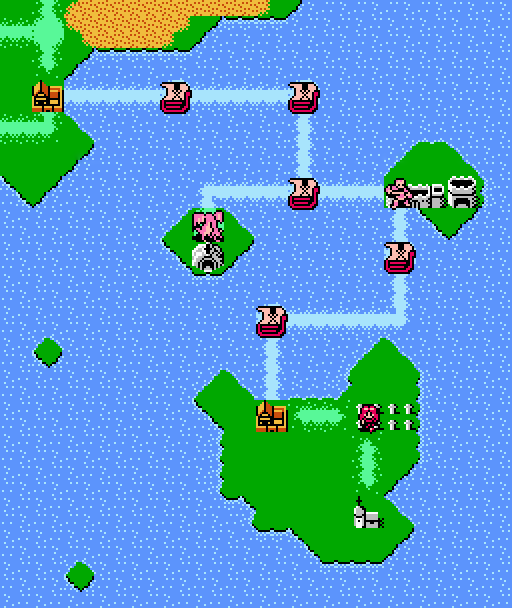 Celica's journey in the second chapter has the same eventual goal as Alm's in the first - Sofia Castle. In her way are some thieves guarding a fort, a bunch of naval battles, and some kind of monster guarding a shrine. The eastern half of the map here is actually visible during the first chapter, but none of the paths or enemies are present and none of the locations could've been examined back then, so why bother? Next time: 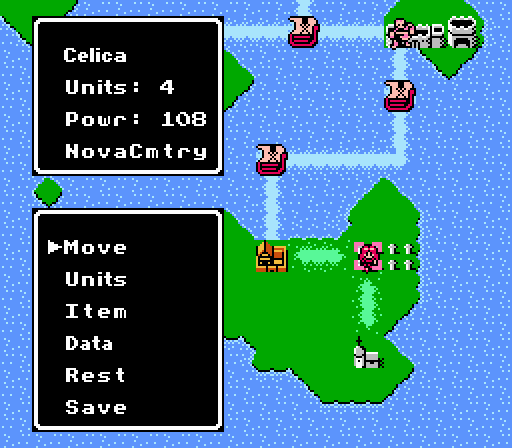 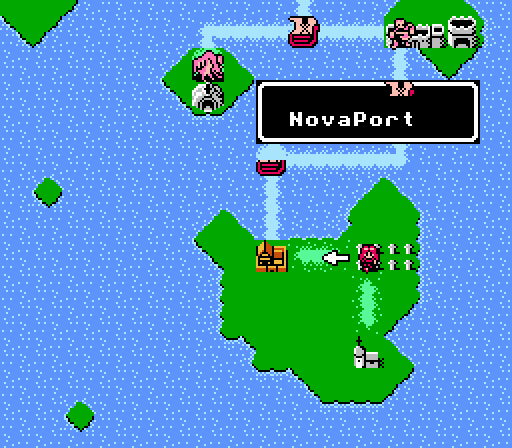 It's time to secure ourselves a boat at the Nova Port. And for some reason the sail from the first enemy ship is flying around the text box instead.
|
|
#
?
May 4, 2013 20:31
|
|
|
DKII posted:The gravestones for some reason give a massive 60% bonus to physical evasion, so we'll be making use of them extensively here. Well, have you ever tried to attack an enemy standing on top of a gravestone? Maybe it's a really big gravestone and the zombies just can't reach? Also, why was Celica forced to use her sword to counterattack? Can she just not counterattack with magic?
|
|
#
?
May 5, 2013 23:05
|
|
|
Silver Falcon posted:Also, why was Celica forced to use her sword to counterattack? Can she just not counterattack with magic? I think that using your own HP to counterattack would be somewhat counterproductive.
|
|
#
?
May 6, 2013 00:08
|
|

|
Yes I think it's to avoid the case of trying to counterattack after having been left at 1 HP? Though really the regular mages have that problem as well. I bet if there were some kind of hard mode that required that level of exploitation, forcing enemy mages to deplete their own HP by counterattacking would play into a strategy somewhere, though. Quick non-combat update shortly.
|
|
#
?
May 6, 2013 04:53
|
|
|
Chapter 2, Part 2: Nova Port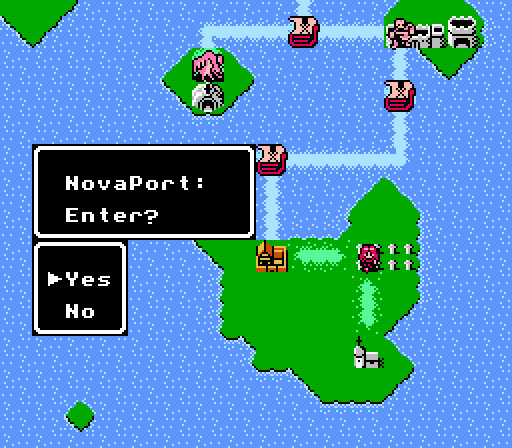 Today we're in for a quick jaunt through Nova Port. Music: Encounter 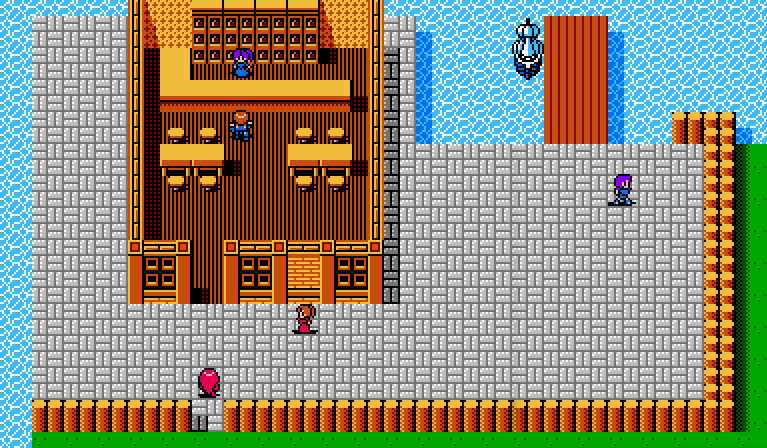 The port consists of just a bar and a single pier, which currently holds an empty ship for us to take. Entering it immediately 'ships' us off to the next battle.  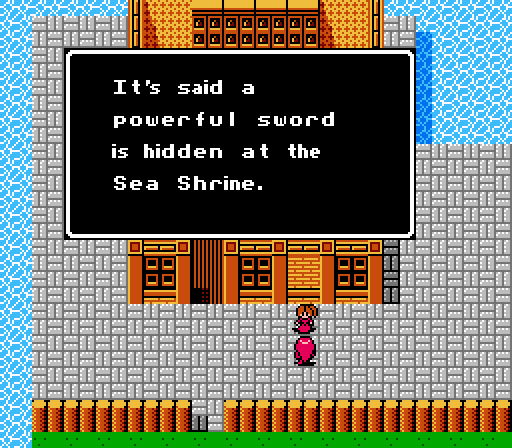 First though we have some people to chat with. We'll reach the Sea Shrine soon enough - it's the shrine on the world map guarded by a monster of some kind. 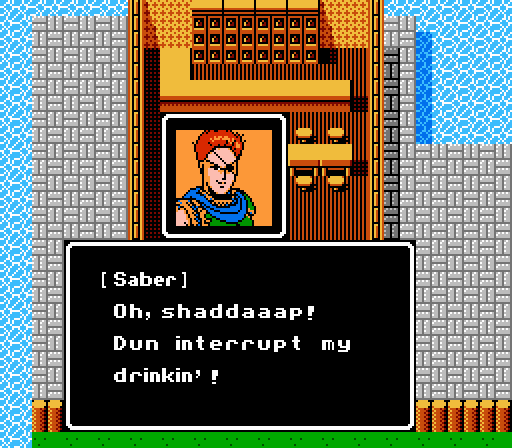 The man at the bar has a bit more personality. 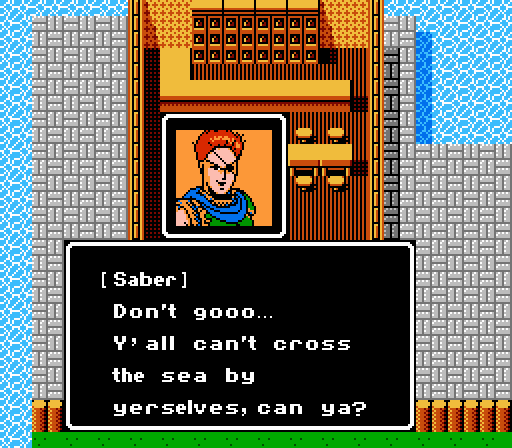 Actually, we can, there's a boat sitting at the dock waiting for us to steal. 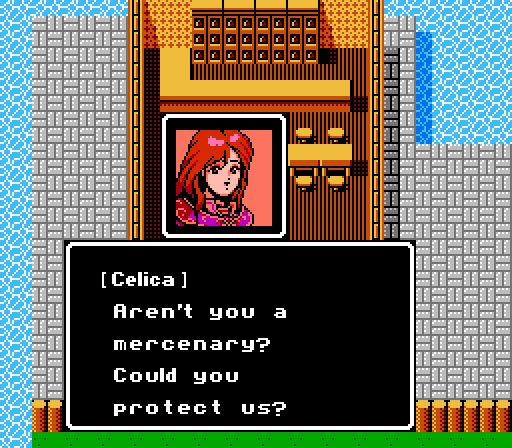 Celica realizes that sailing off into contested waters with four mages might not be the best idea.  What? You wanna hire me? Hmm.... Alright, it might be interestin'. What? You wanna hire me? Hmm.... Alright, it might be interestin'.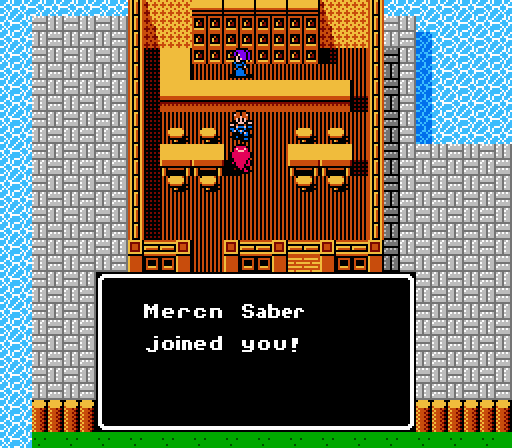 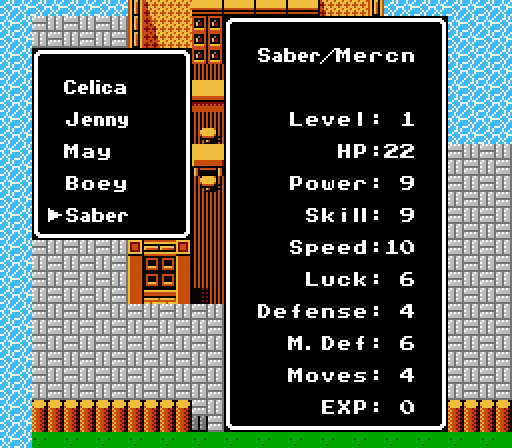 Not exactly a meat-shield - he has the same Defense as Celica, but a bit more HP - but he'll be a welcome addition.  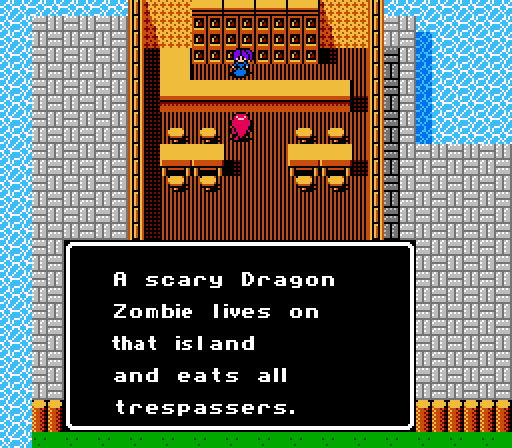 The bartender is always a good source for gossip. She has some information on the monster guarding the Sea Shrine - do Dragon Zombies sound familiar to any Fire Emblem 8 veterans? 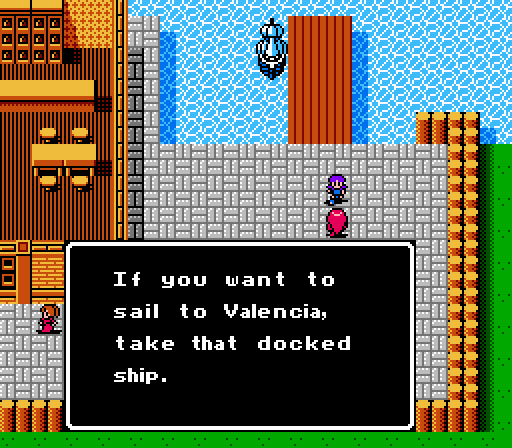 However, lots of pirates trawl the waters. Their boss, Dahha, has killed many people. Earlier, some men left to avenge their families. They probably won't return alive. The last person here invites us to steal the ship, then gives us a straightforward info-dump on what we'll be facing in the next few battles. 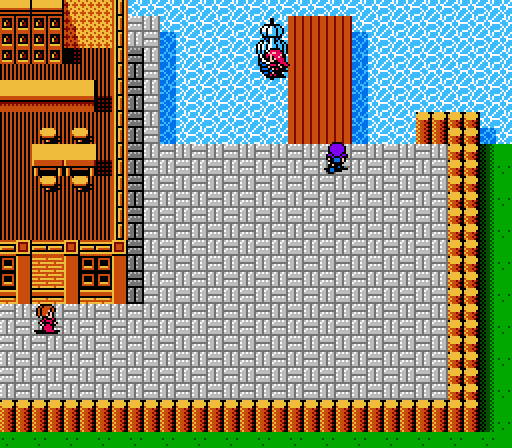 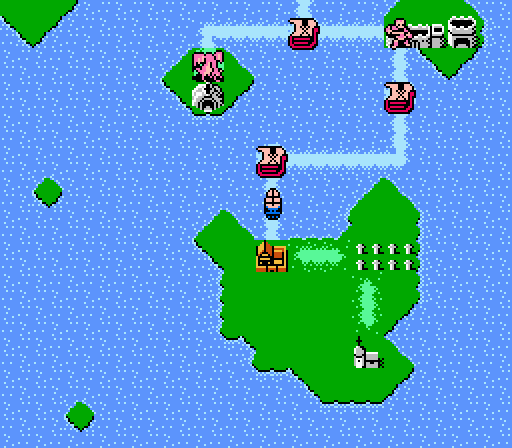 There's nothing else here, so Celica enters the ship and sails away towards her second battle. Current Roster  New Characters Sabr is the first purely physical unit to join Celica, and while he starts off with pretty good stats, his growths are more in line with a damage-soaker.pre:Stat Base L1 Growth HP 22 50 Power 9 20 Skill 9 15 Speed 10 15 Luck 6 10 Defense 4 40 M. Def 6 0 Moves 4 0 Quality 38 100 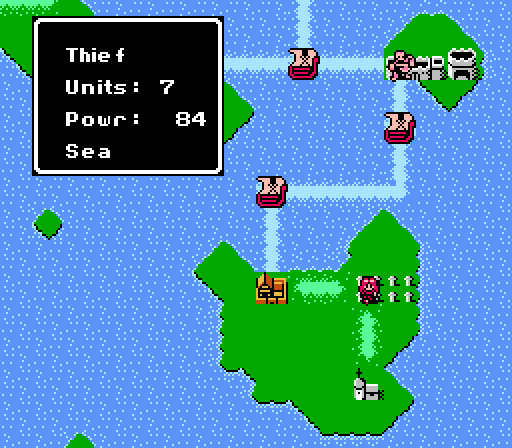 Celica battles some pirates (thieves) on the open seas. DKII fucked around with this message at 19:39 on Jun 9, 2013 |
|
#
?
May 6, 2013 05:10
|
|
|
Ugh. Yes. I remember Dracozombies. I remember them well.  gently caress those things and killing Artur on the final goddamn floor of the Ruins!
|
|
#
?
May 6, 2013 14:18
|
|
|
Only one melee fighter? Man, that'd be a death sentence in later Fire Emblems. This one seems more forgiving.
|
|
#
?
May 17, 2013 06:20
|
|


|
Is this LP still alive, by the way? I've been enjoying it so far, and I can't wait to see you get to the Dracozombie. That was a hilarious fight in the previous LP.Silver Falcon posted:My god, those growths! And on the "main" character!? Oy. Older Fire Emblems had low growths in general; that's where the idea of getting "RNG-screwed" really comes from, because it's very possible to get completely empty, meaningless levels. The really high growths (and accompanying high stats) are a recent phenomenon. The good news is that the game is balanced around those low growths, so unless DKII gets properly screwed, he'll be fine.
|
|
#
?
May 25, 2013 20:55
|
|

|
Thanks to how promotions work in this game, it isn't really possible to get screwed. There's also another nice way to really buff up the few +1s you'll be getting.
|
|
#
?
May 26, 2013 05:44
|
|
|
SpaceDrake posted:Is this LP still alive, by the way? I've been enjoying it so far, and I can't wait to see you get to the Dracozombie. That was a hilarious fight in the previous LP. Yea I went on vacation for a week and have been caught up playing Awakening. Need to grind myself through these next couple boring battles. Fortunately despite low growths, getting RNG-screwed is pretty unlikely overall due to a couple of to-be-revealed features.
|
|
#
?
May 28, 2013 02:01
|
|
|
Chapter 2, Part 3: Sea Last time, Celica picked up a new ally in Nova Port and then "borrowed" a ship because hanging out on the starting island would be boring. Now we're sailing off towards our first encounter with the local pirates, which are really just thieves on a boat. 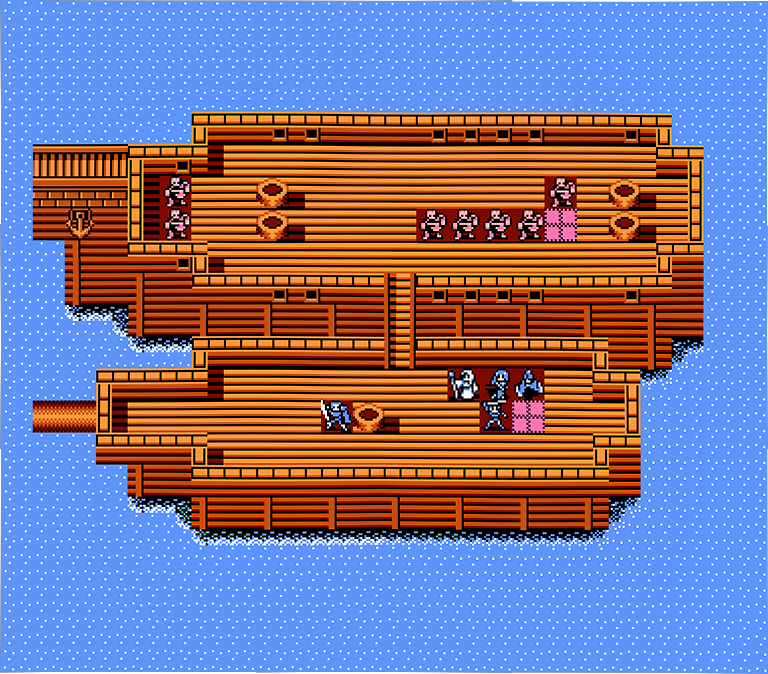 A simple battle with seven thieves, pretty similar to Alm's second battle in the Thief Shrine. All of the thieves are still just level 1, but we aren't stuck with any villagers on our side and have a tailor-made chokepoint in that bridge, so this battle is really even easier. Turns 1-2 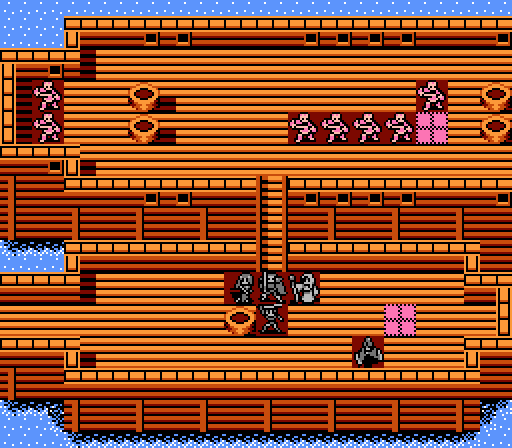 Saber sets up at the end of the bridge with magic support, and waits until the end of the second turn for the thieves to arrive. Boey is exiled to the corner. 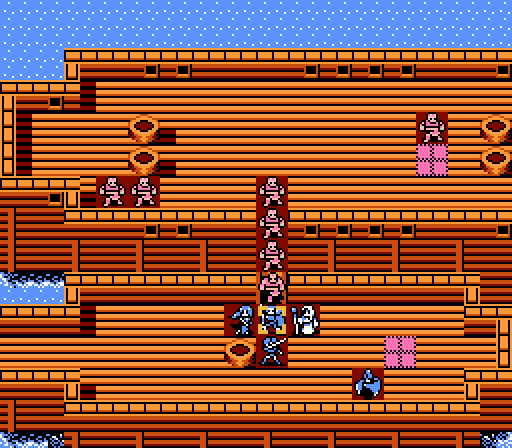  The first of the thieves finally reaches Saber, connecting for 3 damage but taking a double-counterattack for 14 damage in return. Turns 3-5 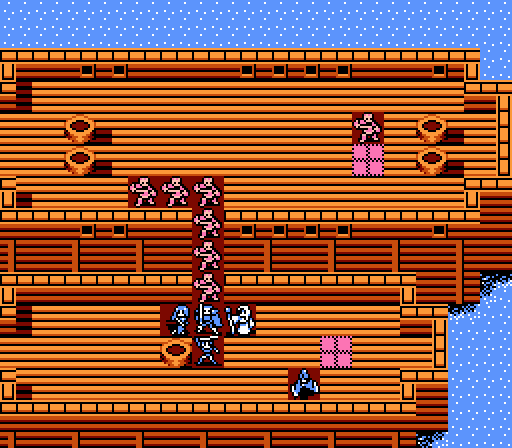 The next three turns consist of Saber killing off the thief in front of him, Jenny topping off Saber's HP, and then another thief moving up in line to take a chip shot at Saber. Turn 6 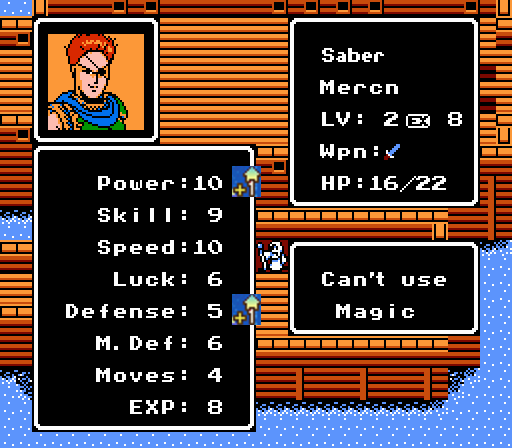 Saber picks up this pretty great level after killing the fourth thief. 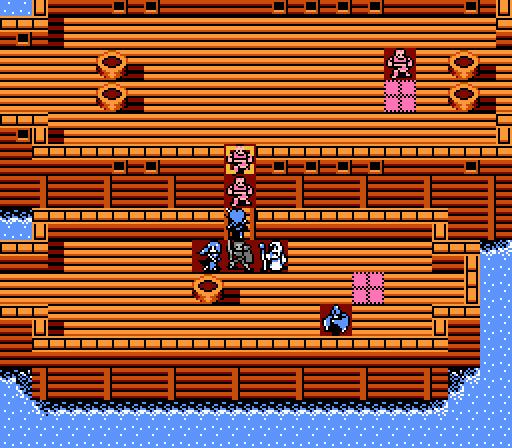 With Saber having gained a level, Celica takes a turn on the front line, roasting the back-line thief for 24 damage and forcing it into retreat mode. 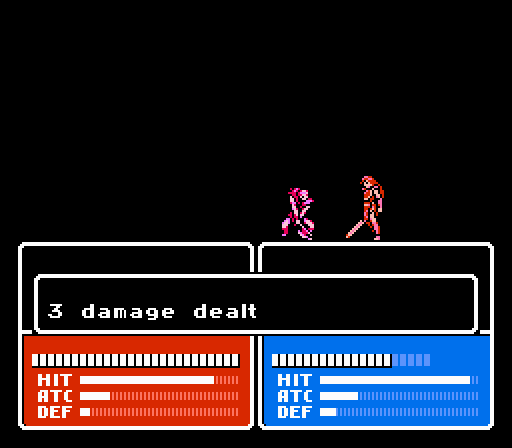 The remaining thief up front attacks Celica for 3 damage, taking 14 in return. Turn 7 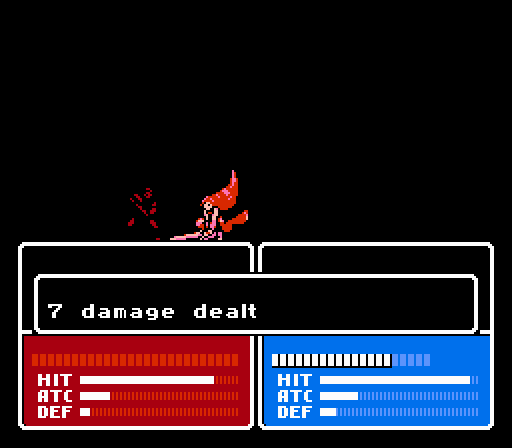 Celica starts off by removing the last thief on the bridge. 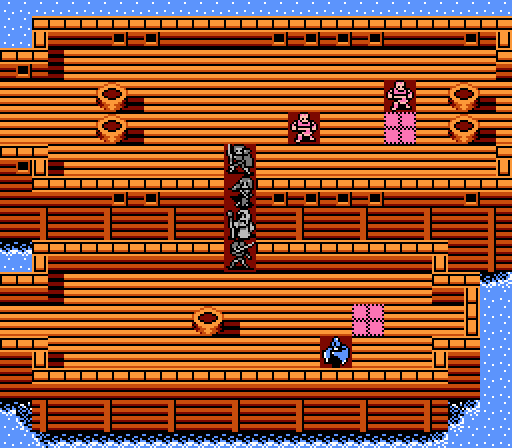 Time to chase down the injured thief, then draw out the final thief who has parked himself on the healing tile for the entire battle. Turn 8 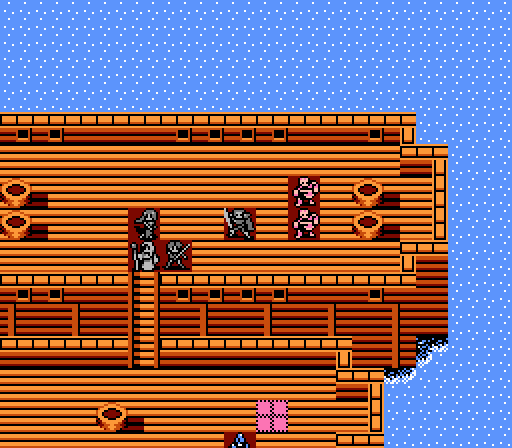 The top thief is at full health and on the enemy phase goes after Saber, the only unit of ours that it can reach. The other thief is desperately trying to heal up, as if that would help him. Turn 9 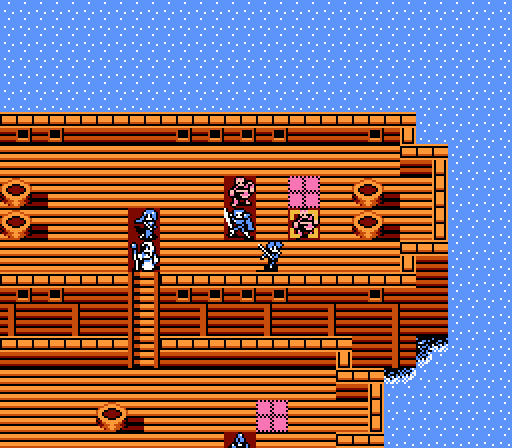 Celica starts off with a fireball to finish off the injured thief. Actually she missed the first attack, but landed the second. Music: Celica Battle Map 2 (Near Victory) This track probably played in the graveyard battle, too, but I missed it then so here it is now. It plays at some point in the battle where the game decides you're about to win. 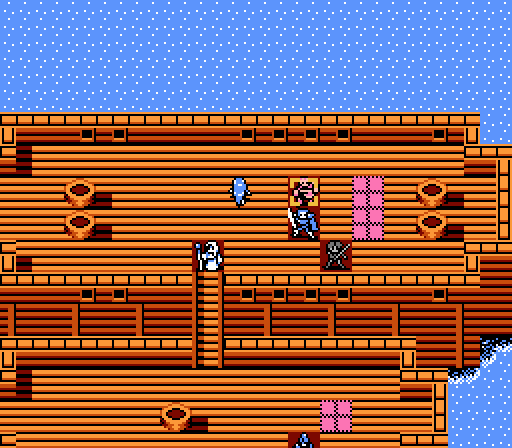 May finally gets some action and takes out the last thief to win the battle. Current Roster  Next time:   More pirate-thieves on the open sea. DKII fucked around with this message at 07:22 on Aug 15, 2013 |
|
#
?
Jun 10, 2013 02:40
|
|
|
Chapter 2, Part 4: Sea II Ready to sail on and clean out another pirate ship.  - Chapter 2 Part 4 Battle 0.gif) Sailing through the sea, to fight another enemy....  In a nice touch, our ship has the same 'map' as the last battle. The pirates have a larger ship this time around, with another seven level 1 thieves, a level 3 thief with a bit more power/speed/defense, a level 1 archer, and a level 1 mercenary.  In another parallel to Alm's chapter, the mercenary comes with a Leather Shield (+3 Defense). Unlike Alm's encounter, the mercenary here starts off right next to us and will get to us at the same time as the other enemies. Turn 1  Celica blocks off the first bridge, while Saber and May prepare to meet the charge to the west. 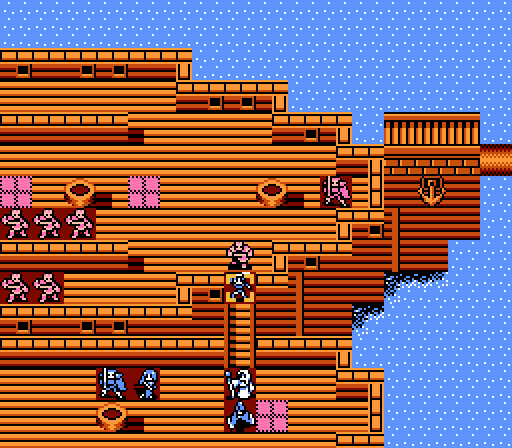 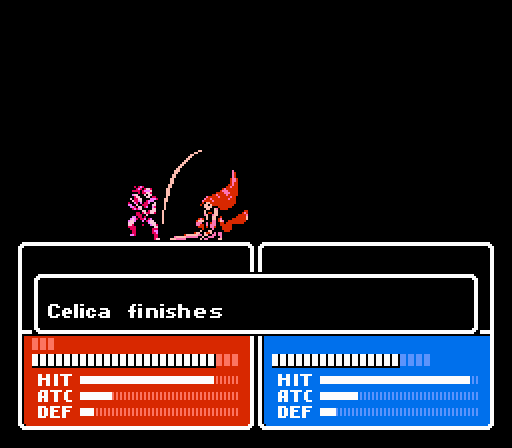 She takes 4 damage from the level 3 thief, and returns two attacks for 12 damage herself. 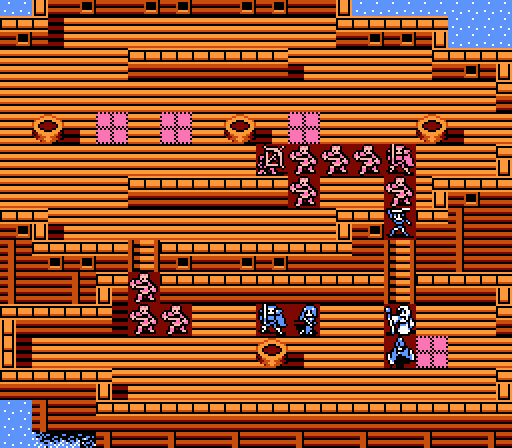 Most of the enemies go for Celica. Really I probably should have put Saber here instead since he got the extra Defense last battle. Turn 2 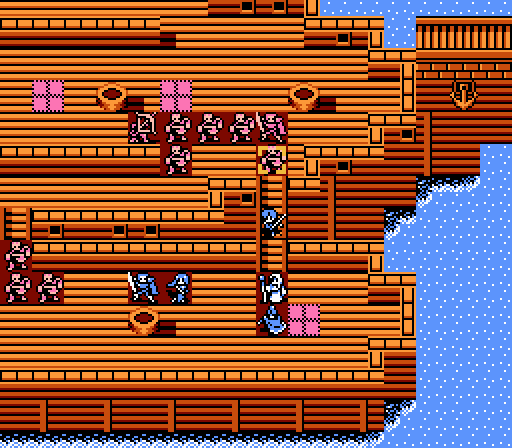 Celica backs off a space to finish off the thief. 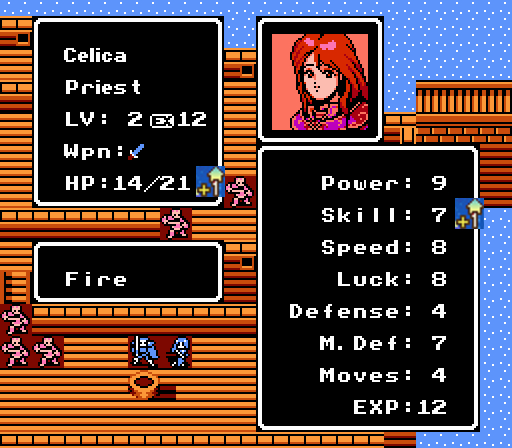 She gets a rather terrible level out of it. 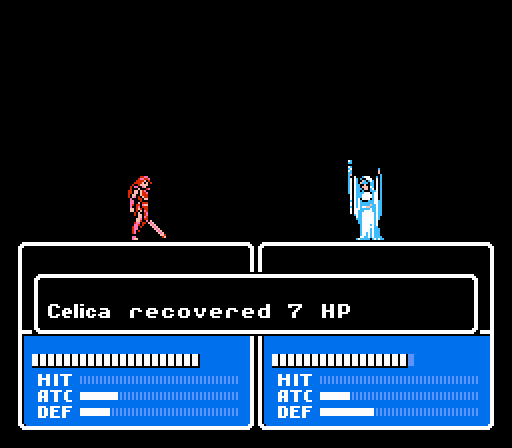 Jenny patches up Celica to face the mercenary. 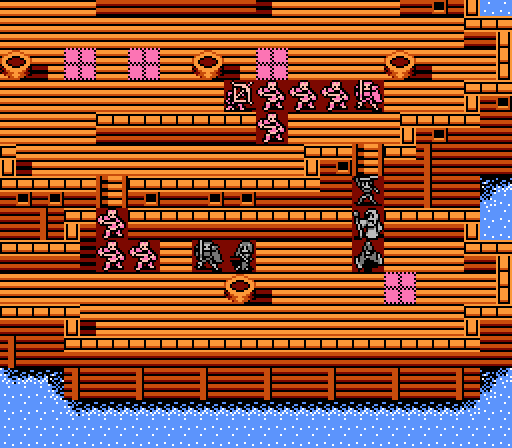 Saber moves up a space to draw in more of the thieves, since we'll want to finish them off quickly and help out Celica. 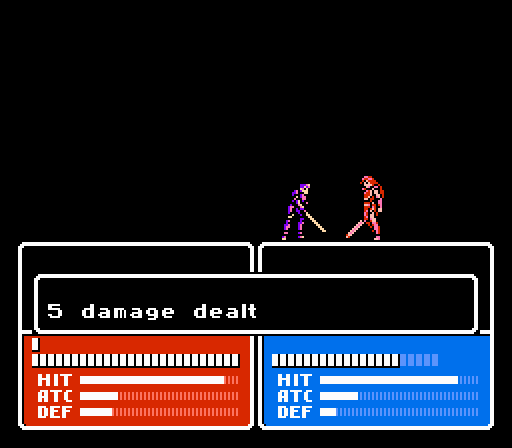 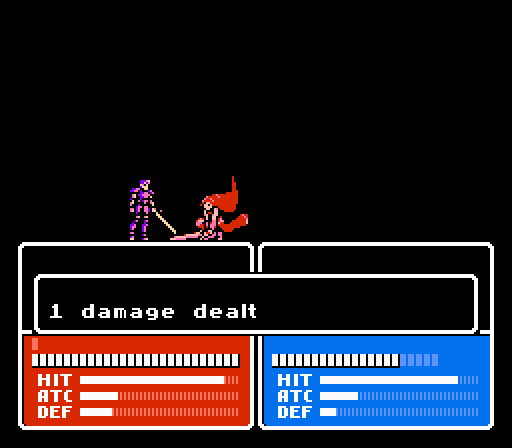 Celica's not really a match for the mercenary. She takes two attacks for 10 damage, and only manages 1 damage herself. 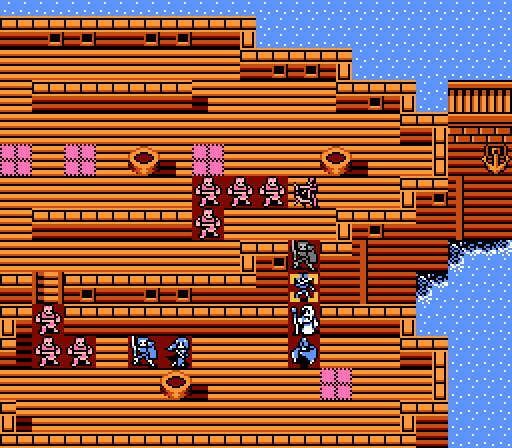 The archer also gets in range, but thankfully misses Celica. 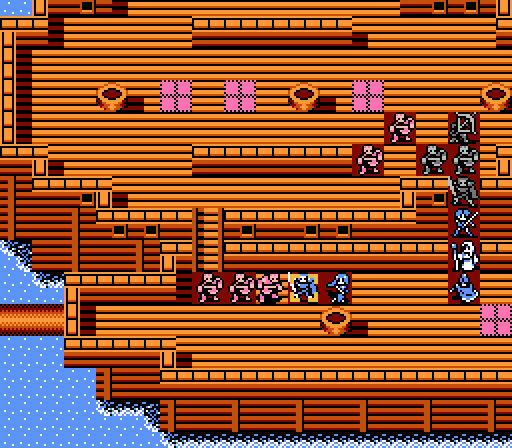 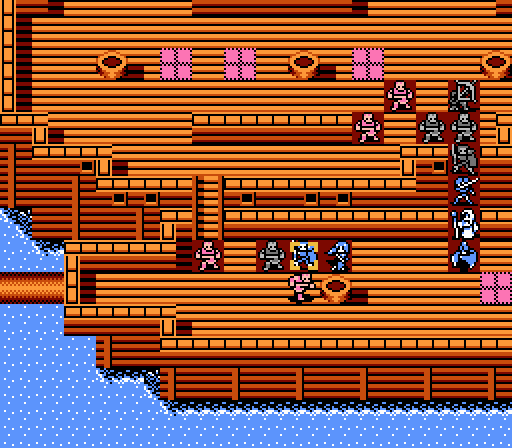 Two thieves scratch up Saber without much effect. 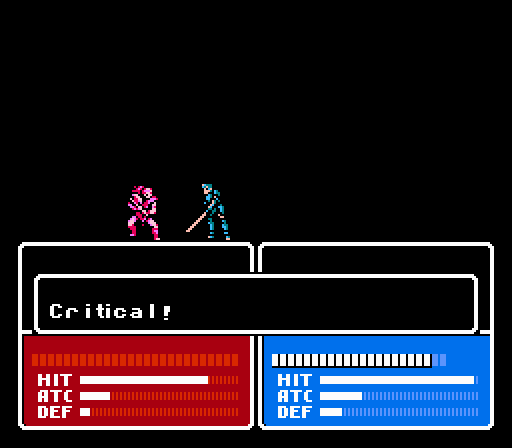 Saber gets a nice critical to immediately kill off the second thief. Of course that just allows the third one in as well, but no trouble there. Turn 3 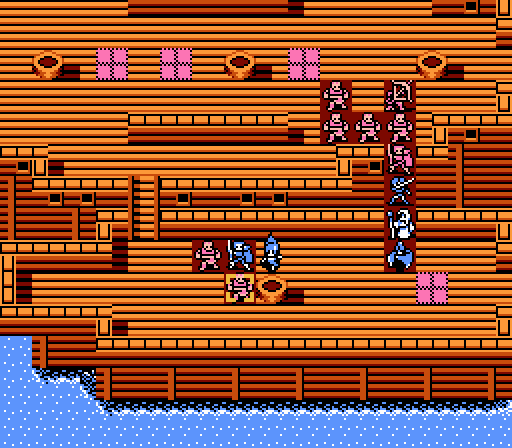 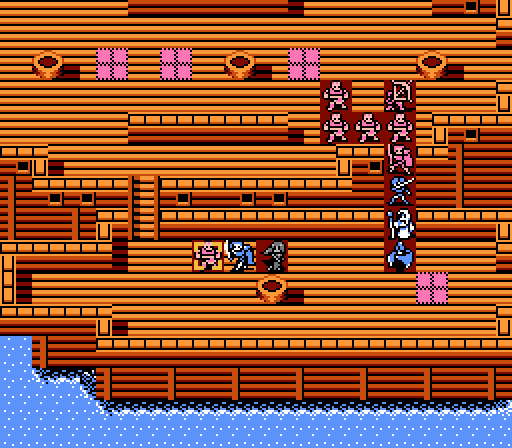 May and Saber start off by clearing out the two remaining thieves on our ship. 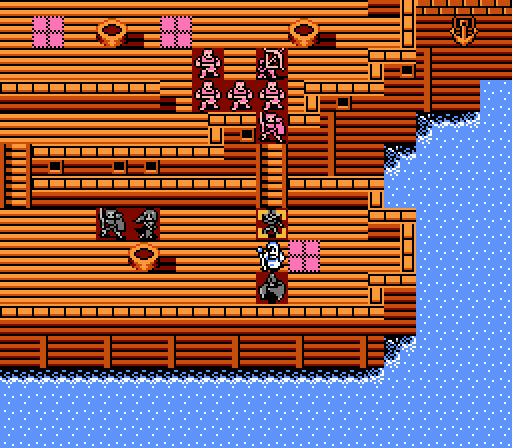 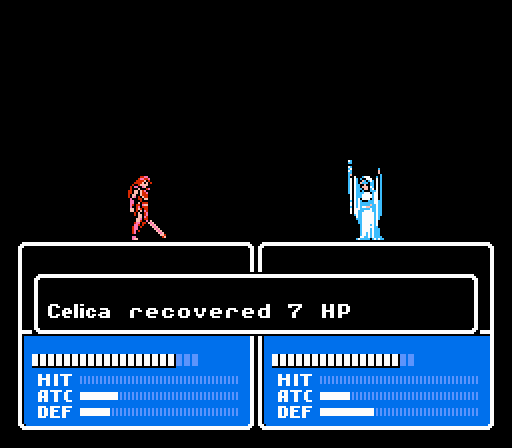 Celica can't survive another attack from both the mercenary and the archer, so everyone retreats so that Jenny can heal her up some more. Unfortunately Jenny can't actually heal up all of the damage. 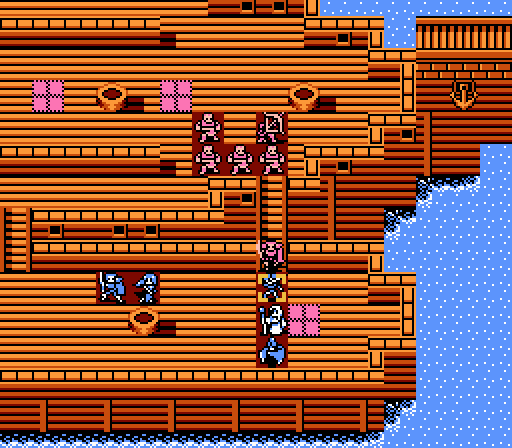 The mercenary deals out another 10 damage to Celica in exchange for another scratch. 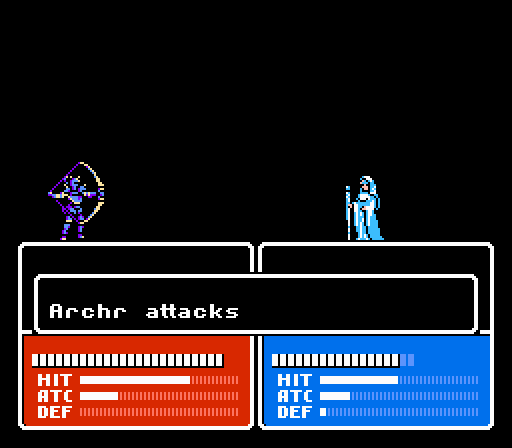 The archer moves forward and can now reach Jenny for 8 damage. Turn 4 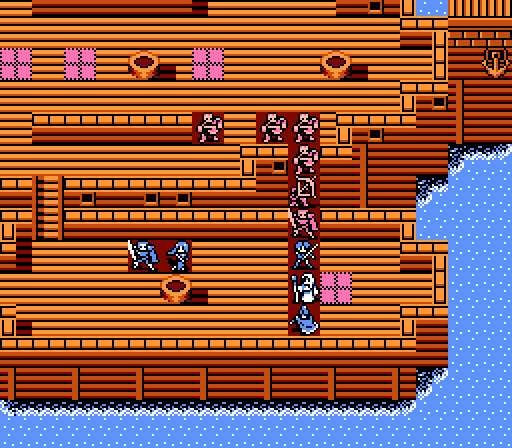 Okay, now I'm in a bit of a bind. Celica's down to just 8 HP and can't survive another encounter with the mercenary. Jenny's got less than 8 HP left and can't take another shot from the archer. And because I was so clever about moving Saber forward another space a couple turns ago, he's now too far away to take Celica's place. 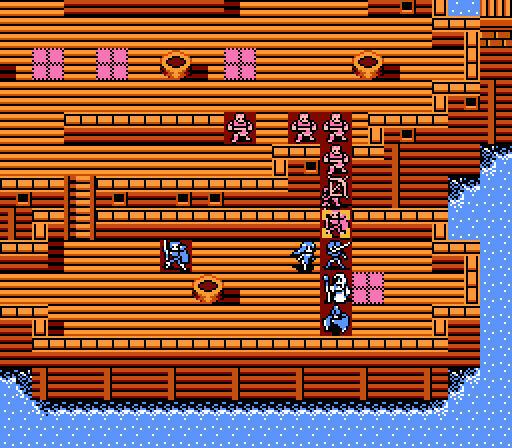 May gets in an 11 damage fireball, but the mercenary still has 16 HP remaining.  She gets a good enough level for it, though. 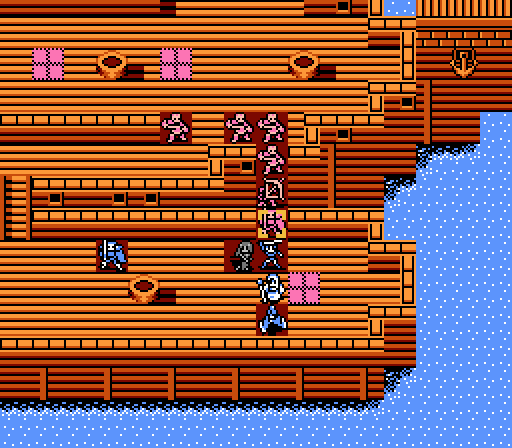 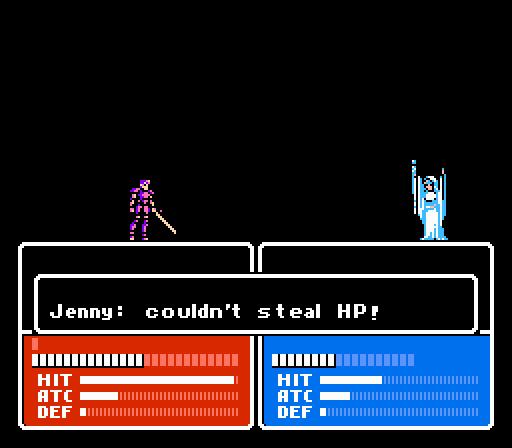 We need three of four magic attacks to land in order to kill off the mercenary. But Jenny misses here.  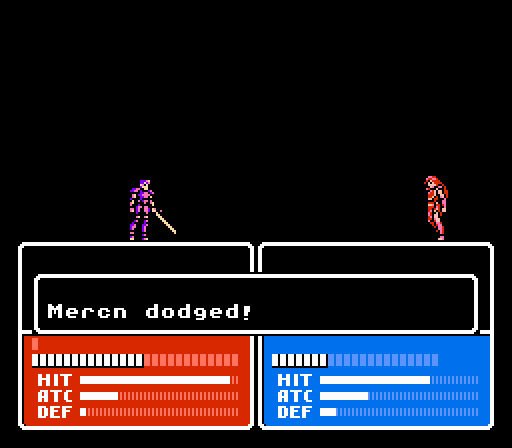 And another miss from Celica. 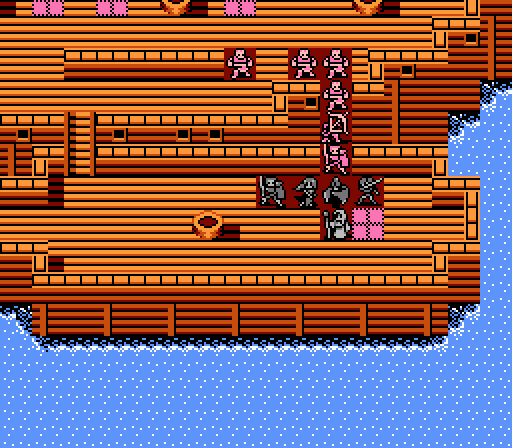 Boey stands in the way to keep the mercenary from immediately killing Jenny or Celica. 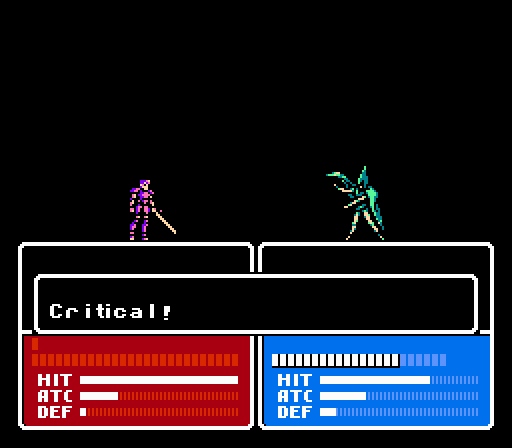 The strategy pays off as Boey gets an unlikely critical to kill off the mercenary.  Unfortunately, since Jenny didn't land Nosferatu, she's still in range of the archer and can't survive another hit. 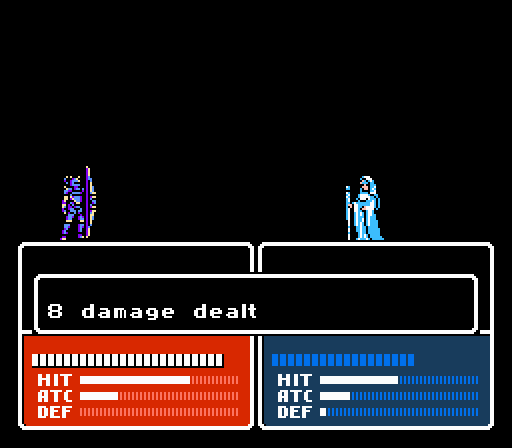 Whoops. Music: Ally Falls 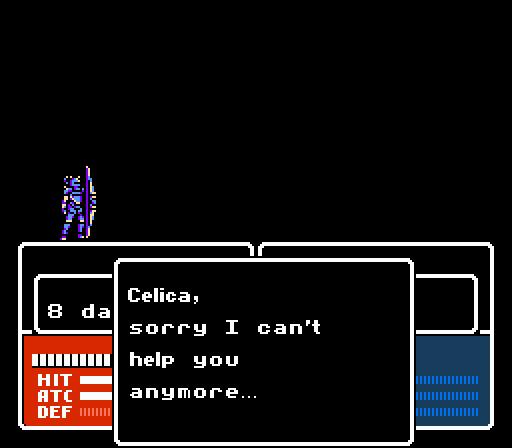 Well, scratch that then. 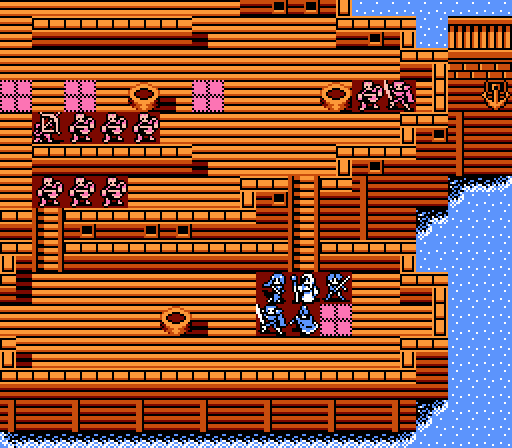 Let's try this again.... Turn 1 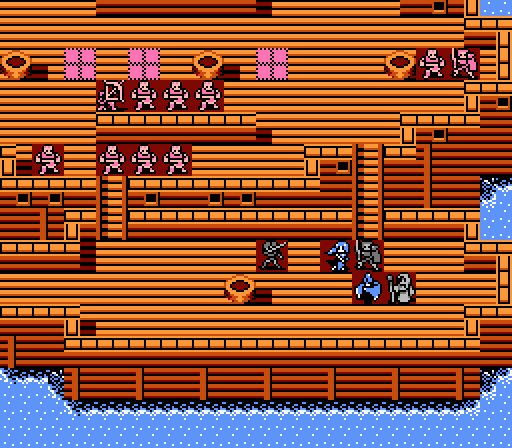 This time Saber blocks off the eastern path, but does so while staying safely on our ship. Celica then moves over to block the western side. 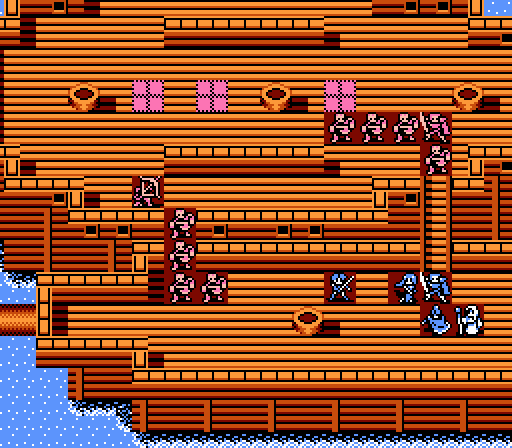 More of the enemies, including the archer, head down the western bridge this time. Turn 2 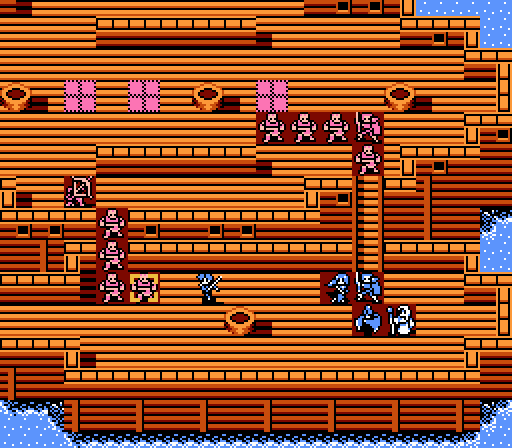 Celica moves forward to get the opening shot in on the lead thief.  Fireball hit rate: 1/2 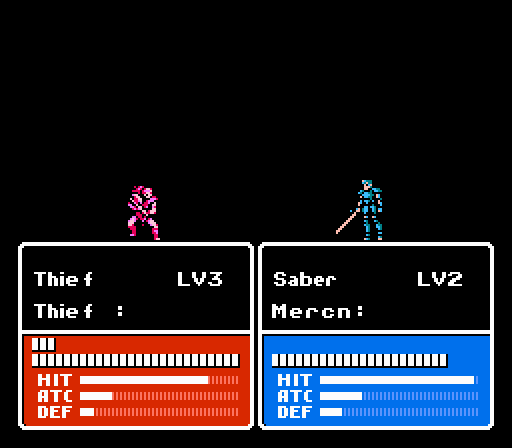 The level 3 thief closes first with Saber, trading 3 damage for 14.  The archer gets in a shot on Celica for 5 damage. 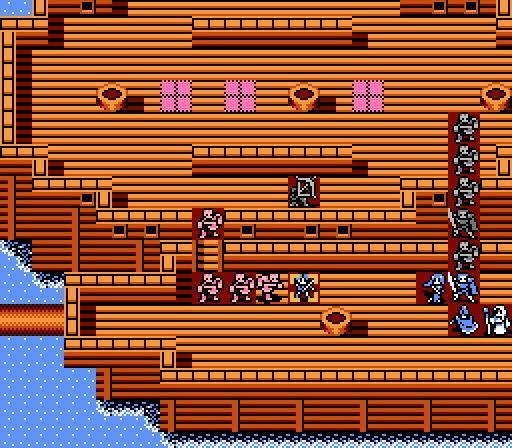 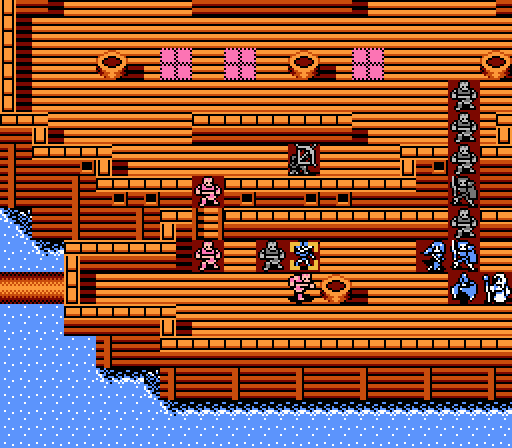 Two thieves get in a total of 6 damage on Celica, each eating a pair of counterattacks.  Somehow Celica gets an even worse level this time around from that action. 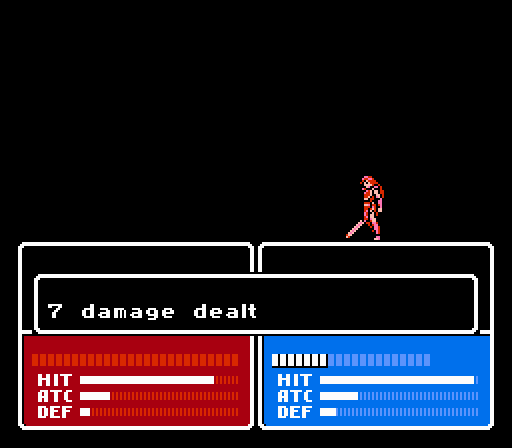 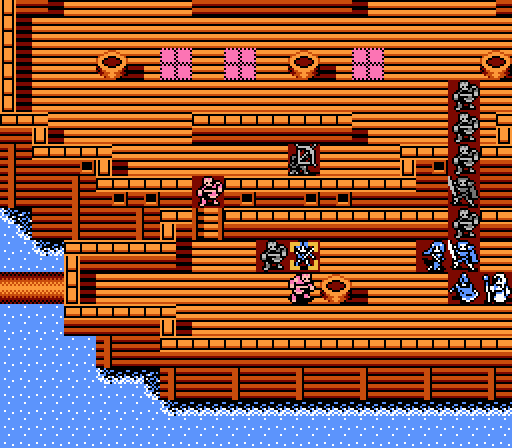 One of the thieves was the one Celica weakened earlier this turn. So she is able to kill it and free up the space for a third thief to attack. Turn 3 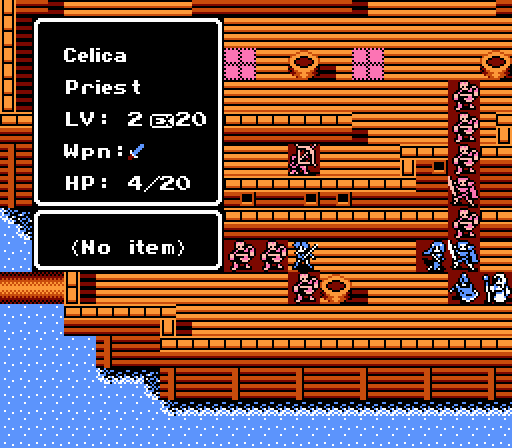 Celica's down to 4 HP, so I need to get her out of there and healed up by Jenny. 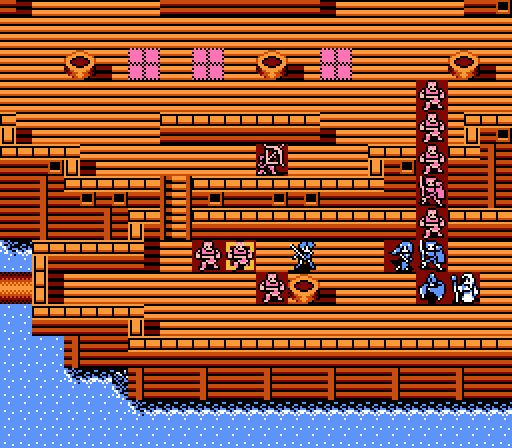 For some reason I instead have Celica back off only one space and try to attack one of the thieves with Fire instead.  Celica gets a critical but now has just 3 HP remaining. One attack from a thief or from the archer will do her in at this point. 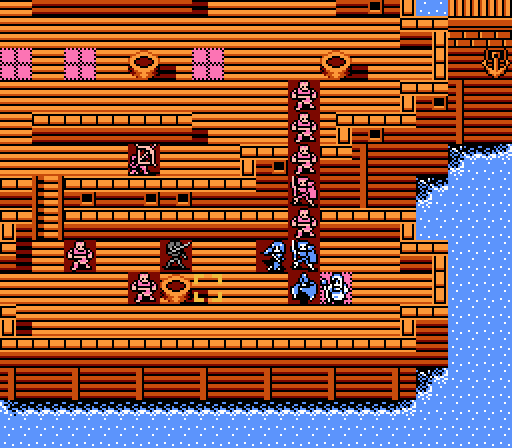 Oh, and Jenny can't actually reach Celica to heal her. Fantastic. 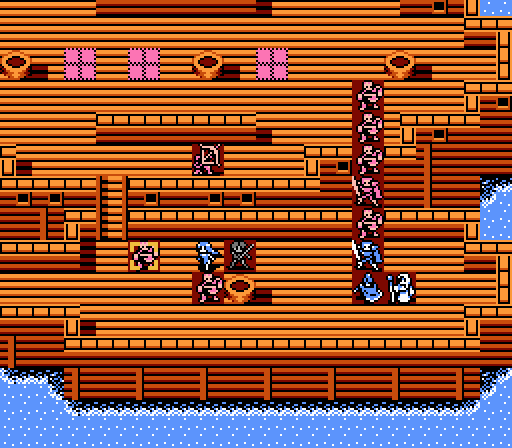 Well, at least May can take care of the thieves. She moves in front to shield Celica, targeting the far thief.  Fireball hit rate: 3/5 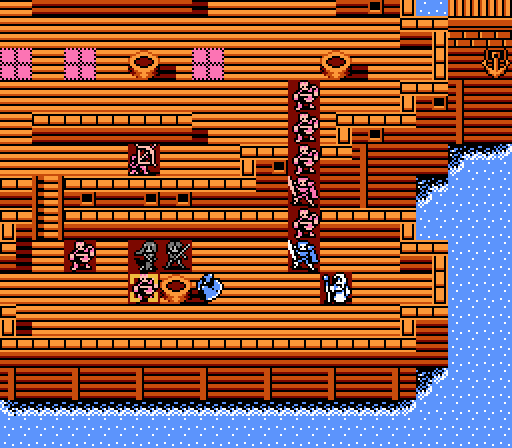 Boey sees his first action, trying to rough up the other thief. 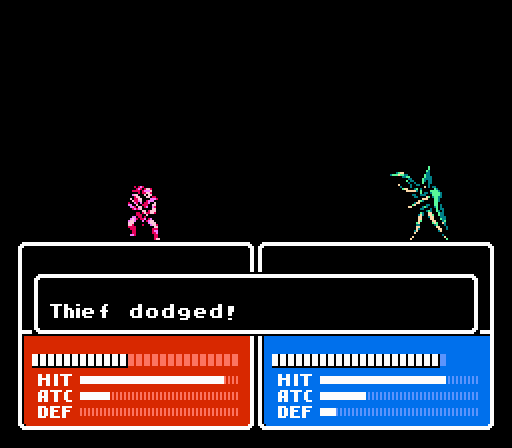 Trying, not really succeeding. Also Boey can't even double-attack a level 1 thief. (Fireball hit rate: 3/6) 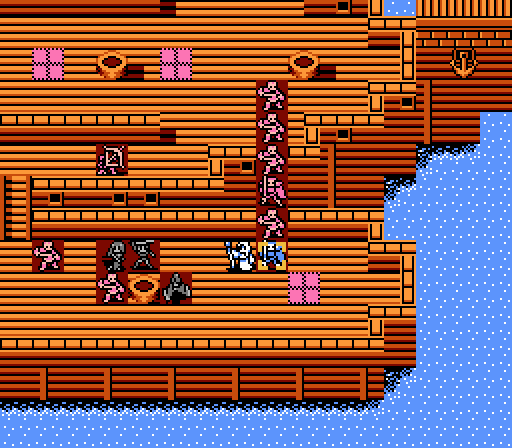 The archer can't reach Jenny from here, so she patches up Saber. If Saber gets a lucky critical to kill the thief, that would let the mercenary in to attack, so might as well make sure Saber is at full health in that case. 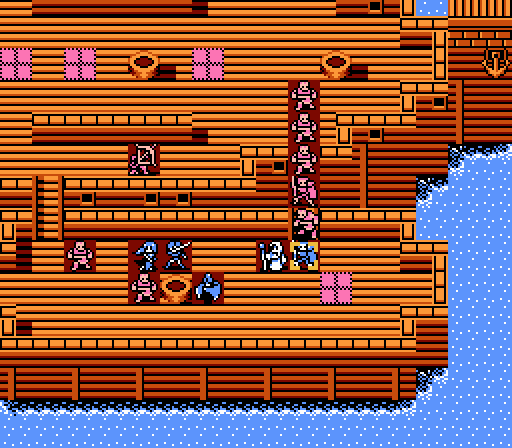 The lead thief attacks Saber, and barely survives with 1 HP. 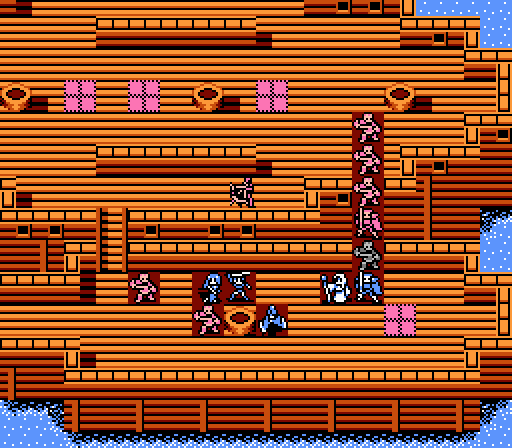 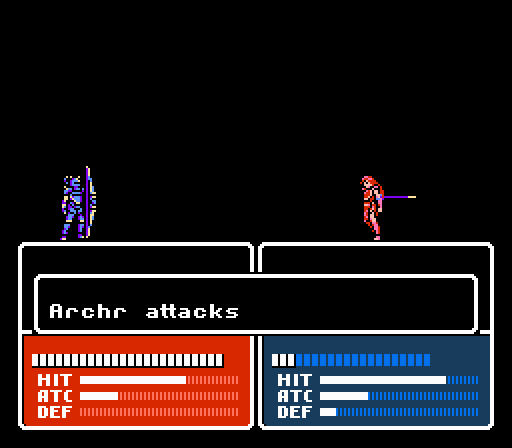 Well, here we go. The archer goes after Celica, and misses a 65% hit chance to keep me from having to reset for the second time in this supposedly simple battle. 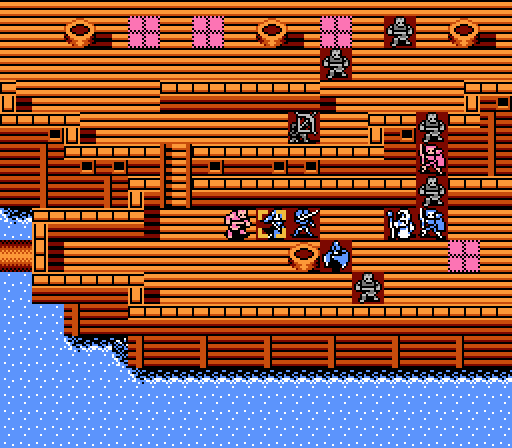 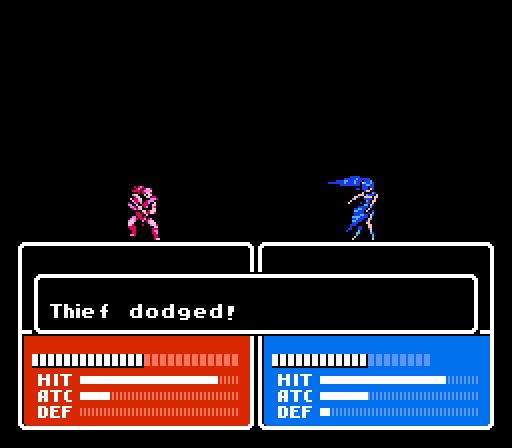 There's still more that can go wrong here, though. A thief does 5 damage to May, who once again misses one of her two attacks. (Fireball hit rate: 4/8) Turn 4 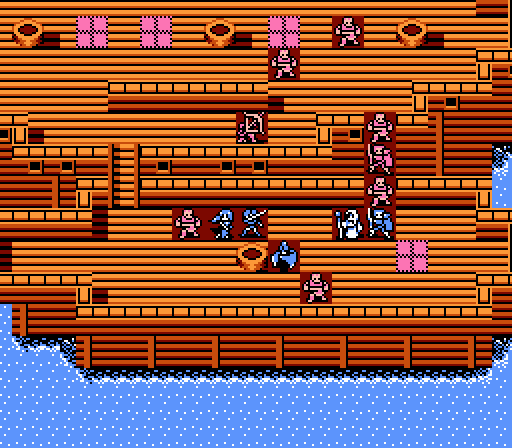 The mercenary is going to close with Saber on the enemy phase this turn, so we need to wrap up the thieves to the west and get Celica to safety first. 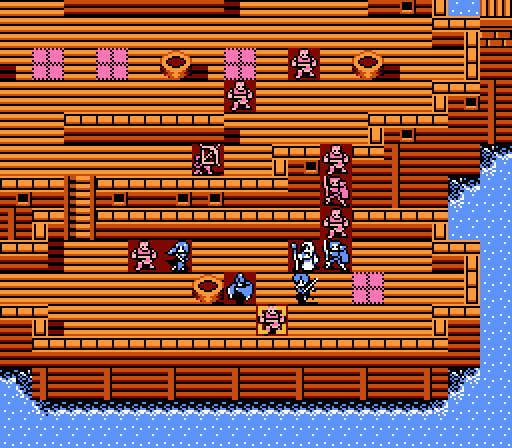 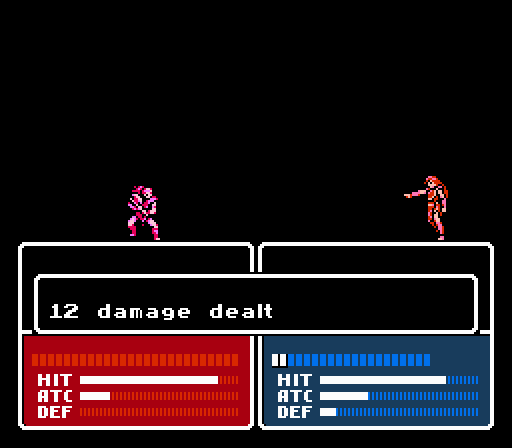 Might as well have Celica blast this thief as she retreats. (Fireball hit rate: 5/9)  Celica finally gets patched up...a little bit, anyway. Man I never thought I'd miss the Vulneraries so much (healing items that anyone could use). 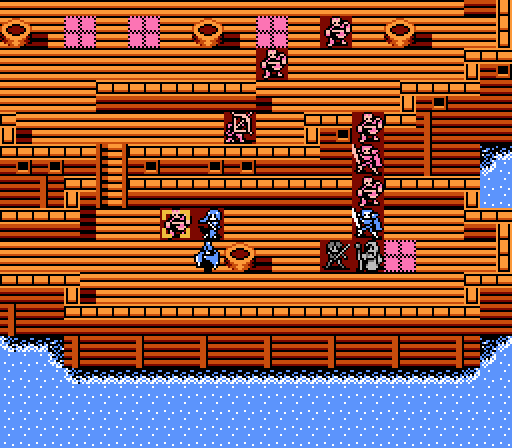  Boey attempts to take out the other thief on our ship, but misses again. (Fireball hit rate: 5/10) 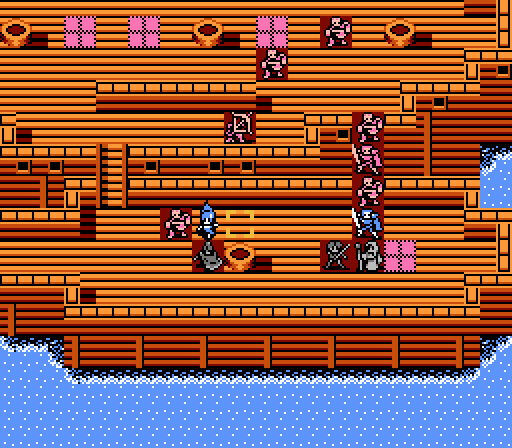 That means either May attacks the thief from the spot marked here, and risks an attack from the archer, or move to the bottom of the boat and stay safe from the archer but need two turns to get back into the fight to the east. 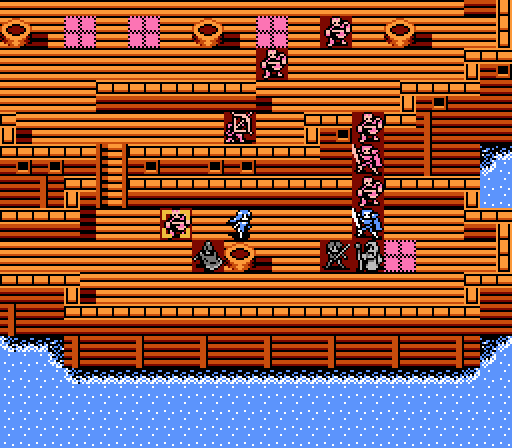  I opt to take the hit from the archer. May misses her first attack yet again, but lands the second to get the kill. (Fireball hit rate: 6/12) 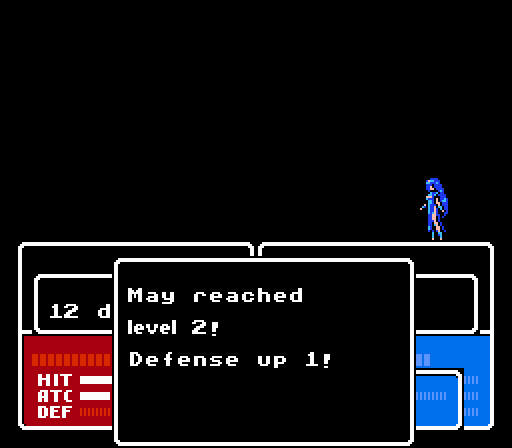 May gets her first level for the second time, and it is again inferior to the prior version. 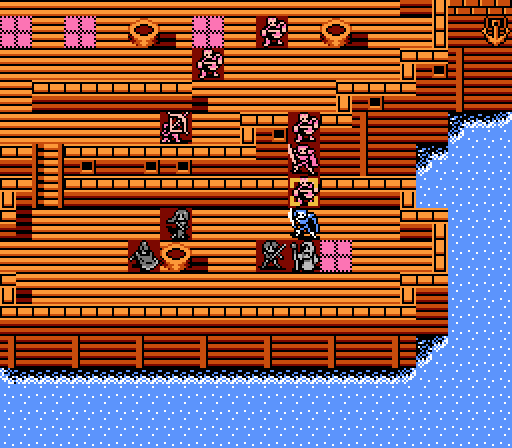 Saber is going to kill the thief on the enemy phase anyway, so he takes the initiative here and kills it now to avoid more damage. 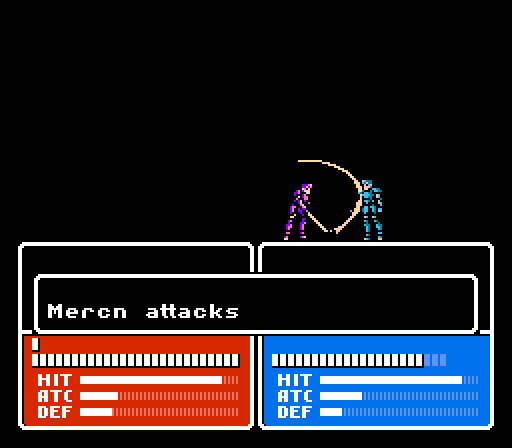 The mercenary joins the battle again, dealing 8 damage to Saber, who misses the counterattack. 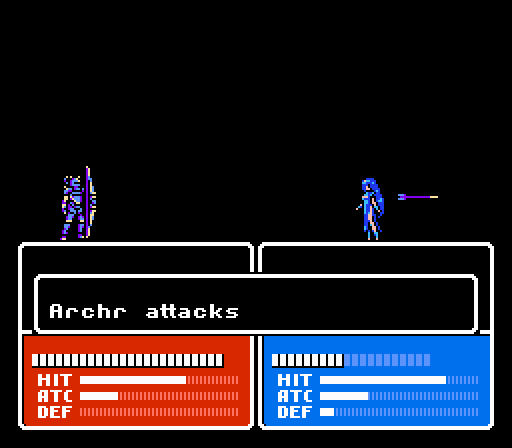 May cashes in some karma as the archer misses again. Turn 5  We've survived longer than last time already, so just need to keep it up.  The first step is healing up Sabr back to near full health.  - Chapter 2 Part 4 Battle 1.gif) Somehow Jenny triggers a double heal. I didn't even know that was possible, and I still don't know what triggered it. Either way Saber's back to full health, and that's just a good thing. 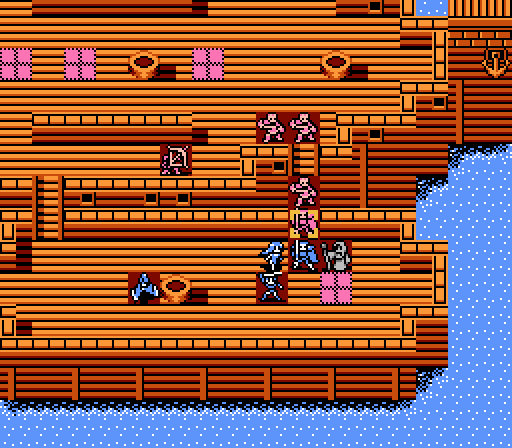 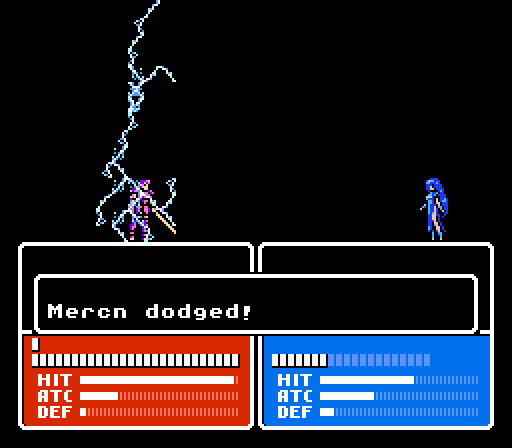 The fireballs haven't really been working so I tried using lightning with May this time - still missed. 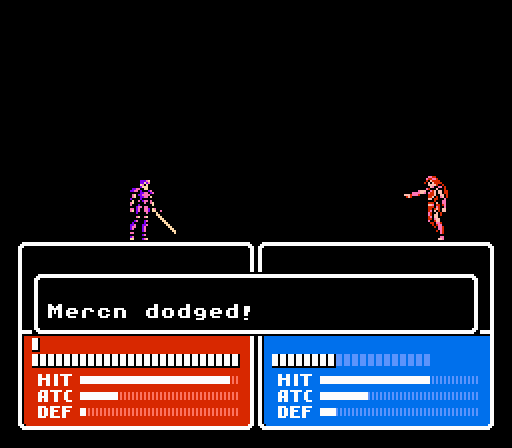 Fireball hit rate: 6/13  The enemy mercenary attacks twice again, missing once this time. Saber gets in the first damage on the enemy merc, a 2-damage scratch. Turn 6 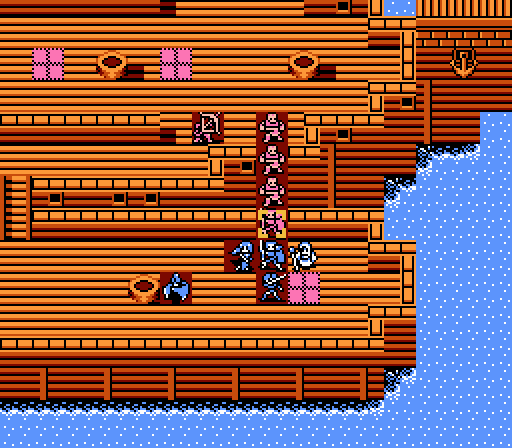  Since Saber only got hit once and doesn't immediately need healing, I try to get Jenny some of her HP back with a shot of Nosferatu. Of course, she misses.   May and Celica both finally land their attacks this time, though even then it's not enough to finish off the merc.  That archer could still cause trouble if it's able to get close, but thankfully the enemy turn order prevents that. The merc retreats first, having <50% HP. Then the archer moves, but can't reach the opening and can't go anywhere else with the thieves in the way, so the archer just moves up one space instead. Then a thief moves up to attack Saber and clog the line again. Turn 7  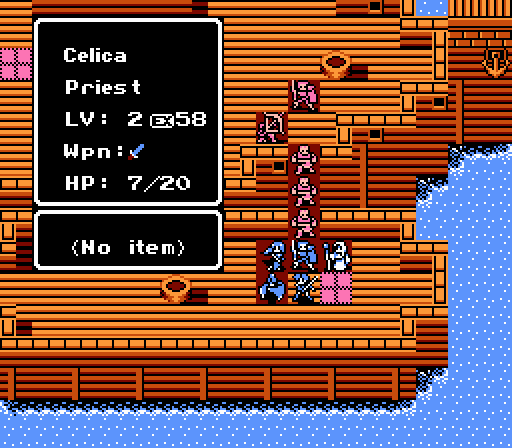 May and Celica are hurting at this point, so the most immediate need is to get them healthy now that the merc is already retreating. 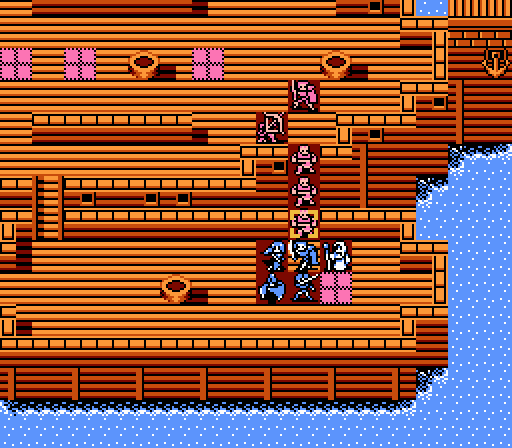 Since Saber's out of immediate danger, he takes a counterattack to get rid of another of the thieves. 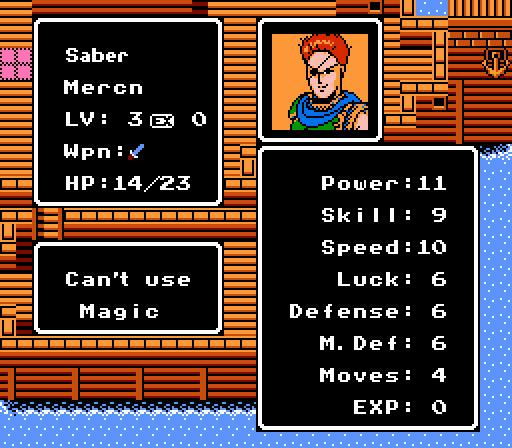 Another pretty great level for Saber. 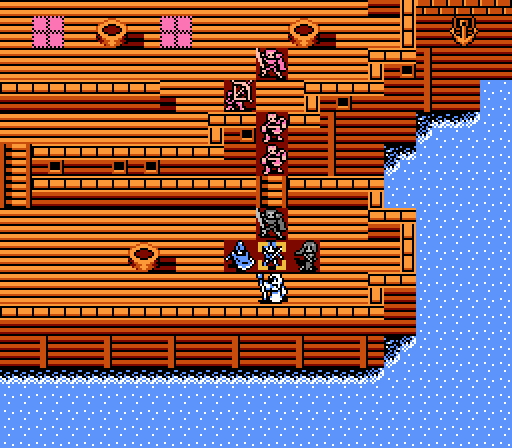 May moves onto the healing tile, and Jenny patches up Celica. 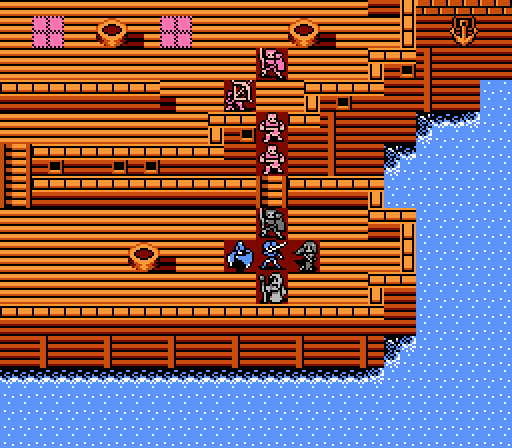 What I should have done here, is move Boey up to the empty space above Saber. He can take a couple hits from the thief and the archer. May, however, can't take another hit. 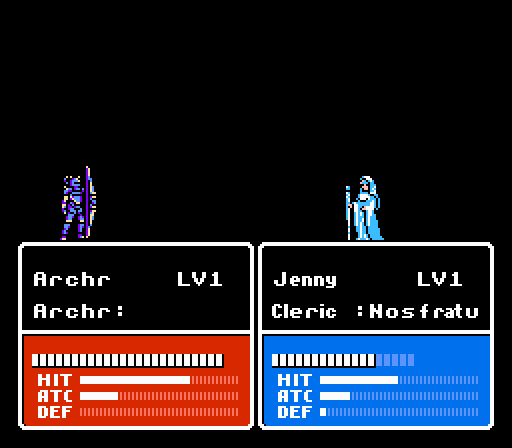 Fortunately, the archer goes after Jenny for some reason instead. She takes the hit but still has 5 HP left. Turn 8 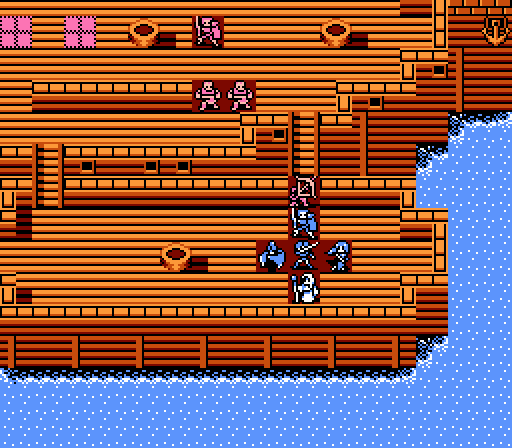 The mistake actually works out pretty well, since now the archer's exposed and we can take it out while the mercenary is still out of the picture healing itself. The thieves, having been blocked out by the archer, started to go around to try and take the west bridge, so they won't be a factor this turn, either.  Saber starts and finishes with a well-timed critical. With the long-range threat removed, we can take our time with the rest. 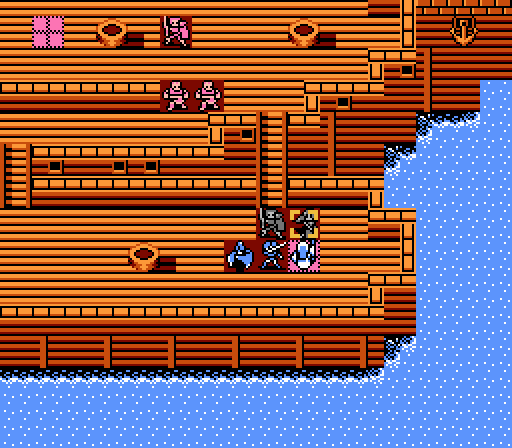 Jenny parks herself on the healing tile this turn, while patching up May some more. She actually pulled off another double heal out of nowhere to get May back to full HP. Turn 9  With only two thieves and the mercenary remaining, it's time to start getting aggressive - the sooner we get to the merc, the less time it has to heal.   Saber and May take out the first thief. May didn't even miss her first attack this time. (Fireball hit rate: 9/16)  Jenny gets Celica back up to full health so that she can...sit there and do nothing, rather than actually move up to attack the last thief.  Instead the last thief attacks Saber on the enemy phase for just 1 damage. Turn 10 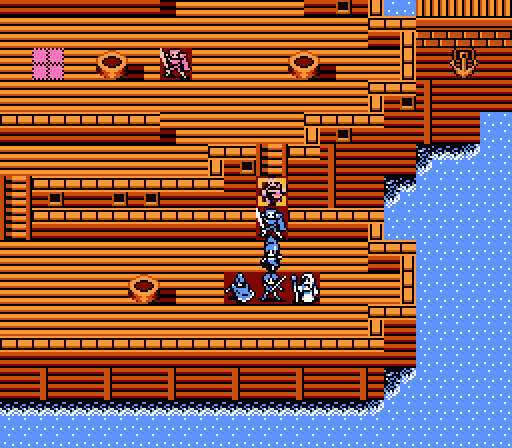  May gets the last thief kill, despite missing the first attack again. (Fireball hit rate: 10/18) 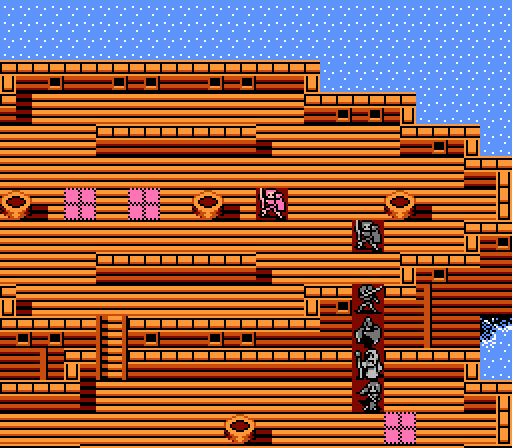 The enemy mercenary will be over 50% HP at the start of the enemy phase, so Saber's going to draw him back out and away from the healing tile. 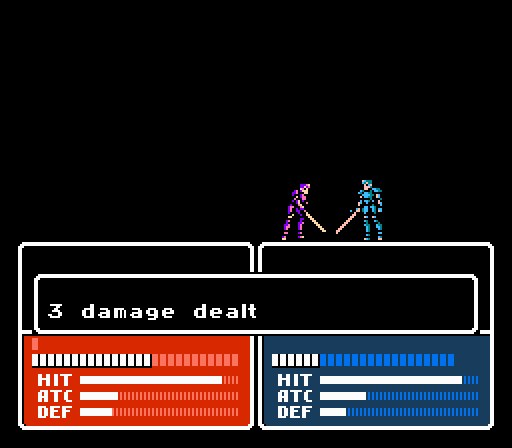 The lure is successful, with Saber only taking 6 damage now thanks to that extra Defense he received. Turn 11 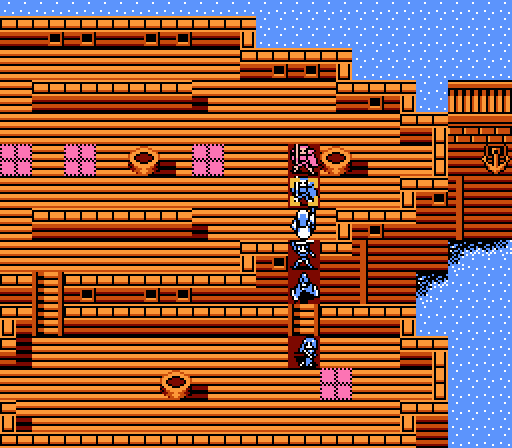 The first action is to make sure Saber can survive another round or two. 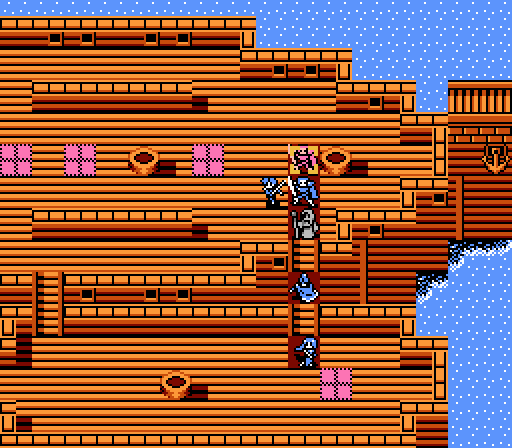 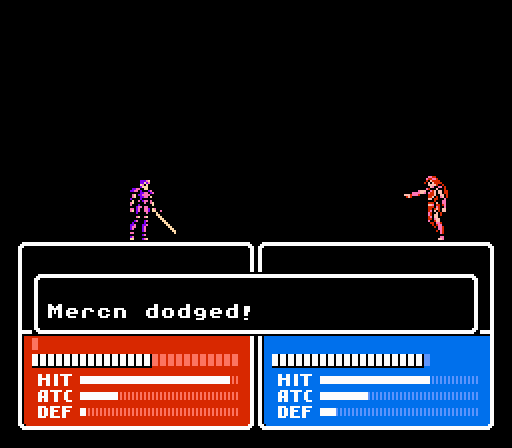 Fireball hit rate: 10/19 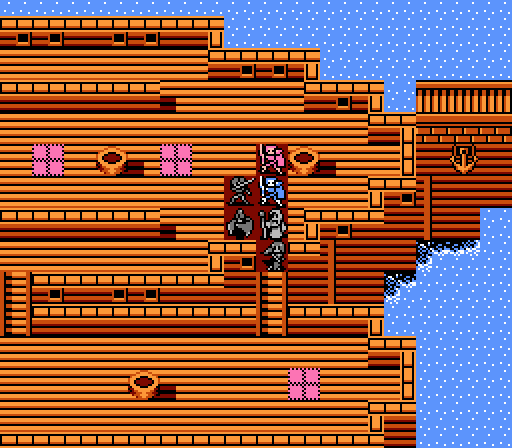 Boey moves up to make sure the enemy mercenary can't get to Jenny. We're in pretty good shape, now. 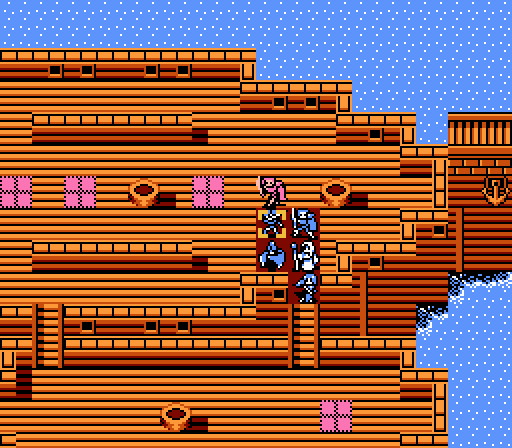 The merc gets in another 10 damage on Celica, but nothing to really worry about. Turn 12 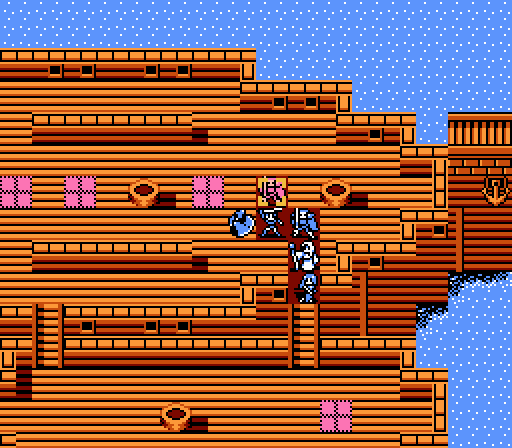  Boey lands his first fireball of the battle, putting the merc back into retreat mode. 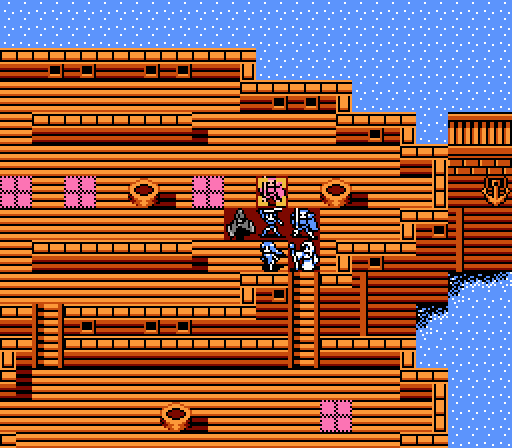  So of course with a chance to end the battle, May misses again. (Fireball hit rate: 11/21) 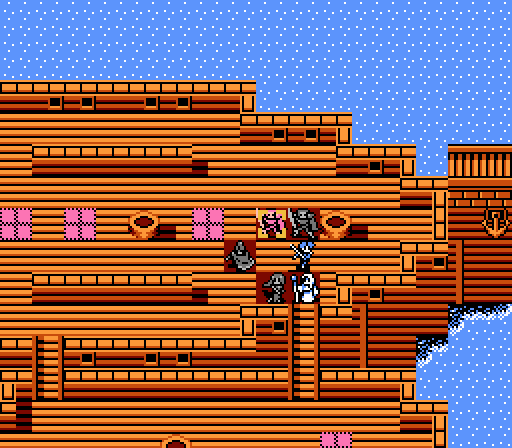  Celica likewise fails to end the battle. Oh well, one more turn. (Fireball hit rate: 11/22) Turn 13 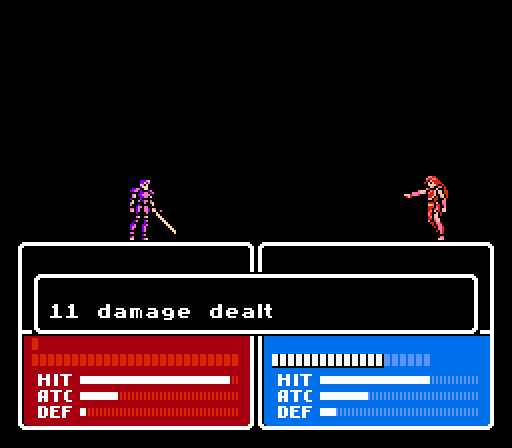 Given yet another chance, Celica finally ends things here. Final fireball hit rate: 12/23 (52%). Fire has an 80% hit rate, and even with the merc's 11 speed that's a minimum of 69% accuracy amongst all our mages. Just a bad luck streak there. 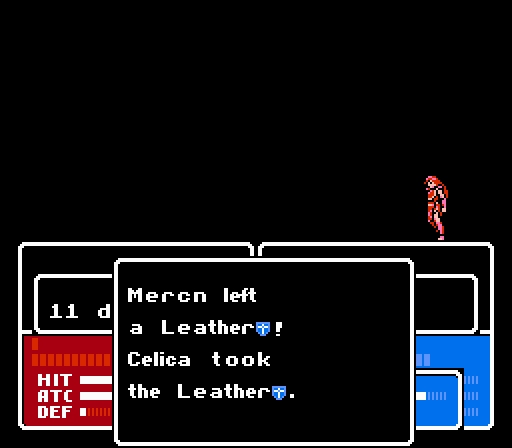 Celica gets the Leather Shield, as well. I'll let the thread decide who gets it - Celica, May, or Jenny are all good options, really. 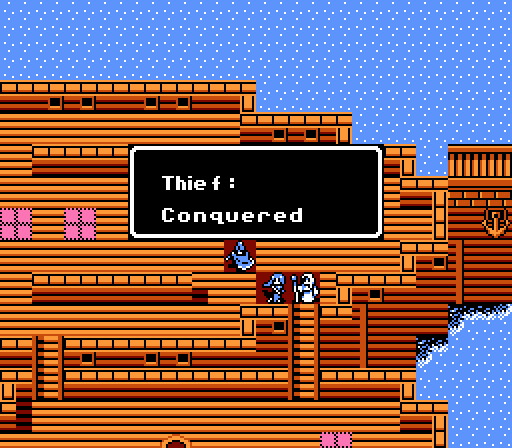 That battle really should not have been that difficult. It only gets harder from here. Current Roster  Next time:  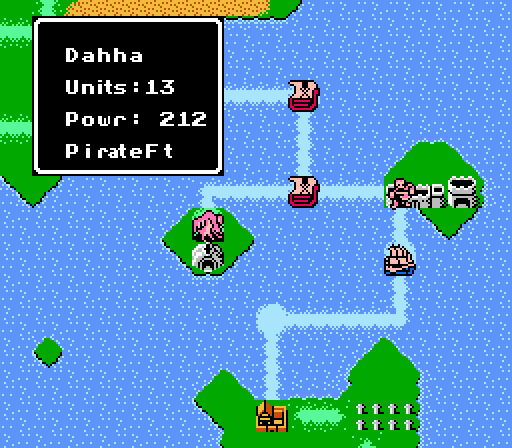 It's time to clear out the rest of these pirates at the source - the Pirate Fort.
|
|
#
?
Jun 10, 2013 03:47
|
|
|
This is the least boring map so far, looks like. ...That's kind of sad.
|
|
#
?
Jun 10, 2013 04:13
|
|
|
Yea it was a nice touch to have the sea battle maps be two ships, with our ship remaining the same each time. It would be nice if some of the other maps had as much thought put into them, but we're still in the early game here.
|
|
#
?
Jun 10, 2013 05:27
|
|
|

|
| # ? May 2, 2024 03:25 |
|
|
I'd say give the Shield to Cecilia. She seemed to be struggling a little this map, so some extra defense could help her out. Also, she's a lord, so she's guaranteed use no matter what.
|
|
#
?
Jun 10, 2013 21:36
|
|