


|
Hey all I'm trying to figure out an issue I have with a motor that I built. It is a mid 70s CB750k. I completely tore the cases apart and had them blasted and I painted them. I'm going to lay out everything thats in the motor and what I have done so far. Pistons: 850cc 65.5mm bore from cyclexchange (no longer available) Cam: Cyclex CX-1 cam (http://www.cyclexchange.net/camshaftpage.htm) with new valve springs. Ignition: ARD magneto which was rebuilt and verified in good working order by mainley magnetos. Fuel: Weber DCOE 40s (which I rebuilt) mounted to a Russ Collins manifold. About two years ago after I got everything put together I was able to get the bike running. At that time I did not have a throttle cable so I set the idle to its highest point and kicked it until it started. It was difficult to get it to start but it did start and run and idle. I had some things happen in my family and I didn't mess with it to much and when I got back to it it wouldn't start at all. I pulled the carbs and went back through them and I sent the mag off to Mainley to have them rebuild it. I also changed the spark plug wires since they recommended solid copper core wires. Below is the troubleshooting that I have performed so far with that motor: Rebuilt carbs again. Magneto rebuilt and verified good working order. Verified ignition timing. The magneto does not have a advance so you must set it to fire when the motor is at full advance. It also does not fire a wasted spark like the stock ignition. So I verified the firing order which is as follow (1, 2, 4, 3). Verified cam timing was correct. Verified piston ring gap was correct. Verified valve lash was correct per the cam card. At this point I was extremely frustrated and I should note that all this occurred over the space of at least a month. I have another late k motor that I bought with a bike that was stock and complete. I pulled the magneto and carbs off my motor and put it on the late k motor and it basically instantly started. At this point I put that motor in the bike so I could ride it around and shake it down. It ran basically perfect once I got the carbs dialed in. So now I have done the following: Pulled the top end off the motor that was running and verified they were stock pistons and cam. Installed the stock bore onto the bottom end that I put together. (At this point I used my MLS head gasket that was for the big bore). I put the mag on the motor and attempted to start it with starter fluid and not carbs (These motors and in fact any motor will run for a few seconds like this) and could not get anything from it. Once again verified spark (with a spark checker like this one https://www.amazon.com/Ram-Pro-Engi...XEEK0NARJK4YXH7) After realizing that I had the wrong head gasket I ordered the correct one and installed it today but still the motor will not even attempt to fire. At this point I am putting the big bore jugs and the head that was on the big bore on the late k bottom end. But if that motor runs then I have zero idea why the other motor won't even at least try to fire. I realize this is a lot but I'm seriously at a loss as to why this motor won't run. As a foot note here I also brought the motor to a shop and they pulled it apart and could not get it to run either. Valt fucked around with this message at 00:11 on Sep 21, 2020 |
 #
?
Sep 20, 2020 23:43
#
?
Sep 20, 2020 23:43
|
|


|

|
| # ? Apr 26, 2024 02:07 |
|
|
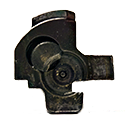
Well in case anyone is interested I finally determined what was going on. I had originally set #1 to be one plug on the cap. But the shop that had it the last time moved #1 to a different plug. The only way I was able to determine this was to pull the cap off the mag and move it to where the marks line up and saw it was on a different plug. After hooking it up correctly I was FINALLY able to get it to run. Here is a picture that shows the markings on the mag. 
Valt fucked around with this message at 00:44 on Sep 26, 2020 |
|
#
?
Sep 26, 2020 00:41
|
|
|
Sounds like a huge pain the rear end, well done. I was flying with the idea of building a cb750; there's quite a few original frames with registration available here. Got any photos of the rebuilt bike?
|
|
#
?
Sep 26, 2020 16:40
|
|

|

|
|
#
?
Sep 26, 2020 18:34
|
|


|
The bike is not in any way related to a stock 750 other then the engine really. It is not really a thing that CA cares about so I don't really ever bring it up. This is the most recent picture of have it together before I started changing parts on the motors. I had it together and with the stock bore motor it ran really good with the mag and the webers. It was not perfect and definitely needed some fiddling but it started easily and idled fine. Since the mag is full advance at all times at some point you have to realize its not going to idle perfect. 
|
|
#
?
Sep 26, 2020 21:22
|
|
|
An I4 vintage custom chopper?!  It's not remotely my thing but I demand to know more. It's not remotely my thing but I demand to know more.
|
|
#
?
Sep 27, 2020 00:48
|
|


|
Coydog posted:An I4 vintage custom chopper?! The frame was custom made by a friend of mine who does fabrication. Its based off a denvers chopper. The front end is like 40 inches from the axel to the bottom triple tree I think? I made the handle bars, brake, kick stand mount, and modified the shifter lever. The rear tire is a shovelhead rear tire and sprocket. The oil tank is a panhead oil tank that was modified to fit the frame. The kick stand was actually a huge pain in the rear end since the bike is slow low to the ground and the exhaust is so close to the frame. I ended up modifying a dyna kick stand mount and that actually worked perfectly. Valt fucked around with this message at 00:57 on Sep 27, 2020 |
|
#
?
Sep 27, 2020 00:51
|
|
|
Would also like to see updates and progress on this bike. Cycle Asylum really doesn't live up to its name (in terms of its fondness for weird or unusual motorcycles with 0 practical applications) the way that Automotive Insanity does.
|
|
#
?
Sep 27, 2020 18:47
|
|


|
What do you mean lots of people in here have KTM's. This build is so crazy. Good job building it out like that. Do you intend for it to stay looking ratbike? What is an i4 cruiser like to ride?
|
|
#
?
Sep 27, 2020 21:36
|
|
|
Coydog posted:What do you mean lots of people in here have KTM's. It�s only unpainted because I need to shake it down to make sure that nothing else needs to be modified. It will eventually be painted black with a little gold flake and gold leaf filigree on the tanks and certain parts of the frame. I mean honestly once you are moving a bit it rides like any other motorcycle. Slow speed turns take some getting used to and because it�s so long and low it scrapes if you are not careful with it. I will make a longer post detailing some the fabrication I have done. As well as the engine work I have done, as it�s a LOT.
|
|
#
?
Sep 27, 2020 21:50
|
|
|
Please! Full write up!
|
|
#
?
Sep 27, 2020 22:25
|
|

|
Prior to this I had a CB750 that was hard tailed in a stock frame. I wanted to build something that was more then just a stock bike with a hard tail on it. I determined that I was going to use a 750 motor again since I was very familiar with them at that point and I had not seen any nicely done 750 choppers in person. The whole bike was built around the front end, wheels, and motor. My original plan was to have a Drouin supercharger and ARD magneto. But finding a supercharger proved to be basically impossible. So I determined that I would run the webers using a Russ Collins manifold. The reason I just didn't use points and stock carburetors is that if I was going to go through this whole effort of building the bike. I didn't just want to put a boring stock motor in the thing. Here is a picture of the frame after Matt Hurtado finished it, I will note this picture was taken in July of 2012: The motor was a several different motors put together. I took it completely apart and and had everything blasted. At this time I also bought a 850cc piston kit from Cyclexchange and had the jugs bored out for the pistons. I had a local guy polish all of the covers and the mag body, and I got it all put together (Jan 2016):  After this I slowly worked on getting parts and working with Matt to have him fabricate things on the bike. It was also during this time that I started to learn how to weld and do more fabrication then what I previously had done. At some point I decided that I would pick up the bike from Matt as I felt comfortable I could finish the fabrication that it needed. After getting it back I went ahead and put the real motor in the bike (before it just had a mock up motor that was just empty cases), I was able to get oil lines setup so the motor was plumbed and ready to run at this point (May 2018):  At this point the bike did not have a throttle cable as getting a cable that would work in my setup is no easy feat. First of all the throttle levers on the webers are mostly designed to be in a car and not pull up in the way they do in my setup. Second I was told that back in the day people used CB450 cables in these setups, which would be fine if this was in a stock frame. In any case I was able to set the idle as high as it would go and kicked it a million times and got it to run for the first time ever! https://www.youtube.com/watch?v=PvQcbUSCB5Q&t=73s Not to long after this I got a call from my step father telling me that my mother had lung cancer and that it had spread to her brain. I ended up going to florida where she lived shortly after that with my sisters to help him take care of her. After months of treatment and struggling she passed in october. After that both of my Grandmothers passed, so I honestly had no interest in trying to work on the bike for about a year. One of my best friends who originally helped me figure out what I wanted the bike to be ended up helping me get back to working on it. It was at this point that we got a lot of stuff done. Two of the things that I was concerned were going to be problematic were the brake setup and the kick stand. I had originally intended to use a sportster rear wheel but changed my mind since the sportster drum is fairly small and would quickly run out of braking due to overheating. So I ended up using a shovelhead rear wheel with a disc and PM brake caliper. Obviously this frame is completely custom made and has no premade brake mounting setups. The master cylinder mounting was fairly straight forward as I just made two tabs to bolt it too, and frankly these tabs are way overkill for the master cylinder:  The harder thing to figure out was the brake arm since it needs to pivot and drive the master cylinder. What I ended up doing was buying a shouldered bolt welding that to the tab so that the tab and the post did not move. Then I welded the brake arm (which I made by bending some round stock with the my oxy/acetylene torch then welding a stock honda brake pad to it) to the bushing and welding a tab to the bottom of the bush to drive the master cylinder. I then used a spring that sits in between the tab and the brake arm as my return spring. This actually ended up working perfectly!   The kick stand was a whole nightmare to deal with. The bike is very low and the exhaust sits VERY close to the side of the frame. This is a problem since most kick stands just pivot on a tab, so there was no way to mount a tab based kick stand and have it clear the exhaust or be able to actually pull up. What I learned after looking at the Dyna. Is that the kick stand comes out at almost a 90 degree angle from the mounting. We were able to get this mocked up and found that it actually worked perfectly! The only issue is that it will not pull up positively, it will stay up but the way a dyna kick stand works is the whole mount pivots on a pin so it can change its geometry when it moves. This is actually a more compact version of panhead style kick stands. But in the way that we mounted it, the mount cannot pivot, which is actually okay as I mentioned that it stays up once you put it up. You can see how close it is in the pictures below. I cannot stress how much of a victory this was for me and my friend. This represents probably a month of work and research and buying parts.   This is getting incredibly long at this point, I'm going to take a break but I have more about the cables and handlebars. Here is a video of my first time riding it, which note I'm not wearing a helmet since I wanted to make sure nothing was going to explode. I have a fully face that I wear when I am riding further then half a block. https://www.youtube.com/watch?v=9VdQs9nOjcM
|
|
#
?
Sep 28, 2020 00:20
|
|
|
This is awesome stuff, thanks for sharing!
|
|
#
?
Sep 28, 2020 00:57
|
|

|
Lol this is sick. I watched a dude put a v8 into a daihatsu kei truck on youtube not too long ago so let me just say I appreciate stupid, fun builds
|
|
#
?
Sep 28, 2020 04:05
|
|
|
awesome project, I'd love to read more updates. That engine sounds mean as hell with the 4 into 4 exhaust
|
|
#
?
Sep 28, 2020 19:54
|
|
|
So the next installment here is about making new handlebars. After I got the bike back I decided that I wanted to change the handlebars. The previous bars were made by Matt but I kind of wanted something different after being able to sit on it and move it around a bunch. I looked around at a bunch of other bikes with long front ends and decided on something that came back a bit. But I didn't want bars that were just bent over, I wanted some kind of shape. So I borrowed a tubing bender from my friend and drilled holes in my garage floor so I could mount it. The thing that makes getting these bars made so difficult is that they are two pieces and not just one piece like say the bars on the harley. They mount through holes in the top of the girder (the mounting is acutally the same size and width as anything harley as far as I know, the dyna uses the same layout). So that means if you are going to say have three bends like I do they ALL have to be exactly the same. If you think about it these bends are not all on a 2 dimensional plane so a TON of time was spent measure and marking the bars to try and figure out where to make the bends and how far to bend them. The whole process probably took the better part of a month and several sticks of tubing from the metal shop. But after a lot of trial and error my friend and I were able to get a shape that we liked and importantly we were able to duplicate it. I ordered some new bungs for the bars and tig welded them in. We also made a little cross bar so that the bars could not twist, which because of how they mount they almost definitely would have twisted no matter how tight you got them.  I had to get these bars done so I could order cables for the bike. As I previously mentioned people that ran these dual weber setups generally ran CB450 cables since they already had a split for two carbs. But in my setup that cable doesn't work since its not long enough. During this time I was able to find a place in Australia that sold universal throttle arms, these let you clock the arm into what ever location you needed it. In the below picture you can see how the cable goes to the throttle arm. I was able to find a pivoting cable clamp to hold the ends of the throttle cable and I believe it came from a go cart or lawn mower or something like that. Since the way this works is there is no end on the throttle cable I bought a solder pot and soldered the ends of the cables so they wouldn't fray.  Since the CB450 cables were to short, I contacted Motion Pro to see if I could get a longer cable. But that was going to end up costing roughly $150 so I decided to see if I could find another cable that would possibly work based on my measurements. After a bunch of searching online I was able to find a scooter cable that was roughly the length and size that I needed. I was able to cut the ends down so it was the correct size for me and finally I had a throttle that actually moved my throttle arms! I had previously reached out to Kiyo at Kyo's Garage as he has built several 750s using weber setups but he wasn't really able to answer my questions. This just leaves the clutch cable, which if I had just used a honda clutch lever it would have been fine. But there are several problems with this, first of all my bars are 1" and the 7/8" that honda bars use. Secondly the honda clutch levers are fairly ugly. What I wanted to use was a panhead style clutch lever. Which would mount fine on the 1" bars but obviously the cable mounting is very different. First of all Panhead clutch levers have no provision for adjustment, because on a panhead you have something called a "mousetrap" which was a piece that helped you get more leverage and make the clutch pull easier. I have circled in blue here:  For this cable I was going to HAVE to order a custom cable from Motion Pro. They requested that I send them the measurements, the original honda cable and lever, and the panhead clutch lever. They were able to make me a very nice cable that has adjustments in the middle of the cable. The nice thing is if I break this cable I can always just re-order it from them and it won't cost anywhere nearly as much. I think the cable ended up costing about $150 after shipping and everything else. Anyways I think thats just about enough for this time, next time I'm going to talk about the lights and their setup on the bike. As well as touch on inspirations for the frame and the race parts on the motor.
|
|
#
?
Sep 29, 2020 20:17
|
|
|
Valt posted:So that means if you are going to say have three bends like I do they ALL have to be exactly the same. If you think about it these bends are not all on a 2 dimensional plane so a TON of time was spent measure and marking the bars to try and figure out where to make the bends and how far to bend them. 
|
|
#
?
Oct 1, 2020 07:36
|
|
|
On a little bit different note I finally got around to modifying my engine stand so I can mount 750 motors. I'm seriously tired of wresting these things around on my bench its going to be so much nicer to just wheel it around and flip it over when I need. I had actually bought a engine stand from lowbrow thinking it could be mounted to a engine stand but that ended up not being the case. https://www.lowbrowcustoms.com/prod...fhoCHCMQAvD_BwE I have an engine stand that I have had small blocks on before so its a pretty beefy deal. I saw that cyclexchange had modified a normal engine stand to mount a 750 so I basically just copied that. You can see the cycle x stand in their engine videos. https://www.youtube.com/watch?v=NUgWuSqap6I All of his stands are a little bit different but the concept is the same, essentially cut the arms so that they can be welded to the plate and hold the rear two motor mounts. a fully assembled cb750 motor only weighs about 220 pounds and this steel is like almost 1/2" so its extremely overkill but it works well. I had to rig it up big time to lay out how I needed to cut the arms and where they needed to get welded onto the plate. But with the combination of magnets and milk crates I was able to get it tacked up then welded. I have never actually had my welder turned up that high so the welds are pretty gross but its definitely beefy enough to hold a 750 motor.   I currently just have a mock up motor mounted to it (no internals). But I am definitely going to be putting motors that I work on the thing. You can see the current state of things here, there is at least 3 750 motors or more in this picture. The one on the bench is actually on that lowbrow stand. Its actually nice since 750 motors are not flat on the bottom so if you just have it sitting on the bench it will rock around and are a pain in the rear end to move around.  I have another bike that I am going to finish once I am done with the long bike. I bought it as a complete bike (in pieces) its an old hard tail frame which as best we can tell was some kind of digger frame. Its actually quite the enigma since its obviously well made and was almost assuredly done in a jig but we can't find any markings on it and it doesn't match any other Honda chopper frames. It has a really cool feature which is that the entire rear motor plate is removable and its chromed. Again this isn't something that we have seen in any other Honda chopper frame. But eventually I will need to go through the motor thats in the bike, since its a complete unknown. It turns over and has compression but that is ALL that I know about it. In the pictures it has a stock honda front end on it which is way to short for it so it looks kind of weird. Plus all of the bars and tins are just what came with it and I would definitely change a lot of that stuff.   Its likely that the frame was intended to be setup like the bike in this video. https://www.youtube.com/watch?v=Q4BHitIzw2k **Edit** I know that I am just writing a bunch of stuff about like making the handlebars and no pictures. Honestly we were just trying to get it done and not document it. But I can make an effort to try and document the little fabrication stuff that I am doing in the future. Most of the time I'm just out there by myself trying to get stuff done and I forget to take pictures until I'm done. Valt fucked around with this message at 04:22 on Oct 2, 2020 |
|
#
?
Oct 2, 2020 04:15
|
|
|
This is a good thread.
|
|
#
?
Oct 2, 2020 05:13
|
|


|
I love this bike. It's such a long boy.
|
|
#
?
Oct 7, 2020 06:05
|
|

|
So as an update to my original post I FINALLY got my 850 setup running. I'm still not exactly sure what was wrong originally but I think that the spark plugs not being fully seated in the mag cap was the main cause. I did notice that it probably won't start on the starter motor at least not right now while its super fresh. I used a spark checker tool and it was just barely lighting up. But I half heartedly kicked it and it tried to start. So I unplugged the spark checker tool and gave it one good kick and it IMMEDIATELY started. I am waiting on a valve cover gasket before I really try and let it run. But this is a HUGE relief, I have been working on this big bore setup for the better part of 6 months now. I will get a video of it running tomorrow and also do a little write up on the lighting on the bike.
|
|
#
?
Oct 18, 2020 22:04
|
|
|
builds character posted:This is a good thread.
|
|
#
?
Dec 2, 2020 00:50
|
|


|
Just out of curiosity. Have you ever used any of the offerings from Cycle Exchange? http://www.cyclexchange.net/ They've been updating their site a lot lately with restocks and I've been getting the itch to finally go nuts on my K7
|
|
#
?
Dec 2, 2020 23:22
|
|
|
GnarlyCharlie4u posted:Just out of curiosity. Have you ever used any of the offerings from Cycle Exchange? http://www.cyclexchange.net/ Yah lots of stuff in the motor came from ken. The 850 kit, all of the gaskets, and the cam. They make great stuff!
|
|
#
?
Dec 3, 2020 04:53
|
|
|
Valt posted:Yah lots of stuff in the motor came from ken. The 850 kit, all of the gaskets, and the cam. They make great stuff! I'm sitting on a set of CR-29's that I was considering selling, but then I thought "well I might need them if I go big bore." Of course I'd also need a new cam, and a nice primary and cam chain tensioner, and crank balancing, and...
|
|
#
?
Dec 3, 2020 06:57
|
|
|
So I know I mentioned I was going to do an update on the lights and I promise I will get to that. But I wanted to do a quick post on the valve cover that I am modifying for the bike. A normal CB750 valve cover has a little drive for a tach, which I am obviously not using. They make a plug for this drive since it will leak oil if you just leave it open. But I have seen examples of the covers where they removed the drive entirely from the cover. So my friend cut out a patch from another cover and tacked it onto a cover with that section cut out. Seen here with a smoothed cover for comparison:  I practiced a bit with a tig welder on some other junk covers I had to try and get an idea of how it would weld. Since welding cast aluminum is much like trying to weld a marshmallow with a propane torch. I have some practice welding stainless and regular steel with the tig but almost none with cast aluminum. I brought the cover over to my friends house who has a big miller tig. I was able to get it mostly welded together but ran into an issue chasing pinholes.   I messed with a bit more, but I finally broke down and bought a eastwood tig 200 digital machine for my garage. I have had my mig for some time and it definitely works for a lot of what I do but honestly most of the welding I do is better with the tig. A lot of it is small welding or in tubing, which is just so much easier to do with the tig.  I am still trying to figure out the best setup for welding aluminum with this machine. I went ahead and ordered pure tungsten rods since they are apparently the best for welding aluminum. I attempted to do some welding with the grey tungsten that I have and it works but its maybe not the best? I am certainly not professional so I don't really know. It seemed like the arc was not stable and I had trouble getting the weld pool to start. here is some of the welds that I attempted with the new machine. I also preheated the valve cover at 200 degrees in the oven before attempting to weld and that did seem to help.   My tungsten should be here today so I'm going to try and finish welding then start grinding and blending the valve cover this weekend. I might get to posting about the lights today as well.
|
|
#
?
Jan 22, 2021 18:03
|
|
|
I use the blue lanthanated rods for everything, AC or DC, and they're fine. They don't melt as fast as the green pure ones and they aren't radioactive like the red ones. Your description of welding cast aluminum as like cooking a marshmallow with a propane torch is spot on, though. It just sucks a lot and all you can really do is build it up huge and file it back down and hope you didn't get too much porosity.
|
|
#
?
Jan 23, 2021 20:03
|
|


|
Sagebrush posted:I use the blue lanthanated rods for everything, AC or DC, and they're fine. They don't melt as fast as the green pure ones and they aren't radioactive like the red ones. Yah the pure tungsten is working alright and yah that�s exactly what I�m doing just building weld and trying to make sure the puddle looks clean before getting off it. I really need to get a tig finger for this type of work as well. Since aluminum gets ripping hot almost immediately.
|
|
#
?
Jan 23, 2021 21:58
|
|
|
So I spent about 3 hours today welding, grinding, and filing on the cover. Its getting much closer to being to the point of getting final sanding and polishing. I'm obviously still trying to learn all of the ins and outs of this welder. One thing I noticed is that once I got the tungsten to ball up it would not strike an arc again. I had to sharpen it every time. I also had to go up in my amperage, I think I have it set to nearly 90 amps now. But the cleaning is set to 45% out of a max of 50%.  
|
|
#
?
Jan 24, 2021 03:56
|
|
|
Update time! So I wanted to talk about the lights for this thing. Firstly this bike will 100% never see unlit roads at night unless its some kind of emergency and if so I'm going 5 mph. I don't even ride the dyna on unlit roads at night, to many deer / hogs around here to ever even think about it. So for the headlights they are the most custom part of the lighting. I wanted to have dual headlights since the front end is so large I thought that the bike would be strange with just one small headlight. The guy who built my frame made the headlight mount which is stainless steel, and its fairly thin. The headlights such as they are, are PMC 401 lights, these are old tractor backup lights. PMC is actually still around and they make lighting for trailers and tractors. These lights often get used on custom bikes since they are very small and have an interesting lens. The lens on these lights obviously is not meant to direct light and just scatters it which is fine since I want people to be able to see me. These lights originally used a 1157 bulb like what you would find in tailights for old cars (like my 67' C10 for instance). Even the LED version of these lights are really not any good for anything more then a hint of light. So I wanted to put and LED panel of some sort in the lights but wasn't sure exactly how to go about it. After some searching I found these 4x4 marker lights that shop right down the street from me had. They fit almost perfectly inside the housing, so all I had to do was remove the stand of the 1157 bulb. I also didn't really want to have to modify the housing to mount them, so I tried hot glue at first but that clearly did not work at all since its to hard and won't bond with the metal. My friend told me about clear construction adhesive that he had used for a similar purpose in the past. So I grabbed a tube of that and was able to get then set in place. This is actually ideal since they are easily removable in case they fail and nothing was changed about the housing.  The rear taillight was much more straight forward since again I needed something small but bright. Its actually just a custom piece that I bought from after hours choppers. It is very very bright for how small it is and he was super nice to deal with.      
|
|
#
?
Feb 7, 2021 22:41
|
|
|
So another exciting thing has been that cylinder #1 is basically throwing oil out of the exhaust. I'm not really sure why this happening though I suspect its something to do with the head / valves. I did a compression test on it since I think #1 is the cylinder with the rings that I had to source outside of what came with the pistons. But honestly at this point I don't even remember. But I did a compression test and it went up past 150psi so the rings are fine. The valve guide seals that I bought for the head thats on it never seem to fit right so thats what I suspect. I tried to do a leak down test but anytime I put pressure to it, the motor just rolled over. So it could be a seal somewhere on the head as well.
|
|
#
?
Feb 8, 2021 00:34
|
|
|
Valt posted:So another exciting thing has been that cylinder #1 is basically throwing oil out of the exhaust. I'm not really sure why this happening though I suspect its something to do with the head / valves. I did a compression test on it since I think #1 is the cylinder with the rings that I had to source outside of what came with the pistons. But honestly at this point I don't even remember. But I did a compression test and it went up past 150psi so the rings are fine. The valve guide seals that I bought for the head thats on it never seem to fit right so thats what I suspect. I tried to do a leak down test but anytime I put pressure to it, the motor just rolled over. So it could be a seal somewhere on the head as well. Motor turning over on leakdown is a good sign but it's still worth it to get a wrench on the flywheel and do a proper leakdown. Nice work on the headlights though. Those look great.
|
|
#
?
Feb 8, 2021 03:18
|
|
|
GnarlyCharlie4u posted:Motor turning over on leakdown is a good sign but it's still worth it to get a wrench on the flywheel and do a proper leakdown. Unfortunately there isn't really a way to put a wrench on a CB750 crank. As you can see the mag is replacing the points setup where you could maybe put a wrench on it. But now with the mage on there, there is definitely no way to do this. I'm not really worried about the head being toast since I have a good head thats replacing it. But it would be nice to confirm that is where the oil is coming from.
|
|
#
?
Feb 8, 2021 04:48
|
|
|
Valt posted:Unfortunately there isn't really a way to put a wrench on a CB750 crank. As you can see the mag is replacing the points setup where you could maybe put a wrench on it. But now with the mage on there, there is definitely no way to do this. I'm not really worried about the head being toast since I have a good head thats replacing it. But it would be nice to confirm that is where the oil is coming from. So I went ahead and took the valve cover off to see if a valve stem seal came off or something. Sure enough the exhaust valve, valve guide seal had come off. I double checked the parts fiche on bike bandit and the valve guide seals are the same for all years and k and f models. Maybe these are not great seals or something? But they never seemed like they fit properly. I'm going to pull the spring off and reseat that seal and hopefully get it up and running again.
|
|
#
?
Feb 9, 2021 01:18
|
|
|
Valt posted:So I went ahead and took the valve cover off to see if a valve stem seal came off or something. Sure enough the exhaust valve, valve guide seal had come off. I double checked the parts fiche on bike bandit and the valve guide seals are the same for all years and k and f models. Maybe these are not great seals or something? But they never seemed like they fit properly. I'm going to pull the spring off and reseat that seal and hopefully get it up and running again. Not sure if this will help or not but this is a youtuber I watch who does a lot of work with Honda engines and he posted a video dealing with valve seals a few months ago https://www.youtube.com/watch?v=JWBpVJFEaFo
|
|
#
?
Feb 9, 2021 23:59
|
|
|
mewse posted:Not sure if this will help or not but this is a youtuber I watch who does a lot of work with Honda engines and he posted a video dealing with valve seals a few months ago Oh I had already replaced the valve guide seals on this head. The valve guide seals seemed to not seat in the same way other ones I have dealt with. Since I have done this several times on several different motors. The video you linked is just a guy replacing old ones which can be problematic. After I reseated the valve guide seal the motor runs clean again so that is a relief!
|
|
#
?
Feb 10, 2021 03:15
|
|
|
Well I finally ordered the rest of the stainless tubing for my exhaust. I just need to get a set of purge plugs and a different regulator for my argon tank so I can use it to purge. But hopefully I can get started on that this weekend. I also ordered a tubing polisher for my angle grinder so I can better polish the exhaust and also all of the bare metal that is going to get chromed.
|
|
#
?
Feb 23, 2021 15:55
|
|
|
Valt posted:Well I finally ordered the rest of the stainless tubing for my exhaust. I just need to get a set of purge plugs and a different regulator for my argon tank so I can use it to purge. But hopefully I can get started on that this weekend. I also ordered a tubing polisher for my angle grinder so I can better polish the exhaust and also all of the bare metal that is going to get chromed. I spent way too long trying to figure out why you could possibly need an argon tank on your bike. Tell me more about this tubing polisher though. Do you have a link?
|
|
#
?
Feb 23, 2021 17:47
|
|
|
GnarlyCharlie4u posted:I spent way too long trying to figure out why you could possibly need an argon tank on your bike. Yup here it is! Almost all of the ones I have seen just come with them already attached to the angle grinder but this one is supposed to bolt onto a 4" grinder. Apparently this is metric and almost all angle grinders we get are imperial. But I saw lots of people just saying they just drill and tap it for imperial fasteners. https://www.amazon.com/gp/product/B086SZZCBC/ref=ppx_yo_dt_b_asin_title_o00_s00?ie=UTF8&psc=1 Also here is the dual outlet regulator I bought for my Argon tank. This lets me either run two welders off one tank or purge and use the Tig welder with the same tank. Which is super useful for me since my Argon tank is huge and I likely won't have to refill it for a long time. https://www.amazon.com/SPARC-Regulator-0-60CFH-UNF-18RH-WARRANTY/dp/B07112PFVJ Valt fucked around with this message at 19:41 on Feb 23, 2021 |
|
#
?
Feb 23, 2021 18:06
|
|
|
|
| # ? Apr 26, 2024 02:07 |
|
|
Well I finally broke down and ordered the tubing that I need to finish my exhuast. Here is what $200 of stainless tubing looks like! My plan is to have all the tubes kick up at about a 40 degree angle and then give them a slash cut. I used some tig wire to get an approximation of what I am going to do.  I also gave the exhaust a quick polish. Eventually I want to try and blend all the welds and get it to look like one smooth tube. I think I will have to end up adding weld to some areas to accomplish this. But some areas might require some real fiddling shaping.  The exhaust colors up nicely and I think this will look really cool against the black and gold flake paint its eventually going to get. 
|
|
#
?
Mar 1, 2021 20:25
|
|