


|
I've only used the festool track saw but it has a great depth stop so you can do slots and stuff
|
 #
?
Feb 24, 2021 05:08
#
?
Feb 24, 2021 05:08
|
|


|

|
| # ? Apr 28, 2024 22:23 |
|
|
CommonShore posted:Ok table saw opponents: Well as always it depends. I bought a bandsaw with loads of maximum throat and height and a 1.5HP motor because I wanted to be able to resaw logs and wide planks on it. If I hadn't had that requirement, cost would have been a lot lower. Size matters a lot (lol), you can get a small benchtop bandsaw in the $300 range, or a freestanding 14" for under $800? This 10" Rikon seems like a good deal right now: https://www.rockler.com/rikon-10-deluxe-bandsaw-with-fence If a 10" is too small, this 14" looks good: https://www.grizzly.com/products/grizzly-the-classic-14-bandsaw/g0555 and I've heard goons in this thread talk up Grizzly before. e. for the record I do have a table saw, and I use it as often as my bandsaw.
|
|
#
?
Feb 24, 2021 05:13
|
|

|
Hypnolobster posted:I have a 500lb cabinet saw and I have absolutely zero urge to run full sheets of plywood on it. It's dangerous as hell and often inaccurate. Makita track saw and Festool tracks is by far one of the best purchases I've ever made even for me in my primarily-powertool shop. In a primarily-handtool shop (maybe with a bandsaw as the main saw of the shop), it'd be even more worthwhile. Plywood is actually safer than hardwood on a table saw. It won't pinch closed and the size of the sheet keeps it from really kicking back on you, not mention your hands are far away from the blade. I used to run doors through a table saw (putting bevels on the edges) all day long. Sheet of plywood is cake compared to a 4'x12'x1.75" door.
|
|
#
?
Feb 24, 2021 05:41
|
|

|
Sadi posted:First of all I really appreciate all the effort and knowledge. I would like to caveat that this is not my first wood working tool, or project but rather my first look into doing something with a little more precision. I own a circular saw, router, miter saw, chisels and what not. A lot of my draw to table saw may be out of ignorance, form looking up guides like this. Just seems like a good way to get repeatable square/normal cuts. I hadnt considered a band saw for joints, but that does make sense. CommonShore posted:Ok table saw opponents: Smaller benchtop saws have a few problems that makes them less than ideal. Because thye are 'portable' the column is usually aluminum (or plastic, lol) and can't really put enough tension on a wider blade, which severely limits the size blade you can use and how well the blade tracks and runs. Because the wheels are small, blades have to be thinner to make the tight bend around the wheels. This also makes blades break more often.
|
|
#
?
Feb 24, 2021 05:57
|
|


|
To go with the mystery brand No 6 plane I posted about a few weeks ago, I also have this transitional No 135. This time I'm fairly confident that it's a Stanley. It was pretty clearly missing the part that connects the chip breaker to the adjustment lever unfortunately, and I couldn't find one in my searches. So I made one and it works great after some sharpening. edit: additional pictures aren't loading from the awful app for some reason oXDemosthenesXo fucked around with this message at 06:56 on Feb 24, 2021 |
|
#
?
Feb 24, 2021 06:52
|
|

|
CommonShore posted:Ok table saw opponents: Rikon 14" Deluxe Laguna 14-12 Hammer N2-35 Jet 14SFX All around 1000-1200 Cheapest new thing worth your money is probably the Grizzly 14" Deluxe at $695+shipping This is for new of course, for used: 14" Delta/Rockwell 14" Powermatic INCA 710 All around 300-700
|
|
#
?
Feb 24, 2021 07:11
|
|

|
GEMorris posted:Re:track saws. For the use cases I'm seeing tossed around, I present a third contender: panel saw. JSK koubou has a diy video for an even better one, but he has a line on weirdly specific aluminum bits that's hard to replicate. The one I made lives in storage right now, but it was amazing for breaking down plywood sheets. Small footprint, too, since it was mounted to the wall. Suntan Boy fucked around with this message at 17:32 on Feb 24, 2021 |
|
#
?
Feb 24, 2021 16:27
|
|


|
Hi thread it's been ages since I posted anything. I'm looking for some technique advice / feedback. I managed to build this near 8' long beast of a sidebar recently which I am very happy with as it replaces an ugly wire bakers rack in the dining room and is perfectly sized for our kitchen / dining items and allows for 1/2 gallon Ball jar storage below (which I use a lot of for dry goods storage). Fun project, had to build it in 2 separate pieces and finish everything and assemble in place around the center console so I could actually get it all out of the basement and into the dining room!  Ok so this needs a top, about 22-23" wide by 8' long and I am building one with breadboard ends out of soft maple that I used for the case construction in the rest of the piece so the planks themselves are going to be 7' 6" or so. I have several 12-13" wide by ~9' long planks to mill down. I need 2 of these for the top for the sideboard, but since I am going to be doing the same thing for a Trestle table in that same room that I am building next, I'll just go ahead and mill out 3 more planks for that and build both tops right now. The issues are, I have basically only 1 plank that is actually pretty flat, barring a little light cupping its got going on. No big twist to speak of though so I am just knocking down the high spots and sending it through the planer.  The other pieces I have though have some pretty pronounced twist. 2 of them are thick enough and the twist mild enough that I can flatten them as-is. One of them is probably too far gone and I have 3-4 other identical size planks that are also badly twisted. They've been stickered indoors for ~6 months, but the basement has been incredibly dry this winter so I assume that's done it.  I have recently purchased a Delta 6" jointer (37-190) and I have a DeWalt DW735 planer, a table saw and a 14" Delta bandsaw. I am going to handle the one good plank by jointing the top down by hand and planing it then using the jointer to square up the ~1" thick sides, the remaining 4 planks present more difficulty. So I figure my options are to: 1. Use the bandsaw to rip each plank roughly in half which helps a bit with some of the twist and then joint them on the face, plane, then joint the sides and re-glue everything together in 6" strips instead of ~12" ones. 2. Face joint 6" of one side of each plank and use a jointer sled through the planer somehow. I've seen this done by video but I am skeptical that it will work for such long planks as well. Thoughts? 3. Another option I am not considering? If anyone has advice on what is best/ easiest / most likely to work out well I'd love to hear it. It's a lot harder dealing with these big heavy loving boards vs the smaller breadboard tops I've made for end tables and stuff so far. I've not used the bandsaw for large rips like this before and have very little experience with the jointer either so am wondering what people think.
|
|
|
#
?
Feb 24, 2021 17:42
|
|


|
Suntan Boy posted:For the use cases I'm seeing tossed around, I present a third contender: panel saw. JSK koubou has a diy video for an even better one, but he has a line on weirdly specific aluminum bits that's hard to replicate. Something like that would be preferable to a track saw or even an big indeed/outfeed setup on a table saw (imo) assuming that it had the accuracy (which is dependent on your build quality). I like the idea of it occupying little to no floor space the most.
|
|
#
?
Feb 24, 2021 18:03
|
|

|
Blistex posted:Something like that would be preferable to a track saw or even an big indeed/outfeed setup on a table saw (imo) assuming that it had the accuracy (which is dependent on your build quality). I like the idea of it occupying little to no floor space the most. A panel saw will take up drat near a whole wall in garage size shop and you will need the floor space to move a sheet into the machine. The floor space is a lot more than you think and really only viable if you deal with a ton of sheet work or have a large shop. It is a one task machine where other tools can serve multiple purposes.
|
|
#
?
Feb 24, 2021 18:21
|
|
|
That Works posted:Hi thread it's been ages since I posted anything. I'm looking for some technique advice / feedback. Honestly I think by the time you rip/face join/edge join/reglue you could have just face joined them with a hand plane. It looks like you�ve got one and a good bench to use it on. Face jointing and edge joining 8� long stuff on the jointer and getting nice glue joints isn�t exactly a cake walk itself. Making narrow strips definitely will help with twist, but if the board isn�t super well dried, it may all go even crazier when you rip it them in half and now you�ve got to glue two bananas back together. The case will help pull stuff a little bit flat too when you attach the top to it. Given the simple style of the piece and breadboard ends etc. I think the the top is a touch warped it�s not going to look horrible out of place like it might on a slick modern thing. I have never heard of only face joining half a board and then using a sled in the planer and I�m not sure how that would work but I�d love to learn something.
|
|
#
?
Feb 24, 2021 18:40
|
|
|
Yeah, the panel saw is the right way to go if you work primarily-to-exclusively with sheet goods. As mentioned, wall space is valuable (for me its lumber storage and cabinet storage) and access is larger than you'd think unless you are talking about a 2-axis slider from a production shop. But yeah, if sheet goods are your whole game, definitely consider.
|
|
#
?
Feb 24, 2021 18:45
|
|
|
JEEVES420 posted:A panel saw will take up drat near a whole wall in garage size shop and you will need the floor space to move a sheet into the machine. The floor space is a lot more than you think and really only viable if you deal with a ton of sheet work or have a large shop. It is a one task machine where other tools can serve multiple purposes. I'm planning on building a large workshop/garage, so giving up 10' of a wall is no biggie.
|
|
#
?
Feb 24, 2021 19:08
|
|
|
Blistex posted:I'm planning on building a large workshop/garage, so giving up 10' of a wall is no biggie. You say that now. I built a 16x24' workshop and, between windows, lumber storage, and cabinets, every single wall is spoken for and I'd love to have more. Then again, maybe your definition of "large" is bigger. 
|
|
#
?
Feb 24, 2021 19:54
|
|

|
Goddamn 16'x24' is monstrous to me. But yeah, even with that size I'd have trouble dedicating 12' of wall space to a panel saw, personally.
|
|
#
?
Feb 24, 2021 20:14
|
|
|
TooMuchAbstraction posted:You say that now. I built a 16x24' workshop and, between windows, lumber storage, and cabinets, every single wall is spoken for and I'd love to have more. Was thinking somewhere around 24x35-40' (hybrid workshop/carhold). It's probably 2 years off because I have to build my house first this spring/summer, then save up enough cash for materials to build the garage next summer. I'm currently transferring my house blueprints to sketch up, so I haven't had time to work on a detailed design for the garage, but I keep wanting to put the cart before the horse.
|
|
#
?
Feb 24, 2021 20:52
|
|
Kaiser Schnitzel posted:The sideboard looks really neat. Soft maple can get so many colors in it-sometimes it looks like cherry, sometimes it looks grey. For the face jointing half thing I just saw this vid, I've seen someone else do a vid/ jig like this one but can't recall who else had it, same way as here though. Neat trick I guess and he's using big boards like mine and all but I was hoping to see if anyone else had tried this trick before attempting it and potentially loving up a big piece of lumber. https://www.youtube.com/watch?v=OyVrabLVuBc For one thing at least this wood is dried as well as its going to get, it sat outside at the yard for 1.5 yrs, in my garage out of any moisture for 1.5 yrs and in my basement for 6-8 months after that. I'm having a hard time visualizing how to edge join two boards together that might still be a bit warped and not match up perfectly across the entire edge? Or, am I misunderstanding you.
|
|
|
#
?
Feb 24, 2021 21:03
|
|
|
Jhet posted:It�s a feature, not a bug. Cutting things straight is difficult. Thanks, finished the main "engineering".   I made it out of aspen because it was the cheapest, but it feels super light, almost like balsa. I messed up the rabbets (should have been on the outside of the lower piece and the inside of the lid) and my tolerances are a bit loose. Chiseling the inside corners after the rabbet was new to me and came out kinda decent. I need to sand and finish it. Can I assume water based Polycrylic is going to be safe? It's holding tea, and despite them being individually wrapped, I don't want something toxic. I feel like it'd be okay and I already have some, but I guess I can get some shellac or something. I also kind of want to engrave the word "TEA" in the lid and then maybe paint the letters or something? Under the clear coat? I'm not really certain what to do here and am hoping for some direction. I was going to make a second one and recently saw a video where the guy split the box using a router table (after putting grooves on the inside), which looks like it would give me a cleaner finish, so I'm trying to think of how to do this using a handheld router. https://www.youtube.com/watch?v=IMjs7FgxkuI
|
|
#
?
Feb 24, 2021 21:22
|
|

|
GEMorris posted:Yeah, the panel saw is the right way to go if you work primarily-to-exclusively with sheet goods. As mentioned, wall space is valuable (for me its lumber storage and cabinet storage) and access is larger than you'd think unless you are talking about a 2-axis slider from a production shop. Those are fair points. My biggest shop space ever was a windowless single car garage, so modularity has been the name of the game for me. If it doesn't fold up, it's got wheels; even the panel saw frame was on sliding rails. Being able to easily shuffle everything around has been key to what success I've had so far. In addition to sliding back and forth, I set up the panel saw carriage rails to be able to extend along the z-axis, to where it could handle up to 8/4 boards. With a couple of the more squat rolling cabinets flanking it as supports where necessary, it did most of the things I wanted a table saw to do. Long-rear end rip cuts were still a straightedge and circular saw job, though. I forgot where I was going with this, but food for thought, I guess.
|
|
#
?
Feb 24, 2021 21:57
|
|
|
Drawer update: I bought a little block plane, sand paper and some MDF and now my drawers have fronts 
|
|
#
?
Feb 25, 2021 00:35
|
|

|
let's see them
|
|
#
?
Feb 25, 2021 00:55
|
|


|
That Works posted:For the face jointing half thing I just saw this vid, I've seen someone else do a vid/ jig like this one but can't recall who else had it, same way as here though. Neat trick I guess and he's using big boards like mine and all but I was hoping to see if anyone else had tried this trick before attempting it and potentially loving up a big piece of lumber.  It really depends how warped the boards are, and that's really hard to tell, even in person. I spend lots of time staring at boards going 'hmmm is this too warped or not'. If they're twisted by 3/4" on a 1" board, ripping and regluing is may be your best/only option. Sometimes you can split the difference and find a 'flat enough to ride against the fence okay,' but manhandling 5/4 x 8' boards a foot wide over the jointer is hard enough without having to hold them just so. Dowels/biscuits/splines really help keep one face aligned if things aren't exactly straight. I'm hesitant about ripping and regluing very warped wood. Usually if a board is really twisted it's because there is some funky grain or it didn't dry evenly that created lots of tension in the wood that is going to manifest itself when you rip it in half. The face join half and planer trick is intriguing and I think worth trying? As long as there isn't catastrophic failure in the planer step, it doesn't seem like it would do any harm. It's really a great idea-even skipping the planer step and just having that 6" face joined would save you a bunch of time and give you a nice reference surface if you decide to flatten it by hand. How much thickness do you have to play with?
|
|
#
?
Feb 25, 2021 03:09
|
|
|
Hypnolobster posted:I have a 500lb cabinet saw and I have absolutely zero urge to run full sheets of plywood on it. It's dangerous as hell and often inaccurate. Makita track saw and Festool tracks is by far one of the best purchases I've ever made even for me in my primarily-powertool shop. In a primarily-handtool shop (maybe with a bandsaw as the main saw of the shop), it'd be even more worthwhile. That's all on you. drat near every stationary shop tool needs a setup. I have an ancient 60's Boyce-Crane with a prototype Biesmeyer fence and it cuts within a RCH tolerance. I had to figure where to set it for ripping sheet goods long ago. A typical 1 car garage bay is totally sufficient, and you can place other tools, lumber racks around it at your convenience. Toebone posted:Drawer update: I bought a little block plane, sand paper and some MDF and now my drawers have fronts Mdf is a bad choice for anything drawer related, but especially if it's near water.
|
|
#
?
Feb 25, 2021 05:32
|
|


|
So I have zero idea how interested people in this channel might be in carving, but I am currently having a set of carving chisels/tools hand made by a guy in Russia. Pretty excited to get them. This guy apparently is normally backed up 6 months to a year on orders, but is currently starting them within a week or two of ordering. He started working on mine yesterday. His tools are very well known in the model ship building world and are apparently used by most of the ridiculously good ship carving guys in Russia (they are renowned for the carving work on their ship models over there). Quality is supposed to be as good as the best Swiss made tools, and the price, while certainly not cheap, is crazy low for what you get, with cost running from $330 up to $640 for the fancy ones, including the box and shipping from Russia. Included in the set: flat direct :- 0,7. 1.0. 1,5. 2.0. 2,5. 3.0. 3,5. мм. oblique flat :- 2,0. 3.0. мм the left and right sharpening (other sizes from 0.5 to 3.0 mm are possible) semicircular :- 0,5. 0,6. 0,7. 0,8. 0,9. 1. 1,5. 2. 2,5. 3 мм. mini knife corner "V" If anyone is interested in ordering one of these (he gets paid via PayPal, but only when he is ready to start working on your specific set of tools), send me a PM and I'll give you his email. He only speaks Russian but working via Google translate with him is painless and he responds quickly. 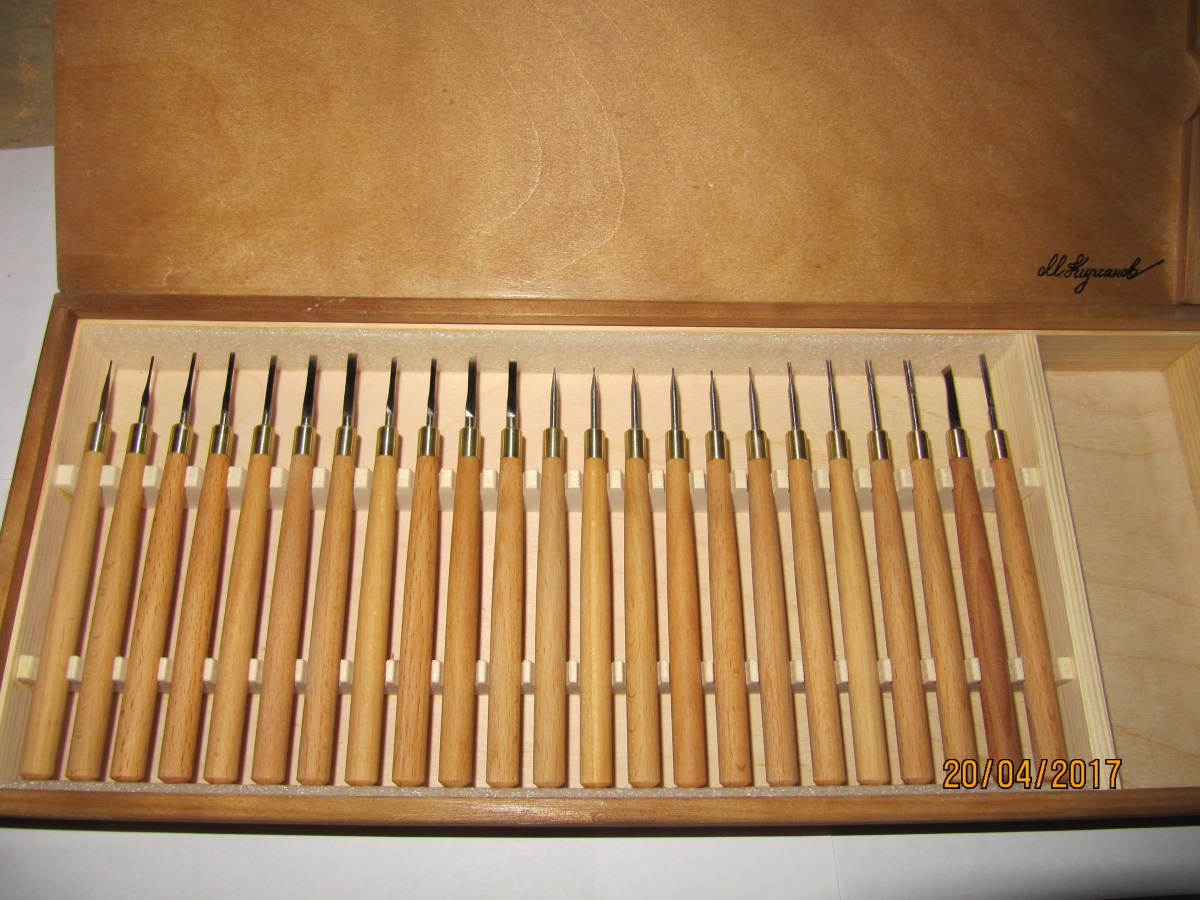  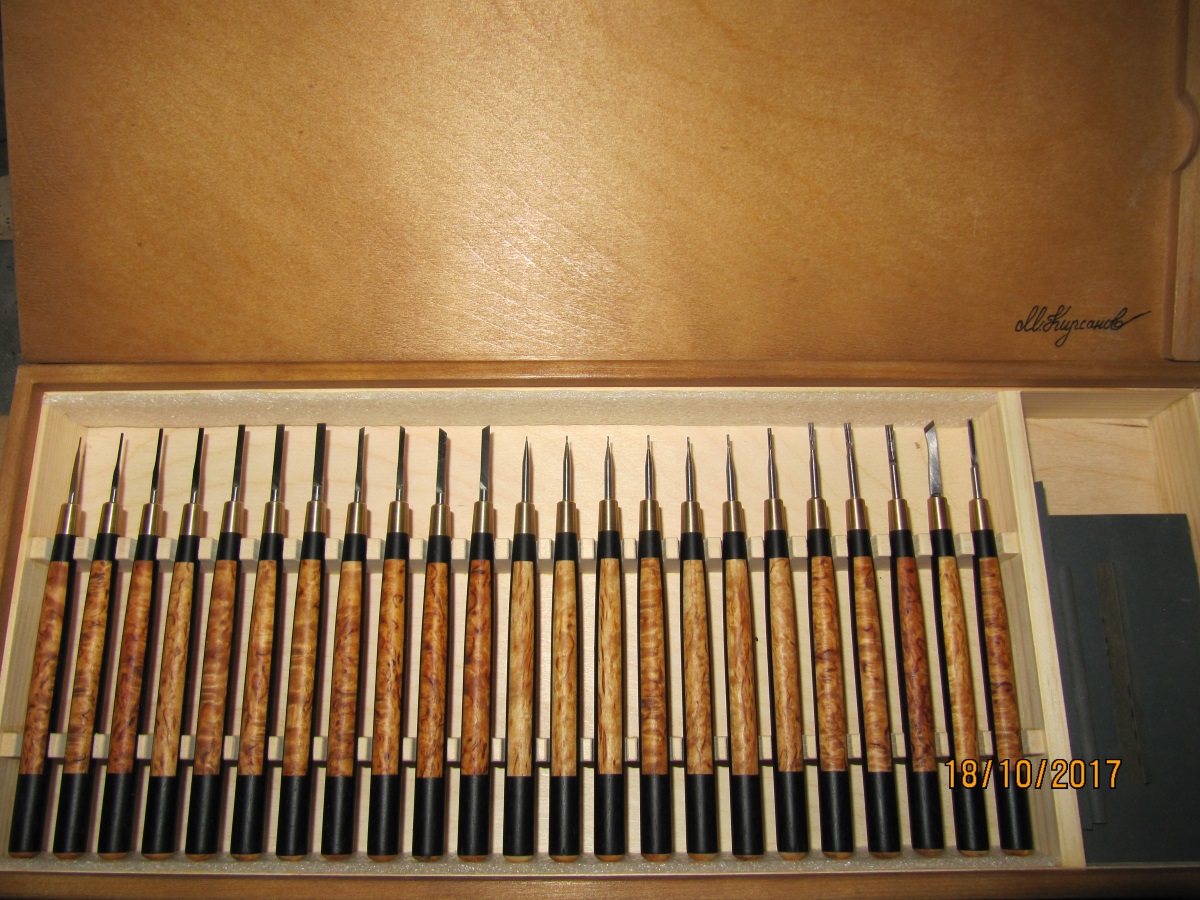 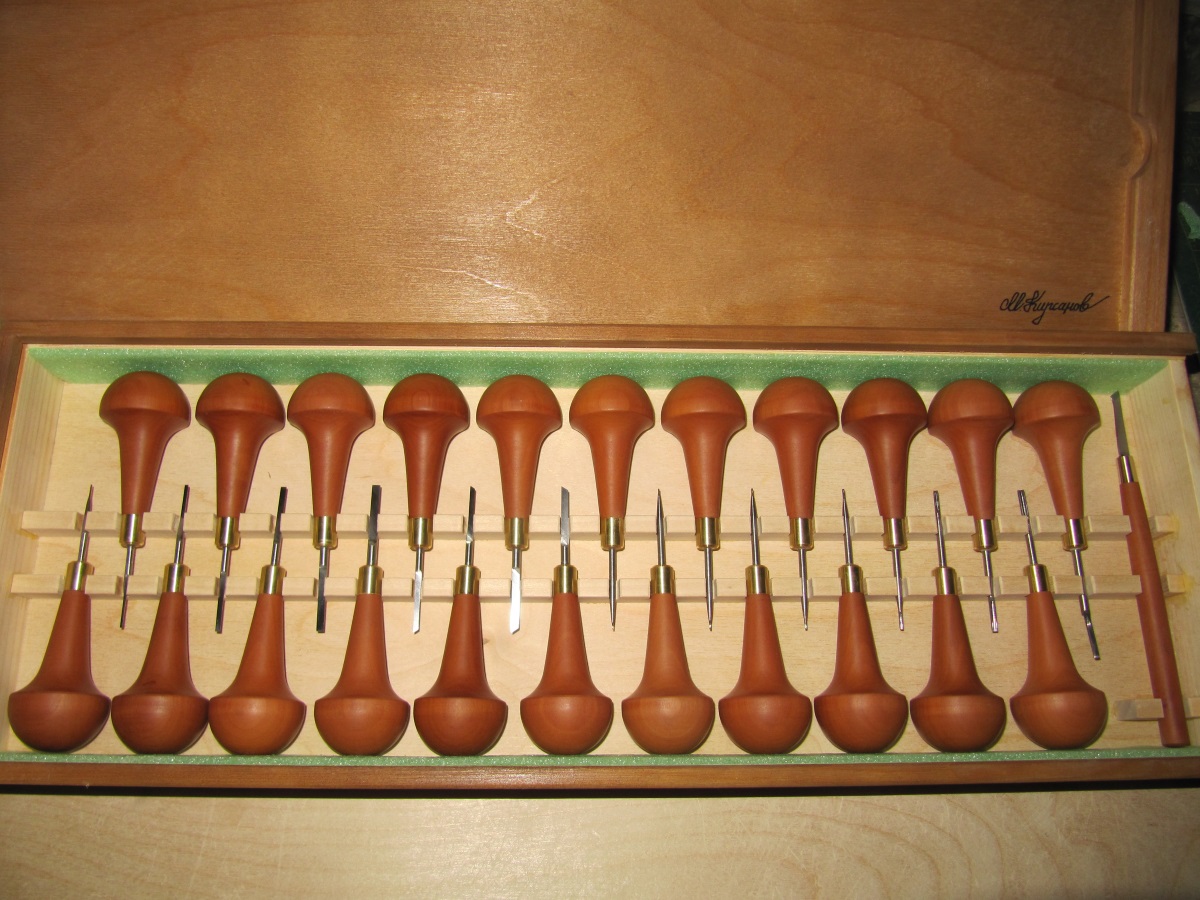 If anyone is interested I'll post pictures of my set when they arrive and my impressions, although I have only a few really good Swiss chisels to compare them to.
|
|
#
?
Feb 25, 2021 05:57
|
|


|
Those are neat carving tools, I've only recently taken the plunge into carving, but via greenwood, so its all big bent gouges for bowls and spoons. Interested to see how you like them when you get your set.
|
|
#
?
Feb 25, 2021 07:02
|
|
|
The knives on my DW735 finally got trashed beyond the point of being fixable with a light sharpening, so I pulled the trigger on a shelix upgrade, and holy poo poo. Kind of a pain in the rear end having to pull the entire thing apart to swap spindles, but the difference in cut quality and overall performance is definitely noticeable. Easily handled the curly maple scraps I had sitting around that I ran through it as a test, and runs noticeably quieter, too (still loud as poo poo because of the blower, but a few decibels matters when you're starting in the 90s). Not having to resharpen a whole knife every time something gets a nick in it is going to be really nice. Would definitely recommend if you've lived with the planer long enough to know if it suits your size needs.
|
|
#
?
Feb 25, 2021 09:27
|
|

|
Mr. Mambold posted:That's all on you. drat near every stationary shop tool needs a setup. I have an ancient 60's Boyce-Crane with a prototype Biesmeyer fence and it cuts within a RCH tolerance. I had to figure where to set it for ripping sheet goods long ago. A typical 1 car garage bay is totally sufficient, and you can place other tools, lumber racks around it at your convenience. What�s up, old-rear end saw buddy? 1951 Unisaw (3rd owner) with 50� capacity Unifence. Dialed in and with a fresh arbor washer I was at .003-4� runout and the fence is a dream in terms of adjustment and repeatability. Bullet-style motor was rebuilt by a Baltimore machine shop a couple years back and it�s satisfying as hell to turn on. �Was,� because I currently have it the saw opened up and on its side so as to properly tackle dust collection (finally,) as these early ones simply have a (very pretty) vented door for after-the-fact vacuuming that does nothing for your lungs. I�ll try to grab some photos of the 2-piece funnel I made from 26ga steel that is hooked straight into 4� plumbing. Having to adjust the length and dressing of the electrical inside the cabinet so the funnel doesn�t interfere with it and push it into the motor pulleys/belts. Re: Table saw safety chat. Though I�m always obsessive about planning/executing rips safely, I�m can say this discussion has convinced me to upgrade from my existing MJ Splitter to a concealable riving knife (a vintage Delta) that can be hidden below the throat plate for non-thru-cuts. No exaggeration: thanks, guys. This is my favorite thread on SA and there�s something deeply satisfying about so many highly skilled people (NOT counting myself among them) with very strongly held opinions about best practices being able to keep things so damned civil and constructive. That complete complete newbies can regularly roll in here with all manner of questions and always receive honest, constructive advice tailored to their situation is loving amazing. Some of you guys really blow me away with your depth of knowledge and experience and sharing it so eagerly makes me feel great. Thanks, all. Love what you�ve done with the place, Kaiser.
|
|
#
?
Feb 25, 2021 13:39
|
|

Kaiser Schnitzel posted:I get so jealous of people with pristine, clean, well lit shops. That's an interesting idea. I guess as long as the planer sled is at least more than half the width of the board you are planing it supports it fine? It's putting alot of faith in the feed rollers-I'm not sure how I'd feel doing it with a lunchbox planer but it's probably fine? Maybe I didn't need this giant stupid 20" jointer after all I definitely have some boards (not in these 5) that are so badly twisted that ripping would be the only option as they have like 2-3" of twist across 8' for a 1" thick board. That's if I wanted to use them at full length of course. For the worst of the "flattest" boards I showed above the twist is about 1/2" on each corner for a 1" thick piece and I'd like the final thickness to be closer to 3/4" so it's not going to be possible to have it completely dead flat but thats enough twist to accommodate across the entire length without much notice and as you said I can just use the case to pull it flat to some extent. I do have a biscuit joiner also and have used that to help lock down edge joints on smaller tops I've built. Thanks for the discussion, just having someone with some experience weigh in on it makes me feel a bit better about deciding what to try. I especially like your suggestion to just joint 6" off one side of the board to use that as a reference to finish by hand for the other side. I hadn't thought of that and even that much would be a huge help as these tops are longer than both my assembly table and my workbench. Establishing a reference that way might simplify things.
|
|
|
#
?
Feb 25, 2021 13:47
|
|
|
Mr. Mambold posted:Mdf is a bad choice for anything drawer related, but especially if it's near water. They're going into a built-in cabinet in the dining room; nowhere near water and not expected to get much use. Mostly wanted them to cover up the big drawer-shaped holes in the wall. I'll post pictures once everything is done. It's an amateur job, but it's my amateur job ")
|
|
#
?
Feb 25, 2021 14:08
|
|
|
Uthor posted:Thanks, finished the main "engineering". I don't think you have to worry too much about the finish you use. Anything that's toxic will boil off as it dries, whatever's left (plastic, shellac) will be inert. Especially since it won't be seeing much abuse so you don't even have to worry about it flaking off into food, etc. FWIW I think painted pieces are underrated. Plain wood goes with everything, so it's great for big furniture pieces, or long-term pieces that may see different environments over their lifetime. But for something personal like a little teabox, I think a paint job would be great. Something understated, or bright and colorful, depending on the personality of whoever will use it.
|
|
#
?
Feb 25, 2021 14:24
|
|

|
Discernibly Turgid posted:What�s up, old-rear end saw buddy? The Locator posted:So I have zero idea how interested people in this channel might be in carving, but I am currently having a set of carving chisels/tools hand made by a guy in Russia. Pretty excited to get them. That Works posted:Thanks for the discussion, just having someone with some experience weigh in on it makes me feel a bit better about deciding what to try. I especially like your suggestion to just joint 6" off one side of the board to use that as a reference to finish by hand for the other side. I hadn't thought of that and even that much would be a huge help as these tops are longer than both my assembly table and my workbench. Establishing a reference that way might simplify things.
|
|
#
?
Feb 25, 2021 14:55
|
|
|
Kaiser Schnitzel posted:
|
|
#
?
Feb 25, 2021 16:10
|
|

|
Once I finish fitting the dust collection I�ll get some pictures up. I don�t really feel like cutting the cabinet, so I�ll be using a regular ol� Woodcraft 4� plate (12x12) over the original dust opening. I love the look of the old dust door and the delta logo and knob on it, but this is, ultimately, a machine with a job and it�s more work to do it the other way without and increase in effectiveness.
|
|
#
?
Feb 25, 2021 16:12
|
|
|
ColdPie posted:FWIW I think painted pieces are underrated. Plain wood goes with everything, so it's great for big furniture pieces, or long-term pieces that may see different environments over their lifetime. But for something personal like a little teabox, I think a paint job would be great. Something understated, or bright and colorful, depending on the personality of whoever will use it. I don't think I want to paint the whole thing, partially that's not "me" and partially because I want to use what I have in house. I have these craft paint pens that I've used on glass, so should be good enough for wood.  I'm worried about smearing under polycrylic. I guess marking over the top would be okay? Someone here mentioned using stencils and a Dremel to engrave, so I was going to do that, first. Thanks for the reply...
|
|
#
?
Feb 25, 2021 16:25
|
|
Discomancer posted:I have a 6" jointer and a DW735 and do this on drat near everything, it works great. The limiting factor is how deep a cut you can take at the jointer, since you need to do that part in one pass. I use a piece of 1/4" MDF with a stop block screwed to the bottom/back (to avoid the platen getting pulled through the whole planer), and put some paste wax on the top of the mdf to help it feed through the planer. I tried using a long 1/4" board and double stick tape to keep it on the sled, but it's expensive and a little annoying and you have to keep a really long piece of mdf around (it needs to be as long as the board using that method) and I don't have space for that. Light passes helps, and I usually eyeball it going into the planer to make sure the board hasn't shifted and the rabbet that the jointer makes isn't riding on top of the MDF. (The board can sometimes rotate a bit when it hits the rollers and get kicked out of position). On bigger boards that are 9+ inches, I'll use the rabbet and handplane that off until it's able to get run through the planer. My handplane skills make that less successful than using the planer platen. It's awkward the first few times, but is now just a short part of the milling process. I'd rather have an 8" jointer, but this gets the job done, is pretty safe and a reliable method. Oh awesome I am glad that someone is doing this with a setup similar to my own. Can you clarify on the depth of cut bit on the joiner and needing to take one pass? Couldn't I just take a few successive very low depth passes? Why would I not do so? I just don't have my head around that part, sorry.
|
|
|
#
?
Feb 25, 2021 16:36
|
|
|
More stupid newbie questions. My printed router guide will have to be used on both sides of the raw birch table top that I am trimming the edges of. My printer isnt large enough to give me room to clamp it to the board. Can I use hot glue or an other adheasive to temporarily fix it to the surface with out hurting the finish that I will be applying? (General Finishes High Performance poly)
|
|
#
?
Feb 25, 2021 17:27
|
|
|
Uthor posted:I don't think I want to paint the whole thing, partially that's not "me" and partially because I want to use what I have in house. I would personally want the marker under at least some layers of poly to keep it from getting rubbed off, but you should definitely test that on some scrap first. You may also want to put on a layer or two of poly before you apply the marker because the oil based paint markers I have used on wood have a tendency to bleed if you haven't sealed the wood first.
|
|
#
?
Feb 25, 2021 17:32
|
|

|
That Works posted:Oh awesome I am glad that someone is doing this with a setup similar to my own. A second pass on the jointer will hit the front of the rabbeting ledge - this video explains the process a bit better and shows what happens, it sounds counterintuitive but makes sense when you see it. I guess some jointers you can just remove the rabbeting ledge so it's a non issue? I have a Jet and the ledge is fixed to the infeed https://www.youtube.com/watch?v=vzmSjlXJ2fg
|
|
#
?
Feb 25, 2021 17:49
|
|
|
GEMorris posted:Those are neat carving tools, I've only recently taken the plunge into carving, but via greenwood, so its all big bent gouges for bowls and spoons. Dude is really good with communicating. Today he sent me a picture of my handles which he has already mostly finished on the first day. Wood is pear, 2 coats of oil. 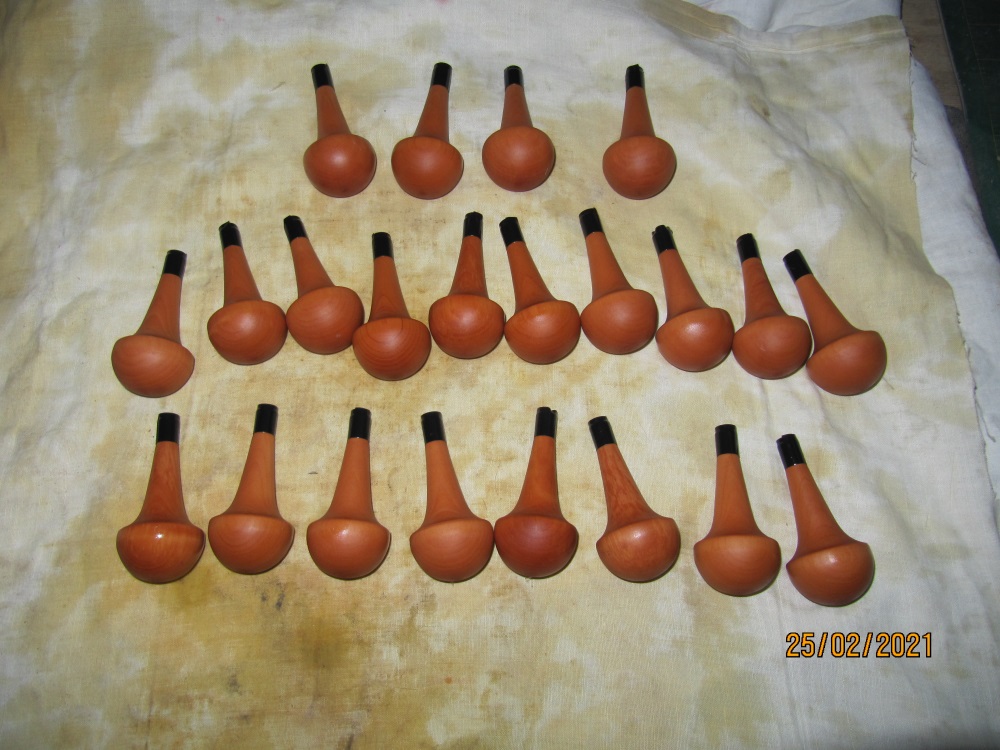
|
|
#
?
Feb 25, 2021 18:02
|
|
|

|
| # ? Apr 28, 2024 22:23 |
|
Discomancer posted:A second pass on the jointer will hit the front of the rabbeting ledge - this video explains the process a bit better and shows what happens, it sounds counterintuitive but makes sense when you see it. I guess some jointers you can just remove the rabbeting ledge so it's a non issue? I have a Jet and the ledge is fixed to the infeed Ahh ok yeah when he explained how it would collide with the rabbeting ledge it clicked. I need to see if mine is removable or not! Thanks a bunch! That Works fucked around with this message at 18:33 on Feb 25, 2021 |
|
|
#
?
Feb 25, 2021 18:28
|
|